
Enabling Archiver Snapshots for ES Clients
Enabling Archiver Snapshots for ES Clients
There are features and functions used in UNUM Manager and UNUM Analytics that are common throughout the user interface (UI). Please refer to the Common Functions section for more information on the use of these functions and features.
Caution: UNUM Archive data is only compatible with Elasticsearch 5.4.1. The instructions detailed below were tested on Elasticsearch versions 5.4.1, 6.8.9 and re-indexed into version 7.8.0.
If there is a need to import UNUM Archiver data into third-party ES tools, there are 1 or 2 steps required.
If your third-party tool runs ES 5.x or 6.x, you can directly restore the UNUM Archiver Data into your third-party ES tool. Please follow Part One below.
If your third-party tool runs ES 7.x, it will require steps 1 and 2; please follow Part One and Part Two below.
The below examples explain how to set up standalone containers running ES 5.x and ES 7.x. To get the data into your Third Party ES tool, replacing the Container with your applicable tool.
General Workflow
1.Run an ES5 instance.
2.Restore the UNUM Archive into the ES5 instance.
3.Run an ES7 instance.
4.Re-index ES5 data into ES7
5.Repeat for all indices on each applicable ES5 instance.
Part One - Create ES 5.4.1 container to restore snapshot from files.
From an Ubuntu VM or server instance run the following commands:
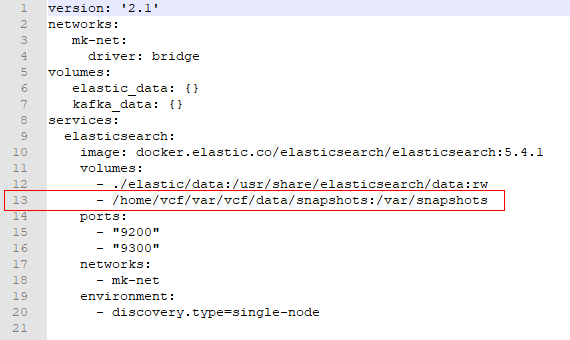
1.Copy the requisite UNUM archive file into the VM / Server as mentioned above. Snapshot files are stored on an NFS mounted in: /home/vcf/var/vcf/data/snapshots/
2.Copy the file docker-compose.yml into a new working directory. Note: Change /home/vcf/var/vcf/data/snapshots/ on line 13 to the location where the snapshots are located.
3.Run the command docker-compose up, this command should fail with permission errors.
4.Change the permissions of the directory docker just created: sudo chmod -R 777 elastic
5.Start the container: docker-compose start
6.Add a line to the config to allow snapshots. Replace es5_elasticsearch_1 with the name of the newly created container:
docker exec -it es5_elasticsearch_1 bash -c "echo 'path.repo: /var/snapshots/' >> config/elasticsearch.yml"
7.Restart container to reload configs: docker-compose restart
8.Get the port of the docker container and set a variable. Replace es5_elasticsearch_1 with the name of the newly created container:
$ docker port es5_elasticsearch_1 9200
0.0.0.0:32934
$ PORT=32934
9.Run the following command:
curl -X PUT -u elastic:changeme localhost:$PORT/_snapshot/snap1 -d '{"type": "fs", "settings": {"location": "/var/snapshots/{snapshot_dir}/", "compress": true, "readonly": true }}'
10.List available snapshots, the first column is the snapshot name:
curl -X GET -u elastic:changeme "localhost:$PORT/_cat/snapshots/snap1?v&s=id&h=snapshot,status,indices&pretty"
11.Restore a snapshot. Change {snapshot_name} with one found with the previous command:
curl -X POST -u elastic:changeme "localhost:$PORT/_snapshot/snap1/{snapshot_name}/_restore?wait_for_completion=true&pretty"
12.Verify the indices have been restored.
curl -X GET -u elastic:changeme "localhost:$PORT/_cat/indices?pretty&v"
Part Two - Re-indexing ES5 data to ES7
1.Install docker-compose, if you have not already. If you already have one skip to step 6.
sudo curl -L https://github.com/docker/compose/releases/download/1.18.0/docker-compose-`uname -s`-`uname -m` -o /usr/local/bin/docker-compose
sudo chmod +x /usr/local/bin/docker-compose
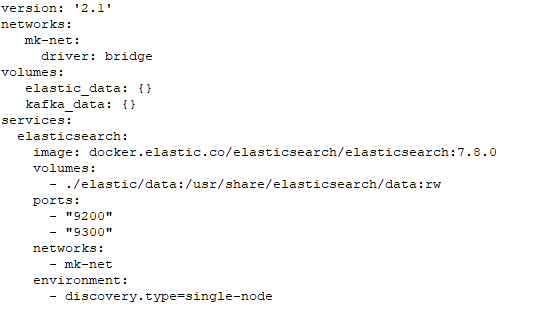
2.Copy the file docker-compose.yml to a new working directory:
3.Run the command docker-compose up, this command should fail with permission errors.
4.Change the permissions of the directory docker just created: sudo chmod -R 777 elastic
5.Start the container: docker-compose start
6.Add line to config to allow remote re-indexing. Replace es7_elasticsearch_1 with your container's name, OLD_HOST and OLD_PORT will be the IP and port of your ES5 instance:
docker ps --filter expose=9200 --format "table {{.Image}}\t{{.Ports}}"

OLD_HOST=10.110.0.68
OLD_PORT=32934
docker exec -it es7_elasticsearch_1 bash -c "echo 'reindex.remote.whitelist: $OLD_HOST:$OLD_PORT' >> config/elasticsearch.yml"
7.Restart container to reload configs: docker-compose restart
8.Get the port of the docker container and set a variable. Replace es7_elasticsearch_1 with the name of the newly created ES7 container:
$ docker port es7_elasticsearch_1 9200
0.0.0.0:32934
$ PORT=32934
9.Get the list of indices from the old host.
curl -X GET -u elastic:changeme "$OLD_HOST:$OLD_PORT/_cat/indices?v&h=index"
10.Choose an index and reindex it. Replace {OLD_HOST}, {OLD_PORT}, {OLD_INDEX}, {NEW_INDEX}.
curl -X POST localhost:$PORT/_reindex?pretty -H 'Content-Type: application/json' -d '
{
"source": {
"remote": {
"host": "http://{OLD_HOST}:{OLD_PORT}",
"username": "elastic",
"password": "changeme"
},
"index": "{OLD_INDEX}"
},
"dest": {
"index": "{NEW_INDEX}"
}
}'
11.Verify the indices have been restored.
curl -X GET -u elastic:changeme "localhost:$PORT/_cat/indices?pretty&v"
12.Repeat Step 10 for every applicable index listed in Step 9.