Configuring Topologies and Topology Links
The VirtualWire fabric enables you to segment the same fabric into multiple independent and isolated topologies. The same switch can be part of multiple topologies, with different ports configured for different topologies.
Note: A single port can be part of only one topology at any point in time.
After creating a topology, you must add the physical links of the VirtualWire fabric. You need to configure the topology links only once.
The topology-* and topology-link* commands sets up a fabric-wide XML file with all details about the network topology, which you, as a network administrator can use for path computation. The port-association-* command enables the path computation of two VirtualWire switches in the topology (see Configuring Fabric-wide Port Associations section later). When a path is found in the topology during port association, VirtualWire reserves the identified path and local port associations are created along the path for traffic redirection. Henceforth, those reserved topology links are not considered for further path calculations.
The Figure 6-4 shows three different topologies (1,2, and 3 - color coded to differentiate) configured within the same fabric and Figure 6-5 displays the topology links between two topologies in the VirtualWire fabric.
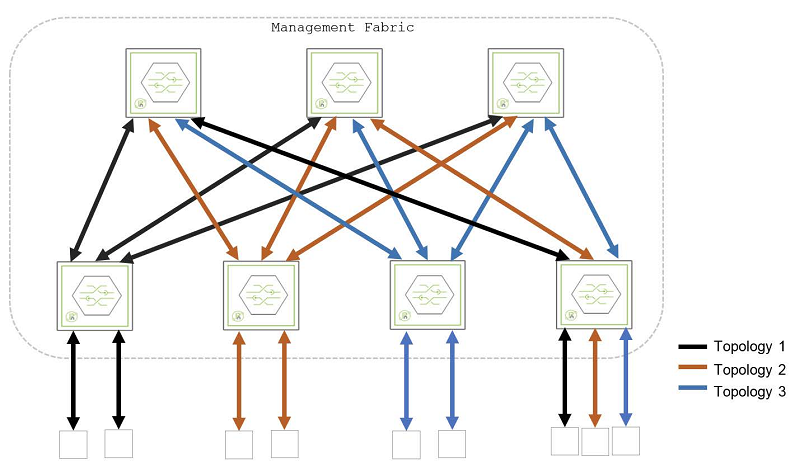
Figure 1-4: VirtualWire Fabric with Multiple Topologies for Automatic Path Creation
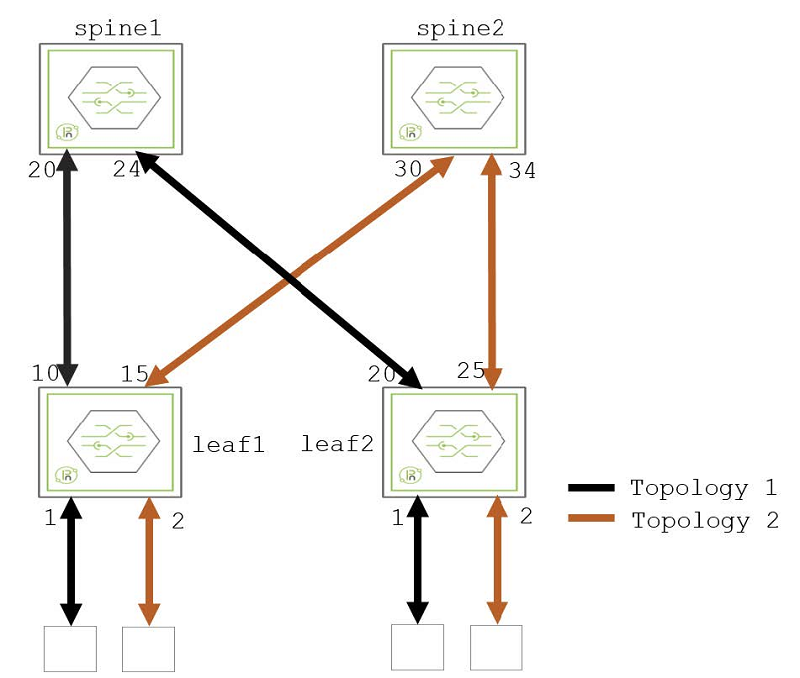
Figure 1-5: VirtualWire Fabric Linking Two Topologies
Use the commands to configure topology and topology links in VirtualWire fabric:
To create a network topology, use the command:
CLI (network-admin@netvisor) > topology-create name name-string
topology-create |
Use this command to create a network topology. |
name name-string |
Specify the name for the fabric topology. |
To view the existing network topologies, use the command:
CLI (network-admin@netvisor) > topology-show name name-string
To delete an existing network topology, use the command:
CLI (network-admin@netvisor) > topology-delete name name-string
To configure a link between two topologies in the VirtualWire fabric, use the command:
CLI (network-admin@netvisor) > topology-link-add name name-string node1 fabric-node name node1-port node1-port-number node2 fabric-node name node2-port node2-port-number enable|disable
name name-string |
Specify the name for the fabric topology. |
Specify the following link arguments: |
|
node1 fabric-node name |
Specify the name for link node 1 |
node1-port node1-port-number |
Specify the port on node 1 |
node2 fabric-node name |
Specify the name for link node 2 |
node2-port node2-port-number |
Specify the port on node 2 |
enable|disable |
Specify the topology link state for path calculation |
To modify the link to the network topology, use the command:
CLI (network-admin@netvisor) > topology-link-modify name name-string node1 fabric-node name node1-port node1-port-number node2 fabric-node name node2-port node2-port-number enable|disable
To remove the link to the network topology, use the command:
CLI (network-admin@netvisor) > topology-link-remove name name-string node1 fabric-node name node1-port node1-port-number node2 fabric-node name node2-port node2-port-number
To view the link details to the network topology, use the command:
CLI (network-admin@netvisor) > topology-link-show name name-string
The following details are displayed:
node1 fabric-node name |
Displays the name for link node 1 |
node1-port node1-port-number |
Displays the port on node 1 |
node2 fabric-node name |
Displays the name for link node 2 |
node2-port node2-port-number |
Displays the port on node 2 |
in-use yes|no |
Displays whether the topology link is in use or not |
in-path in-path-string |
Displays the topology link used by this path |
enable|disable |
Displays the topology link state for path calculation |
id id-number |
Displays the Link identifier |