
Configuring Packet Relay for DHCP Servers
In general, routers do not forward broadcast packets from one subnet to another. However, there are cases in which the broadcast packets need to be passed onto other subnets. One typical example is DHCP (Dynamic Host Configuration Protocol) in which a new computer needs to acquire an available IP address by broadcasting the requests to DHCP server. DHCP protocols work seamlessly if both DHCP client and DHCP server are located in the same broadcast domain. However, that does not work across broadcast domains without supporting features such as DHCP relay. That is, when the DHCP server is not in the same subnet as the clients, use DHCP relay for broadcasting traffic.
Packet Relay is the router functionality that helps forward broadcast packets between broadcast domains. In Netvisor ONE architect, the packet relay functionality is implemented as a service running within a particular vRouter.
You can configure a vRouter to relay DHCP requests from local clients to a centralized DHCP server. Since the initial DHCP request arrives from a client that typically does not have an IP address, the client must find the DHCP server using a Layer 2 broadcast.
The DHCP server needs information before the server can allocate an IP address to the client. It must know the subnet and the MAC address of the client. The DHCP server needs the subnet information to ensure that the IP address that the client receives can work on the client’s subnet. The MAC address is necessary so that the DHCP server can find any information that is unique to the client.
When you configure DHCP relay on a vRouter, the vRouter converts the local broadcast packet from the client to a unicast packet and forwards it to the server.
Since the DHCP client does not have an IP address when it sends the DHCP request packet, the client uses the IP address, 0.0.0.0, as the source IP address and the general broadcast address 255.255.255.255 for the destination.
The vRouter replaces the source address with the IP address assigned to the interface where the request is received, and replaces the destination IP address with the address you specify in the vRouter packet-relay command.
To configure packet-relay for a DHCP server with the IP address 172.16.21.34 and vRouter interface (on the network where the client is connected to) - eth11.100, use the following syntax:
CLI (network-admin@switch) > vrouter-packet-relay add vrouter-name vrouter-dhcp forward-proto dhcp forward-ip 172.16.21.34 nic eth11.100
Once you add the configuration, you cannot modify it. If you make a mistake or want to add a new configuration, you must use the vrouter-packet-relay-remove command.
Configuring DHCP Packet Relay over VXLAN
Netvisor ONE version 6.1.0 supports DHCP packet relay configuration over VXLAN. To demonstrate this functionality, consider the topology below:
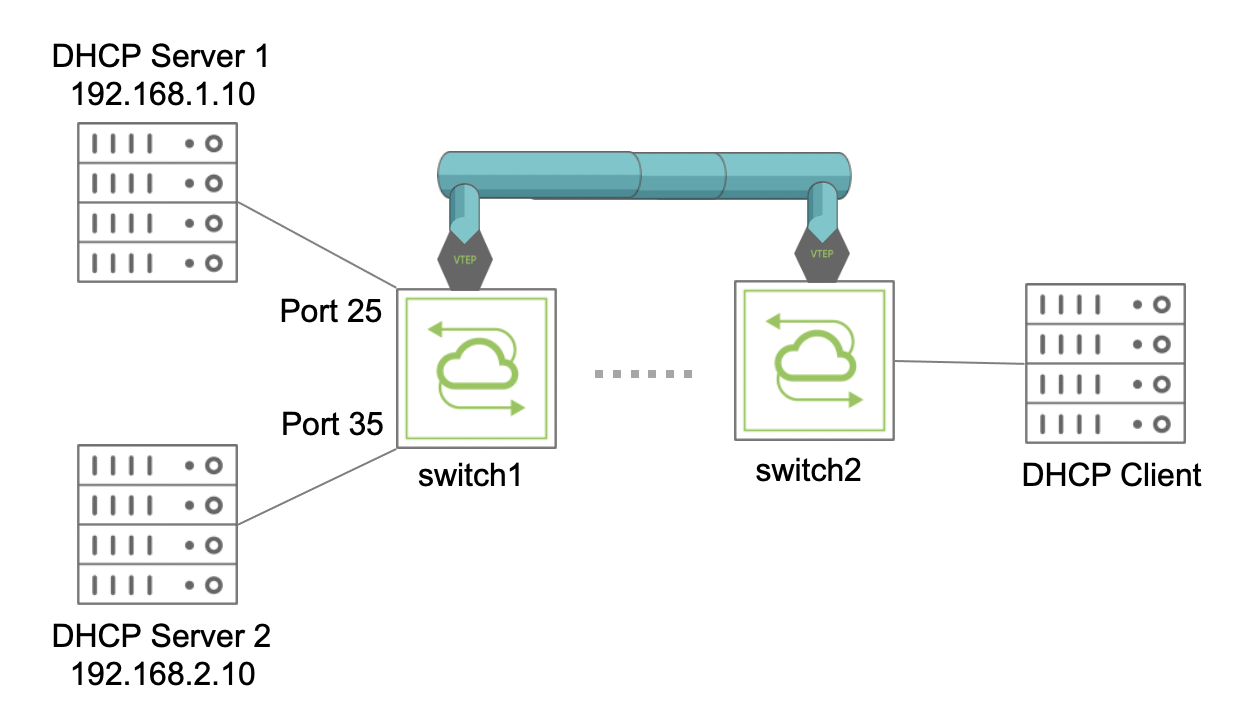
Figure 5-1 - DHCP Relay Configuration over VXLAN
The nodes switch1 and switch2 belong to two separate subnets and have VXLAN connectivity between them. For more information, see the Configuring VXLAN chapter. The DHCP servers 1 and 2 are connected to switch1 while the DHCP client is connected to switch2. The DHCP servers and the DHCP client belong to the VRF vrf1.
From Netvisor ONE version 6.1.1, DHCP relays are VRF-aware. To create a VRF, use the command:
CLI (network-admin@switch1) > vrf-create name vrf1 scope fabric
Follow the steps below to configure DHCP relay between the DHCP servers and the client.
Create a VLAN for the DHCP client and associate a VXLAN with the VLAN:
CLI (network-admin@switch2) > vlan-create id 101 scope fabric vxlan 100101
Create VLANs for the DHCP servers and associate the VLANs with VXLANs:
CLI (network-admin@switch1) > vlan-create id 103 scope fabric ports 25 vxlan 100102
CLI (network-admin@switch1) > vlan-create id 104 scope fabric ports 35 vxlan 100103
Create a vRouter and vRouter interface for VLAN 101:
CLI (network-admin@switch2) > vrouter-create name vr1 vnet vnet1 router-type hardware
CLI (network-admin@switch2) > vrouter-interface-add vrouter-name vr1 ip 192.168.102.1/24 vlan 101 vlan-type public if data if-nat-realm internal vrf vrf1
Note: You also need to configure VRRP interfaces if the DHCP client is attached to a cluster.
View the configuration using the vrouter-interface-show command:
CLI (network-admin@switch1) > vrouter-interface-show vlan 101 format vrouter-name,nic,ip,mac,vlan,vlan-type,nic-state
vrouter-name nic ip mac vlan vlan-type nic-state
------------ -------- ---------------- ----------------- ---- --------- ---------
vr1 eth2.102 192.168.102.1/24 66:0e:94:79:34:fe 101 public up
Associate the vRouter to the VRF by using the command:
CLI (network-admin@switch1) > vrouter-vrf-add vrouter-name vr1 vrf vrf1 bgp-as 65100 router-id 110.0.1.1 bgp-redistribute connected
Use the vrouter-vrf-show command to view the vRouter VRF configuration:
CLI (network-admin@switch1) > vrouter-vrf-show format switch,vrouter-name,vrf,hw-vrid,bgp-as,router-id,bgp-redistribute
switch vrouter-name vrf hw-vrid bgp-as router-id bgp-redistribute
------- ------------ -------- ------- ------ --------- ----------------
switch1 vr1 vrf1 1 65100 110.0.1.1 connected
Configure DHCP packet relay for both DHCP servers:
CLI (network-admin@switch2) > vrouter-packet-relay-add vrouter-name vr1 forward-ip 192.168.1.10 forward-proto dhcp nic eth2.102
CLI (network-admin@switch2) > vrouter-packet-relay-add vrouter-name vr1 forward-ip 192.168.2.10 forward-proto dhcp nic eth2.102
Here, forward-ip is the IP address of the DHCP server, forward-proto is the protocol supported by packet relay which is DHCP, and nic is the ingress interface of the vRouter on which DHCP broadcast packets are expected. The VRF ID is derived from the NIC value provided to the vrouter-packet-relay-add command.
View the packet relay configuration by using the command:
CLI (network-admin@switch2) > vrouter-packet-relay-show
vrouter-name forward-proto forward-ip nic vrf
------------ ------------- ------------ -------- ----
vr1 dhcp 192.168.1.10 eth2.102 vrf1
vr1 dhcp 192.168.2.10 eth2.102 vrf1
Note:
- If the DHCP client is connected through a vLAG to a cluster pair, you must configure vRouters, vRouter interfaces, and DHCP packet relay for both the cluster switches.
- If you configure the DHCP relay and filter on different nodes, the uplink port (from the DHCP filter node to the relay) and the downlink port (from the DHCP filter node to the server interface) must be configured as trusted ports. For more information, see Support for DHCP Snooping section of the Configuring Network Security chapter.
- You cannot specify VRRP VIP NICs in the vrouter-packet-relay command. You can specify VRRP primary NICs instead.