
Configuration of Monitoring Port for vPGs
From Netvisor ONE version 7.0.0 onward, you can configure monitoring ports to analyze the traffic that hits a destination vPG or bidirectional vPG.
Note:
- Monitoring ports are dedicated ports for monitoring vPG traffic and they do not allow other Layer 2 or Layer 3 traffic.
- You cannot configure a monitoring port as the out-port(destination port) of a SPAN configuration.
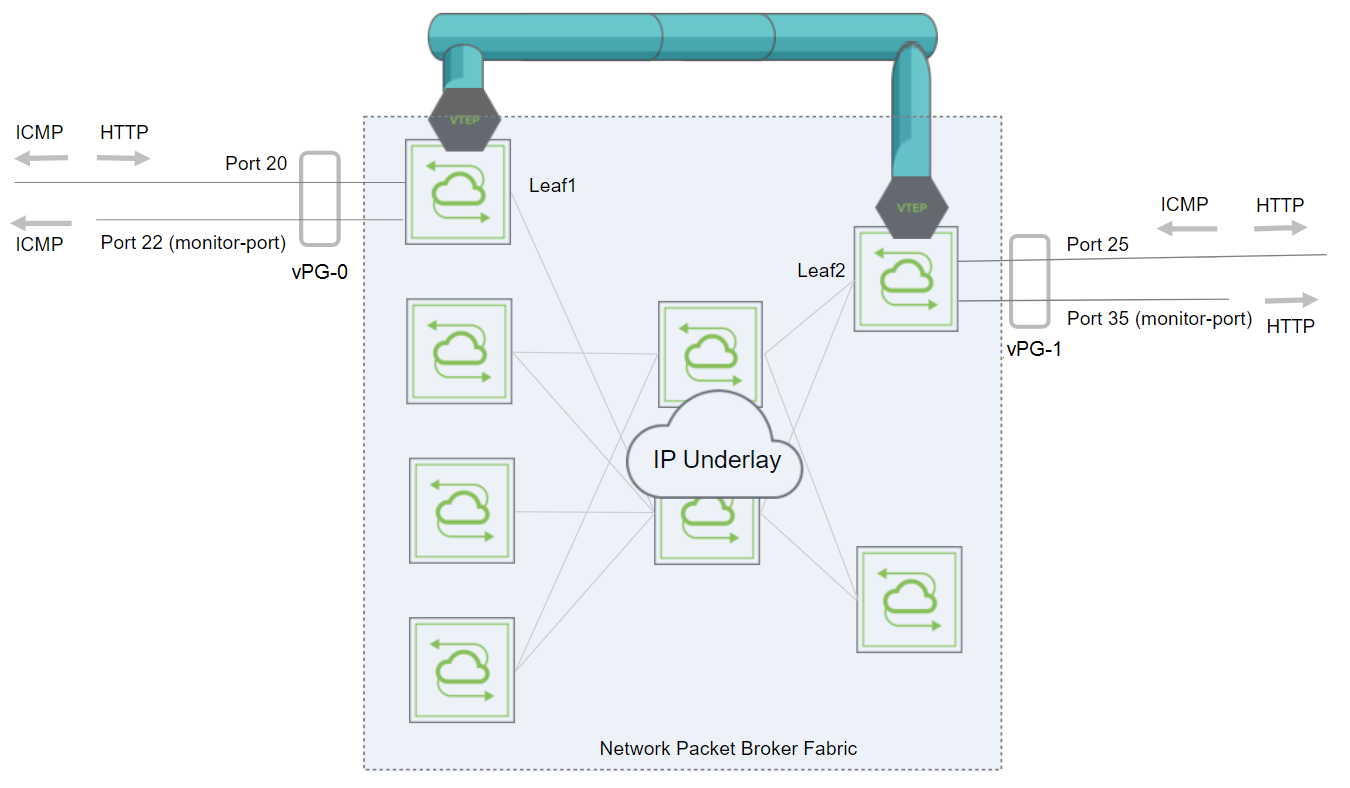
Figure 11-4 - Monitoring Port Configuration
To illustrate the monitoring port functionality, consider the topology above. vPG-0 and vPG-1 are bidirectional vPGs that comprise a regular port and a monitor port each. HTTP protocol traffic flows from vPG-0 to vPG-1 and ICMP traffic flows in the opposite direction from vPG-1 to vPG-0. The monitoring ports can only monitor the ingress traffic on a vPG that arrives from the other vPG. This implies that monitoring port on vPG-0 receives only ICMP traffic while the monitoring port on vPG-1 receives HTTP traffic only.
Follow the steps below to create this configuration.
On Leaf1, create vPG-0 with port 22 as a monitoring port:
CLI (network-admin@Leaf1) > vpg-create name vPG-0 type bidirectional ports 20 monitor-ports 22
On Leaf2, create vPG-1 with port 35 as a monitoring port:
CLI (network-admin@Leaf2) > vpg-create name vPG-1 type bidirectional ports 30 monitor-ports 35
To view the configuration, use the command:
CLI (network-admin@switch) > vpg-show
switch scope name type ports vni vlan monitor-port
------ ------ ----- ------------- ----- -------- ---- ------------
Leaf-2 fabric vPG-1 bidirectional 30 12333333 2666 35
Leaf-1 fabric vPG-0 bidirectional 20 12333334 2667 22
With this configuration, you receive ICMP traffic on monitoring port 22 on Leaf1 and HTTP traffic on monitoring port 35 on Leaf2. You can implement a similar NPB configuration that involves source and destination vPGs where you configure a monitoring port on the destination vPG to monitor the traffic that flows from the source vPG to the destination vPG. A sample configuration is given below.
Configure the source vPG:
CLI (network-admin@Leaf1) > vpg-create name svpg type source ports 11,17
Configure the destination vPG with a monitoring port:
CLI (network-admin@Leaf2) > vpg-create name dvpg type destination ports 9,15 monitor-ports 24
View the configuration:
CLI (network-admin@Leaf2) > vpg-show
switch scope name type ports vni vlan monitor-port
------ ------ ---- ------------ ----- -------- ---- ------------
Leaf1 fabric svpg source 11,17 12333333 2666
Leaf2 fabric dvpg destination 9,15 12333334 2667 24
To add a new monitoring port to a pre-configured vPG, issue the vpg-monitor-port-add command:
CLI (network-admin@switch) > vpg-monitor-port-add
|
vpg-monitor-port-add |
Add monitoring ports to destination or bidirectional vPGs. |
|
vpg-name |
Specify the name of the vPG. |
|
Specify the following parameters: |
|
|
switch |
Specify the name of the switch. |
|
monitor-ports |
Specify the monitoring ports. |
For example:
CLI (network-admin@switch) > vpg-monitor-port-add vpg-name vPG1 monitor-ports 40
CLI (network-admin@switch) > vpg-show name vPG-1
switch scope name type ports vni vlan monitor-port
------ ------ ----- ------------- ----- -------- ---- ------------
switch fabric vPG-1 bidirectional 10 12333333 2666 35,40
Use the vpg-monitor-port-remove command to remove monitoring ports from a vPG:
CLI (network-admin@switch) > vpg-monitor-port-remove vpg-name vPG-1 monitor-ports 40
CLI (network-admin@switch) > vpg-show name vPG-1
switch scope name type ports vni vlan monitor-port
------ ------ ----- ------------- ----- -------- ---- ------------
switch fabric vPG-1 bidirectional 10 12333333 2666 30