
Configuring Open Shortest Path First (OSPF)
Open Shortest Path First (OSPF) is a robust link-state interior gateway protocol (IGP). It uses the concept of Areas which allows further segmentation on the network.
OSPF uses link-state information to make routing decisions, and make route calculations using the shortest path first (OSPF) algorithm. Each vRouter configured for OSPF floods link-state advertisements throughout the area that contains information about the interfaces attached to the router and routing metrics.
You can add more configuration options, such as hello intervals, for OSPF using the vrouter-interface-config commands. In addition, you can add stub or not-so-stubby areas to the OSPF configuration.
You can manually change the OSPF cost for the configuration. Cost is the metric used by OSPF to judge the feasibility of a path. If you specify 0 as the cost, the vRouter automatically calculates the cost based on the bandwidth of the interface. In Netvisor ONE, the OSPF value does not change.
Note: For switches with ONVL, the only available vNET is a global vNET created when a fabric is created for the first time. Use tab complete in the CLI to display the vNET and continue the configuration.
In this example, you configure OSPF for two vRouters with an area, zero. The network has the following configuration:
- VLAN 35 with IP addresses 10.0.3.0/24
- VLAN 55 with IP addresses 172.37.0.0/24
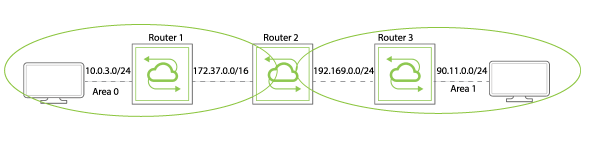
Figure 5-4 - OSPF
1) First, create the vRouter for Router1.
CLI (network-admin@switch) > vrouter-create name vrouter1 vnet vnet-name fabricname-global router-type hardware
2) Add vRouter interfaces to the vRouter:
CLI (network-admin@switch) > vrouter-interface-add vnet vnet-name vrouter-name vrouter1 ip 10.0.3.0 netmask 24 vlan 35 if data nic-enable
CLI (network-admin@switch) > vrouter-interface-add vrouter-name vrouter1 ip 172.37.0.0 netmask 16 vlan 55 if data nic-enable
3) Add the subnets, 10.0.3.0/24 and 172.37.0.0/16, to VLAN35 with the area 0:
CLI (network-admin@switch) > vrouter-ospf-add vrouter-name vrouter1 network 10.0.3.0/24 ospf-area 0
4) Add the second IP address with the area 0.
CLI (network-admin@switch) > vrouter-ospf-add vrouter-name vrouter1 network 172.37.0.0/16 ospf-area 0
5) Add interfaces for OSPF hello intervals of 30 seconds:
CLI (network-admin@switch) > vrouter-interface-config-add name router1 nic eth0.35 ospf-hello-interval 30 ospf-cost 0
CLI (network-admin@switch) > vrouter-interface-config-add name router1 nic eth0.55 ospf-hello-interval 30 ospf-cost 0
If you specify 0 as the cost value, the vRouter calculates the OSPF cost automatically based on the bandwidth of the interface. When you modify the OSPF hello interval, the ospf-dead-interval is automatically reset to 4 times the hello interval.
6) Display the configuration by using the vrouter-ospf-show command:
CLI (network-admin@switch) > vrouter-ospf-show layout vertical
vrouter-name: vrouter1
network: 10.0.3.0
netmask: 24
ospf-area: 0
vrouter-name: vrouter1
network: 172.37.0.0
netmask: 16
ospf-area: 0
stub-area: 11
stub-type: stub
ospf-hello-interval: 30
metric: 34
The metric value can reflect the cost of routes advertised as OSPF routes. It may also reflect the cost of routes advertised with other protocols.