
Implementing the vFlow Policies
NetVisor OS allows you to apply multiple policies in parallel or in series to a particular traffic flow by providing the vFlow construct with two main attributes to control the sequential order of execution relative to other vFlows such as the hardware table and precedence.
The following command keywords enable this functionality:
- table-name − hardware vFlow table name
- precedence − processing priority value
Hardware Table
NetVisor OS provides multiple filter tables along the internal flow hardware data path. However, by default, the vFlow is installed in the ingress filter table, but allows you to optionally implement the vFlow in any other available table, although flow filtering, manipulation, and redirection capabilities may become limited. Figure 12-3 describes the available hardware tables with the corresponding vFlow table names and how the tables are concatenated, allowing both cascading and parallel execution policies.
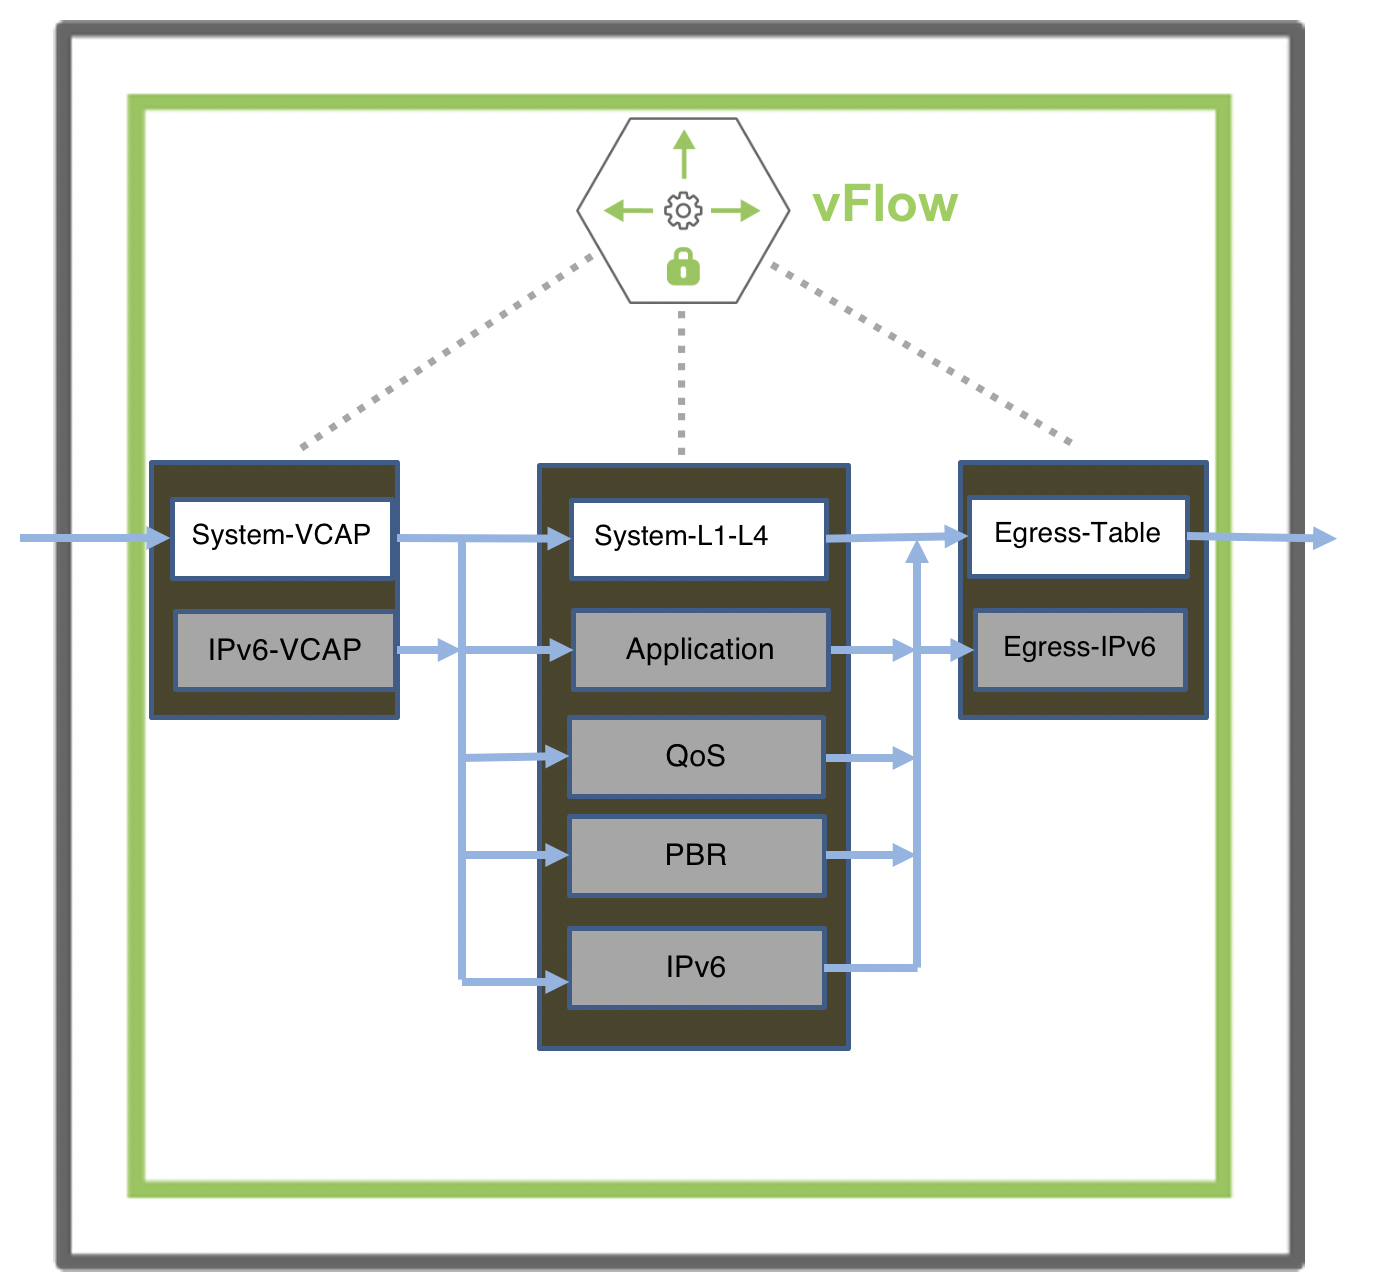
Figure 12-3: Concatenation of vFlow Hardware Tables
Additionally, Figure 12-3 highlights the data-path forwarding stage for each filter table, where some tables are always enabled (displayed in white), while some tables require manual enabling (displayed in grey) such as the Application, QoS, PBR, and IPv6 tables. Use the table-name keyword to install or program the vFlow in the specified hardware table.
Table 12-1: Hardware Filter Tables with Descriptions
|
Hardware Filter Tables |
Description |
|
System-VCAP |
Where the system VCAP policies are defined at the pre-ingress stage |
|
System-L1-L4 |
Where the system ingress traffic filtering policies are defined for L2, L3, and L4 packet parameters at the ingress or ICAP table. All system rules are defined in ICAP |
|
Egress-Table |
Where the system egress policies are defined at the egress or ECAP table. Supports drop and forward actions. |
|
Application Table |
Where the user application level policies are defined. |
|
QoS Table |
Where the ACL policies are defined |
|
PBR Table |
Where the policy based routing policies are defined. For details, see the Configuring Policy-Based Routing section. |
|
IPv6 Table |
Where IPv6 policies are defined. |
|
IPv6 VCAP Table |
Where IPv6 VCAP policies are defined. |
You can view the configurable hardware tables by using the command:
CLI (network-admin@leaf-1) > vflow-table-profile-show layout vertical
profile: system
hw-tbl: switch-main
enable: enable
flow-capacity: 768
flow-slices-needed: 4
flow-slices-used: 7
comment: System-L1-L4-flows
profile: npu-app
hw-tbl: npu-main
enable: disable
flow-capacity: 0
flow-slices-needed: 0
flow-slices-used: 0
comment: L1-L4-flows
profile: application
hw-tbl: switch-main
enable: disable
flow-capacity: 0
flow-slices-needed: 1
flow-slices-used: 0
comment: User-Application
profile: qos
hw-tbl: switch-main
enable: disable
flow-capacity: 0
flow-slices-needed: 1
flow-slices-used: 0
comment: QoS
profile: ipv6
hw-tbl: switch-main
enable: disable
flow-capacity: 0
flow-slices-needed: 2
flow-slices-used: 0
comment: IPv6
profile: pbr
hw-tbl: switch-main
enable: disable
flow-capacity: 0
flow-slices-needed: 0
flow-slices-used: 0
comment: PBR
profile: egress-v6
hw-tbl: switch-main
enable: disable
flow-capacity: 0
flow-slices-needed: 1
flow-slices-used: 0
comment: Egress-IPv6
profile: ipv6-vcap
hw-tbl: switch-main
enable: enable
flow-capacity: 256
flow-slices-needed: 1
flow-slices-used: 1
comment: VCAP-IPv6
Note: The capacity and availability of the hardware tables vary between switch models.
The optional tables (in grey in Figure 12-3) are disabled by default. You can enable optional tables with the vflow-table-profile-modify command.
CLI (network-admin@leaf-1) > vflow-table-profile-modify
|
vflow-table-profile-modify |
Modify vFlow table profiles. |
|
profile application|ipv6|qos|ipv6-vcap |
Specify the type of vFlow profile. |
|
hw-tbl switch-main|switch-hash|npu-main|npu-hash |
Specify the hardware used by vFlow. |
|
enable|no-enable |
Enable or disable vFlow table profile. |
For example, enable the qos table using the command:
CLI (network-admin@leaf-1) > vflow-table-profile-modify profile qos enable hw-tbl switch-main
NetVisor OS version 6.1.0 introduces ipv6-vcap table profile to enable IPv6 filtering for features like Network Packet Broker. When you enable ipv6-vcap table profile, NetVisor OS constructs an IPv6 VCAP table by allocating half the space in the VCAP table for IPv6 entries.
Enable IPv6 filtering in VCAP table by using the command:
CLI (network-admin@leaf-1) > vflow-table-profile-modify profile ipv6-vcap hw-tbl switch-main enable
You must reboot the switch or restart the nvOSd service for the settings to take effect. When you enable optional hardware tables, NetVisor OS allocates a minimum number of entries in the order of 256 vFlow objects (the number of vFlow objects varies based on the platform and the type of the table). For maximum vFlow scalability, enable hardware tables only when necessary. You can monitor the resource consumption of active hardware tables with the following command:
CLI (network-admin@leaf-1) > vflow-table-show layout vertical
name: Egress-Table-1-0
flow-max-per-group: 512
flow-used: 0
flow-tbl-slices: 3
capability: match-metadata
flow-profile: system
name: System-L1-L4-Tun-1-0
flow-max-per-group: 4096
flow-used: 62
flow-tbl-slices: 4
capability: set-metadata
flow-profile: system
name: System-VCAP-table-1-0
flow-max-per-group: 256
flow-used: 3
flow-tbl-slices: 3
capability: none
flow-profile: system
name: VCAP-IPv6-table-1-0
flow-max-per-group: 256
flow-used: 0
flow-tbl-slices: 1
capability: none
flow-profile: ipv6-vcap
Precedence
When you implement two or more vFlow objects within the same hardware table, it may be necessary to enforce a particular evaluation order. Use the keyword precedence to enforce the evaluation order as NetVisor OS executes vFlows with higher precedence value first. See a sample configuration below:
Figure 12-4 displays the precedence or evaluation order for different vFlow objects. When a flow matches two or more vFlows with the same precedence, the corresponding vFlow actions are merged and executed together. When you create the vFlow, NetVisor OS validates that the new object is consistent and can be merged with objects with the same precedence.
The precedence value is within a numerical range of 2 and 15, with 2 as the default value. You cannot configure the evaluation order or precedence value beyond 15.
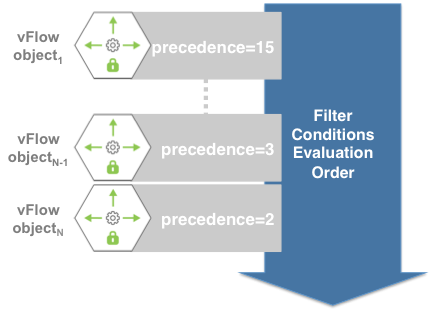
Figure 12-4: Evaluation Order for vFlow Objects with Different Precedence
When you create multiple vflow objects within the same hardware table without specifying the precedence value (default value being 2), NetVisor displays an error message about the vFlow conflicts. For example,
- Create a vFlow:
CLI (network-admin@Leaf1) > vflow-create name example_vflow1 scope fabric bw flow-class meter bw-max 2g
- Create a second vFlow:
CLI (network-admin@Leaf1) > vflow-create name example_vflow2 scope fabric bw flow-class meter bw-max 5g src-ip 192.168.20.1
vflow-create: Flow conflicts with Flow example_vflow1, ID68: specify fields to make flows mutually exclusive or change the flow precedence
The error message is generated because the vFlow configurations conflict with each other. To differentiate between the two vflows, assign a different precedence to example_vflow2:
CLI (network-admin@Leaf1) > vflow-create name example_vflow2 scope fabric bw flow-class meter bw-max 5g src-ip 192.168.20.1 precedence 5
Managing Traffic Classes with vFlow
The vFlow classes indicate the priority assigned to a packet within a switch for internal processing and prioritization and specifies a service type: traffic metering or traffic shaping, bandwidth guarantee. NetVisor OS supports two types of vFlow classes:
- System Flow Classes
- Metered flow class, where the traffic is not allowed to exceed a set rate.
- Guaranteed bandwidth flow class, where the vFlow object guarantees a certain bandwidth and the switch priority is 9.
- Lossless flow class, where drop action is unavailable and the switch priority is 10.
- User Defined Flow Classes
- Flow classes created by users with priorities between 1 and 8
- Used for traffic metering
- Used for traffic shaping and bandwidth guarantee