
Packet Broker
Packet Broker
Note: The Pluribus Network Packet Broker solution is available on all platforms except NSU, NRU01, NRU02, NRU03, and NRU-S0301 platforms.
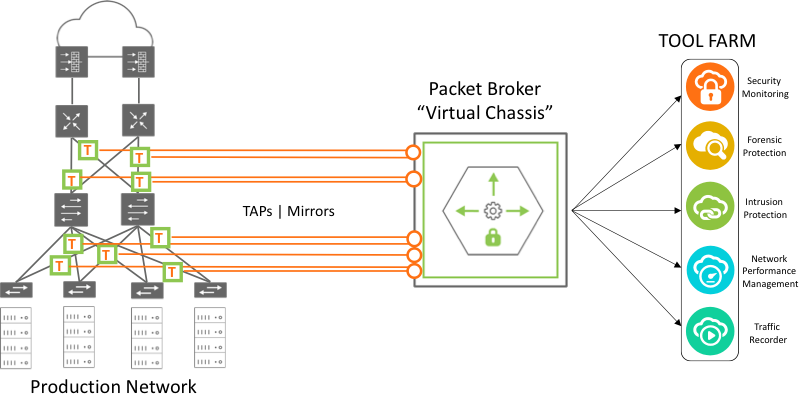
The Pluribus Networks' Packet Broker solution enables users to deploy modular, scale-out, monitoring fabrics with a distributed architecture that allows sharing visibility and security tools located anywhere in the network. Simple and global monitoring fabrics deployed as part of the Network Packet Broker solution feature centralized management capability and function as a 'distributed virtual chassis.' Built on top of Netvisor ONE Unified Cloud Fabric, Network Packet Broker does not require specialized software or a proprietary fabric and consequently provides a high degree of flexibility, resiliency, and operational simplicity.
Using tools such as network taps or mirrors, the Network Packet Broker service copies traffic from a production network to the adaptive monitoring fabric's ingress ports. In turn, the monitoring fabric redirects the traffic arriving on the ingress ports to the monitoring tools located geographically apart. This implementation employs VXLAN overlay to transport packets from ingress ports to monitoring tools and features ECMP in the underlay to address link failures.
Network Packet Broker Architecture
The monitoring fabric can be of any physical topology, including leaf-spine, ring, hub-and-spoke, mesh, tree, and others. Netvisor ONE allows you to club the ingress or source ports and the destination ports into Virtual Port Groups (vPGs). The vPG construct permits you to flood the traffic that arrives at select source ports to multiple destination ports.
Monitoring Fabric Topology
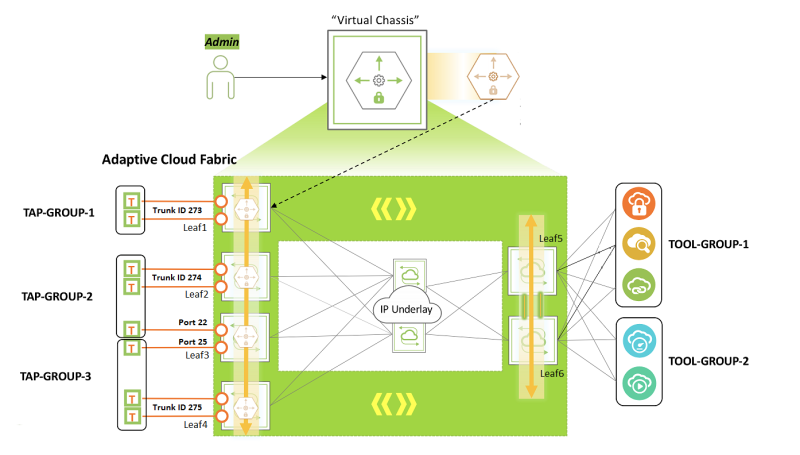
Reference the example above, a monitoring fabric with a leaf-spine topology. Network taps copy traffic from the production network to the source ports or trunks on Leaf1, Leaf2, Leaf3, and Leaf4. These ports constitute the source vPGs: TAP-GROUP-1, TAP-GROUP-2, and TAP-GROUP-3. The switches Leaf5 and Leaf6 form a cluster. The monitoring tools connect to ports on Leaf5 and Leaf6, which constitute the destination vPGs: TOOL-GROUP-1 and TOOL-GROUP-2.
Note: Before creating the vPGs, you must configure a VXLAN underlay network and VTEPs for the overlay. And, to deploy the Packet Broker fabric that spreads across geographical locations, you must create a Fabric over Layer 3 configuration.
UNUM Packet Broker
Selecting Dashboards → Packet Broker → displays important information about the Fabric and/or individual switches within the Fabric.
There are features and functions used in UNUM Manager and UNUM Analytics that are common throughout the user interface (UI). Please refer to the Common Functions section for more information on the use of these functions and features.
Note: Selecting Dashboards → Packet Broker displays information about a Fabric assuming a fabric was created and added. For more information about creating and adding a Fabric please refer to the ZTP - Zero Touch Provisioning section in this manual.
Select the applicable Fabric from the left-hand navigation bar and the dashboard updates showing all Switch entries from all switches within the Fabric.
Packet Broker Dashboard
When first instantiated, the default Packet Broker dashboard displays as shown below.
Note: Certain images and illustrations depicted below have been edited for clarity, display, differentiation, or example purposes.
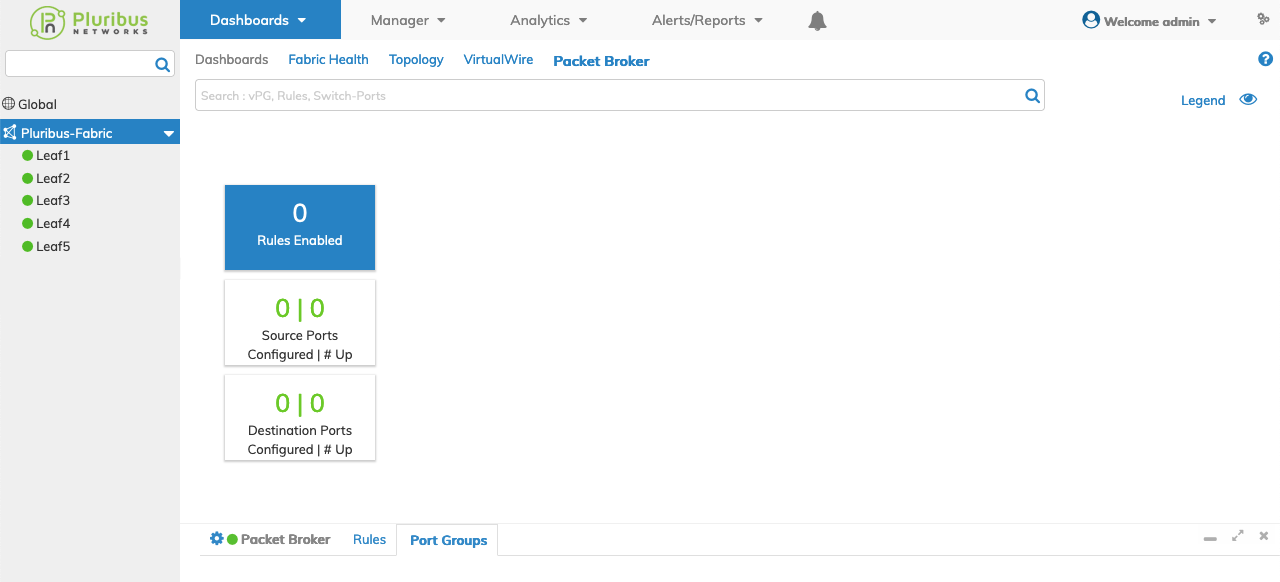
UNUM Packet Broker Default Dashboard
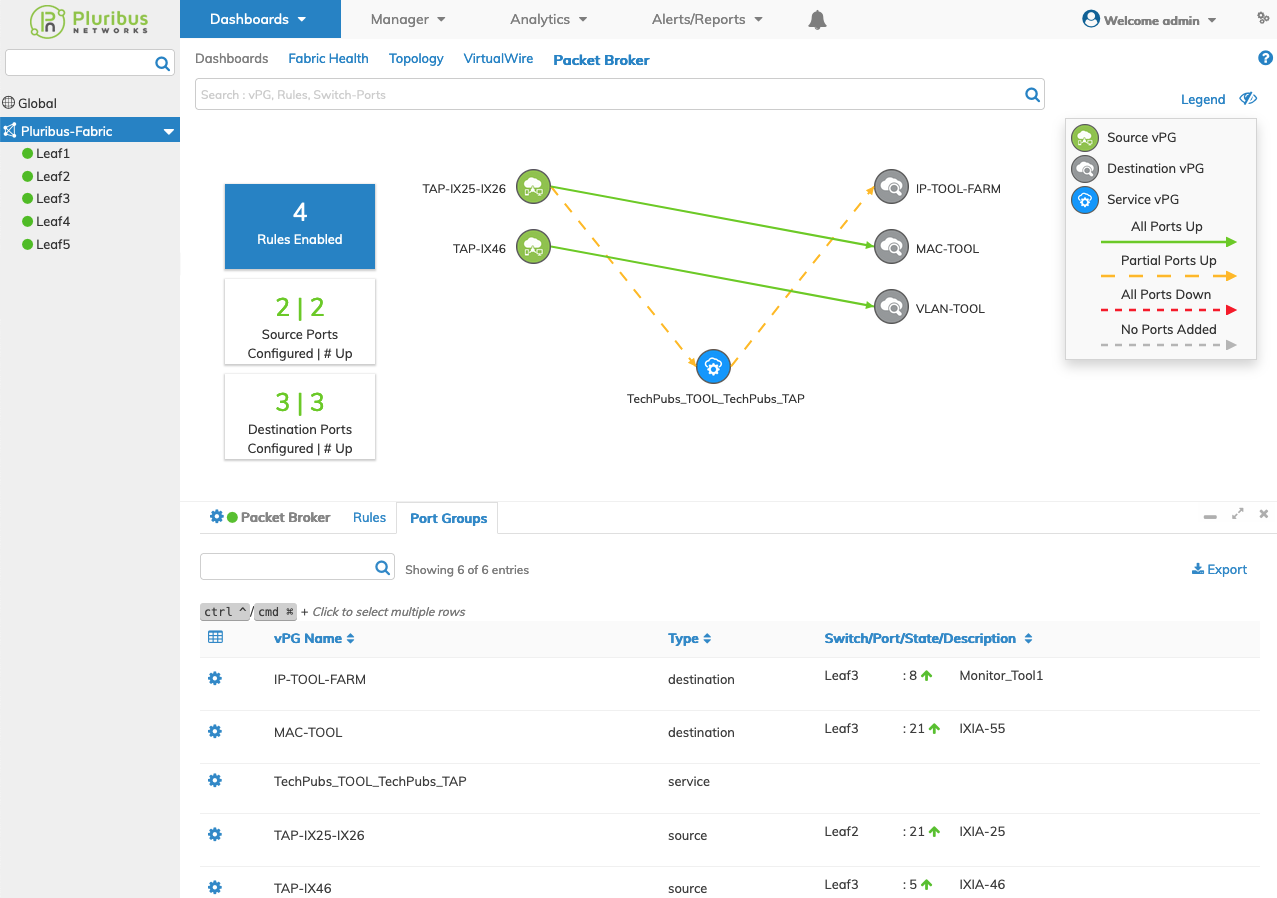
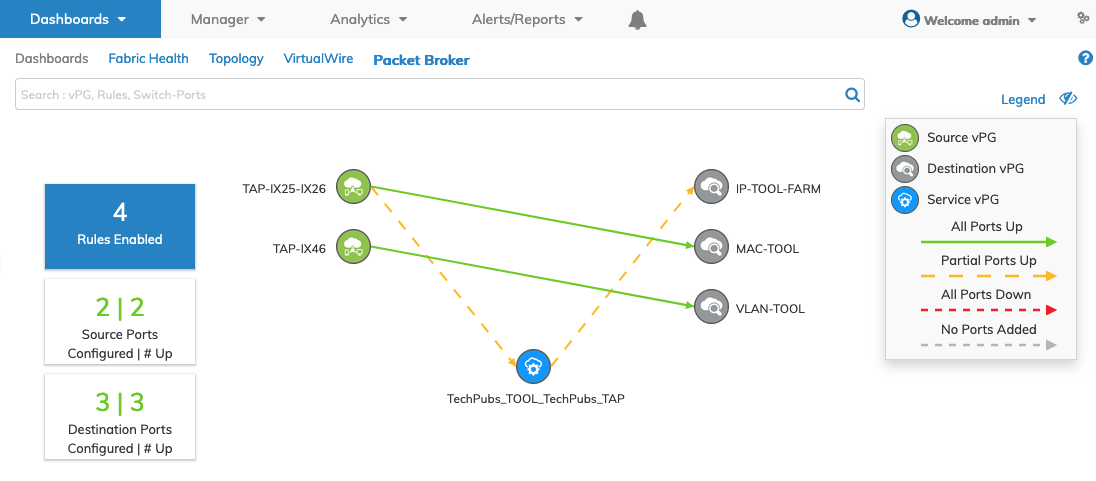
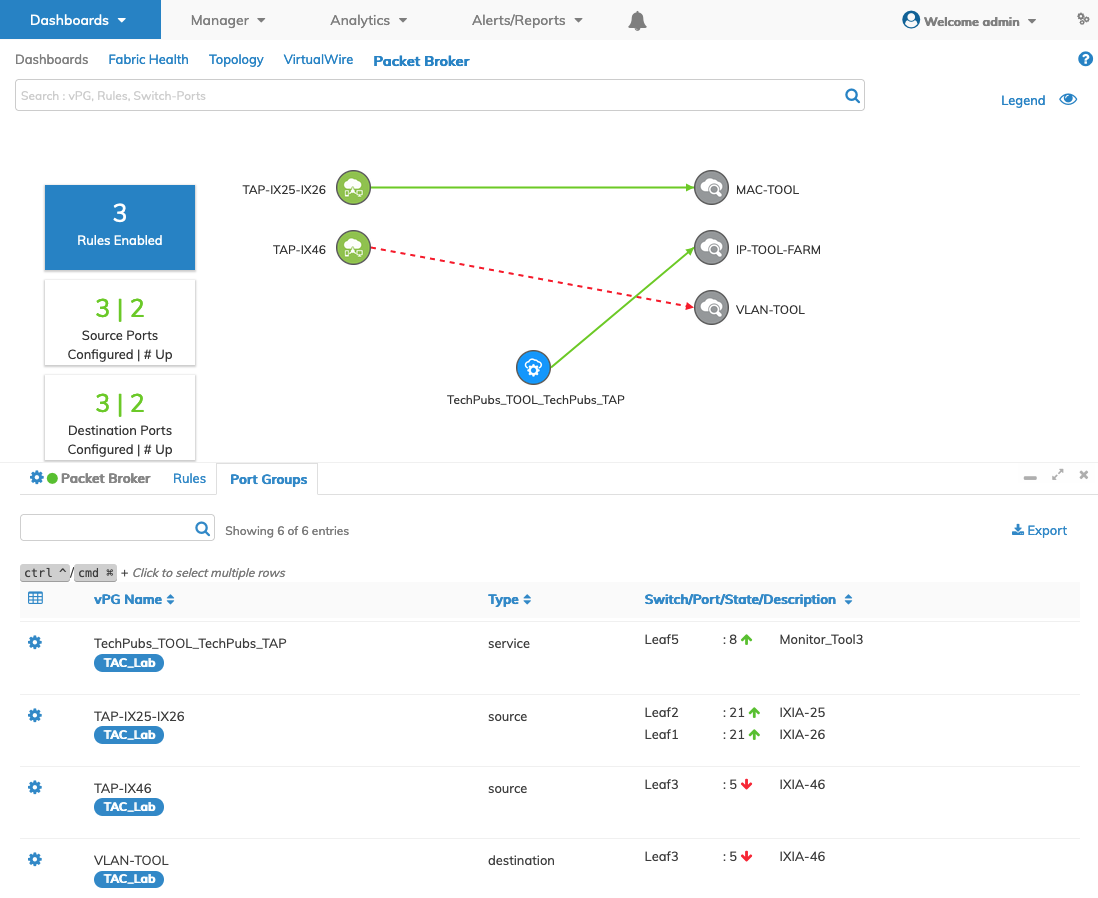
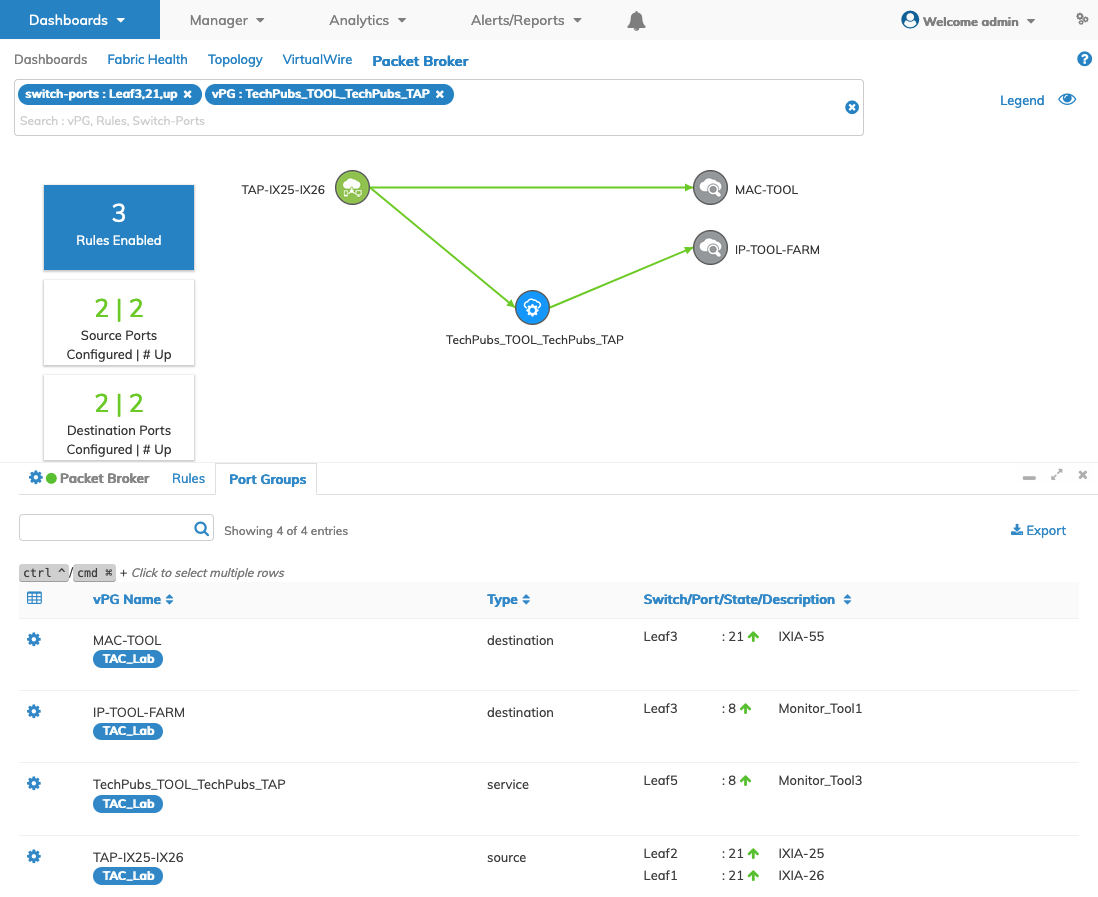
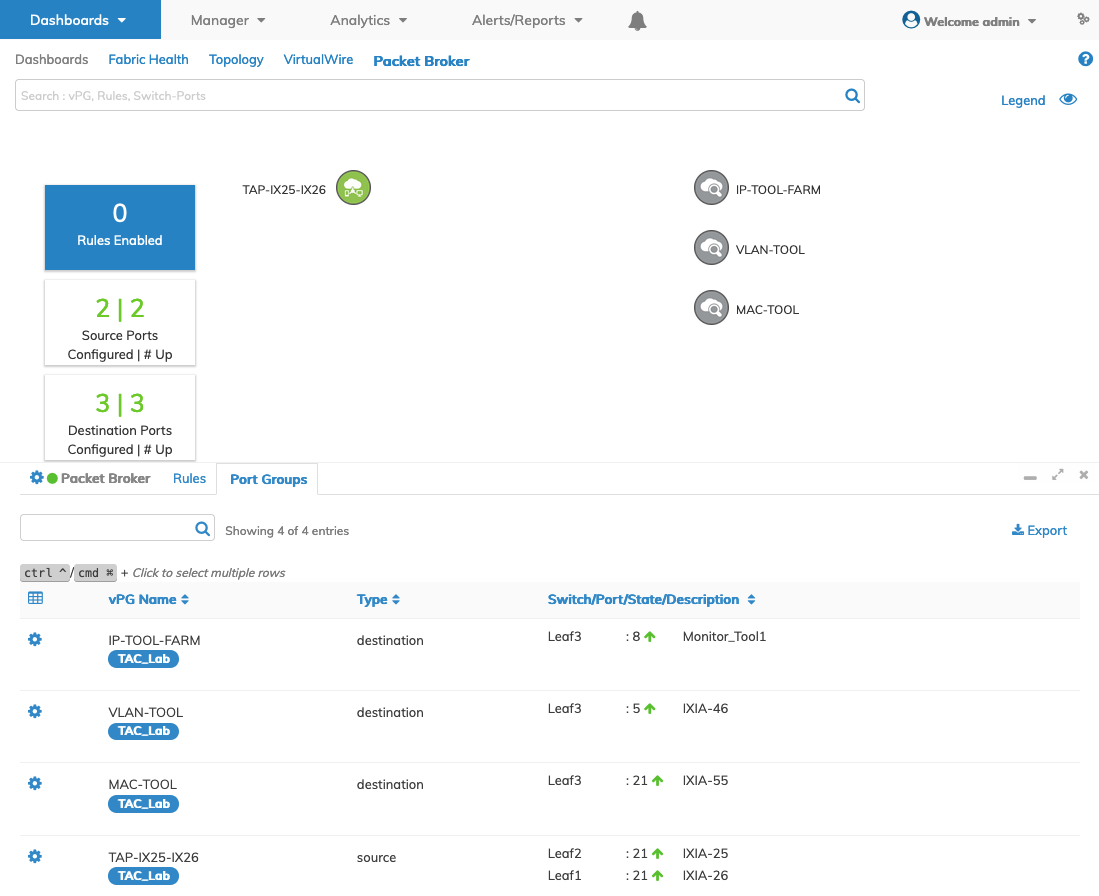
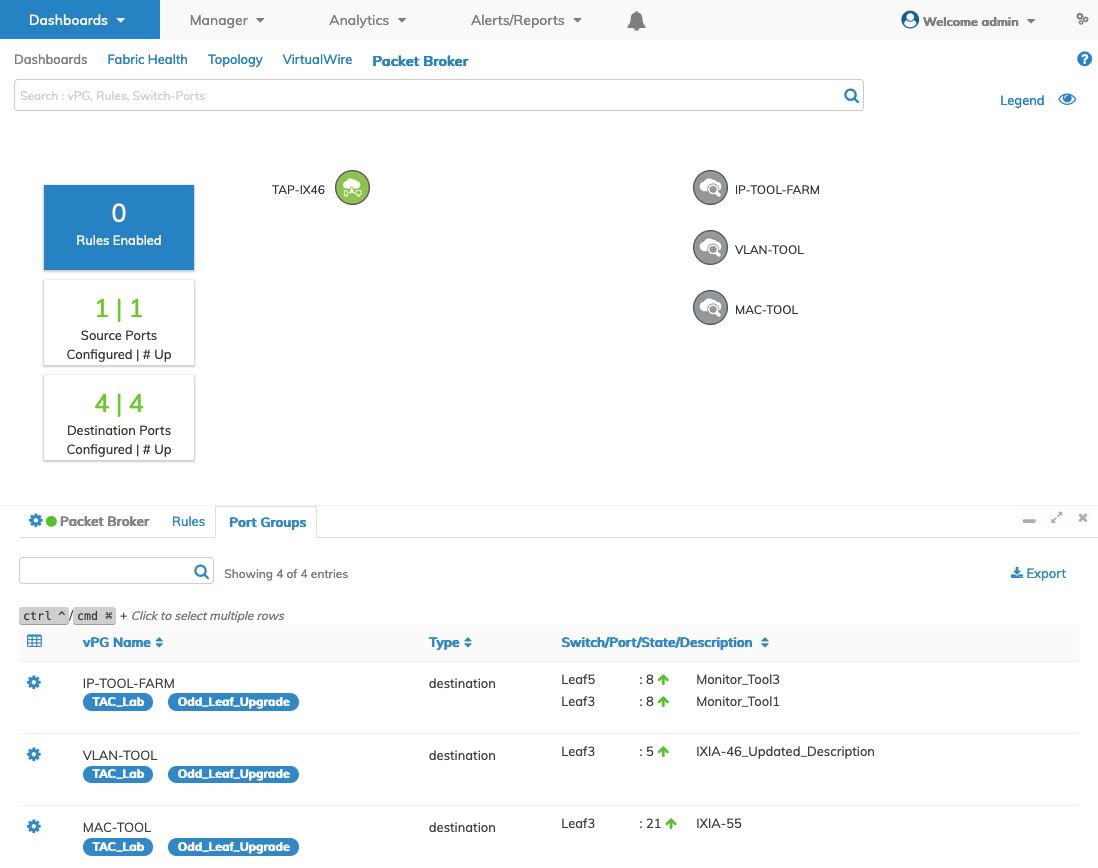
When configured, the dashboard displays the Virtual Ports Groups, filters, schema, statistics, and vFlow data as illustrated below.
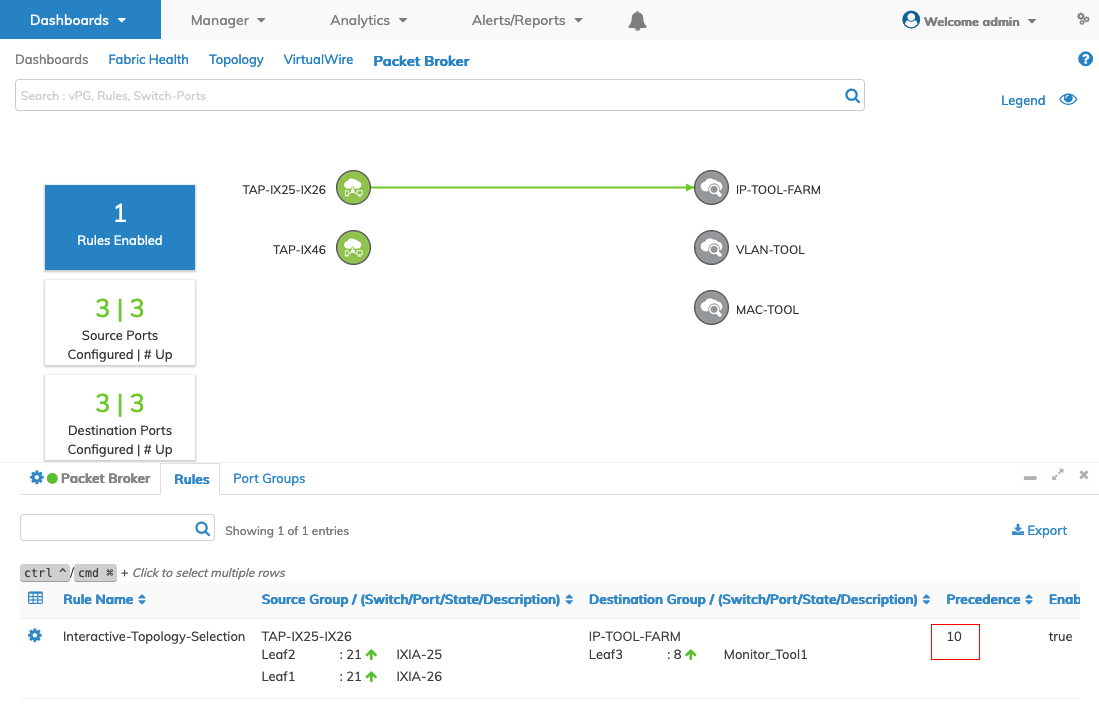
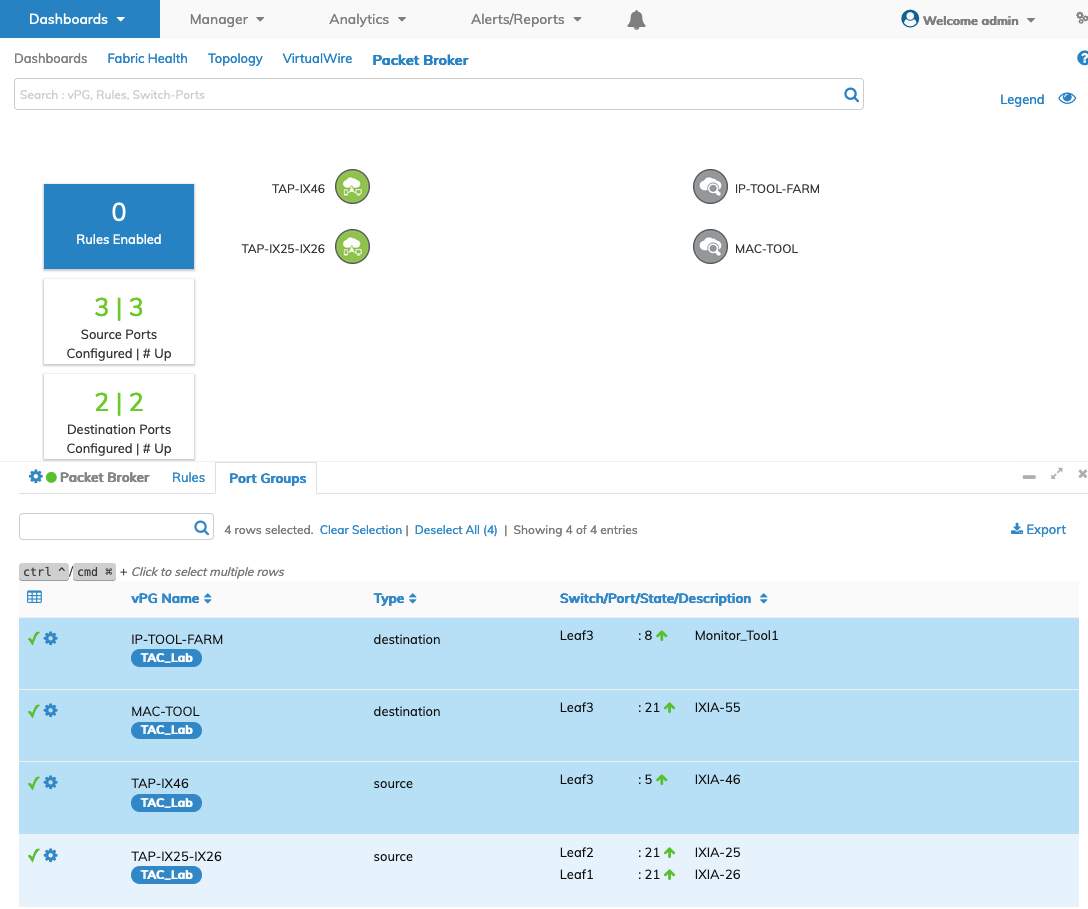
The schema shows the vPG Source, the vPG Destination, and the vPG Service Group and the number of Enabled Rules, Source Ports, Destination Ports, and their respective status.
The Packet Broker Rules dashboard displays the Rule Name, Source Group with Switch/Port/State/Description, Destination Group with Switch/Port/State/Description, Precedence, Enable, and Filter Rule.
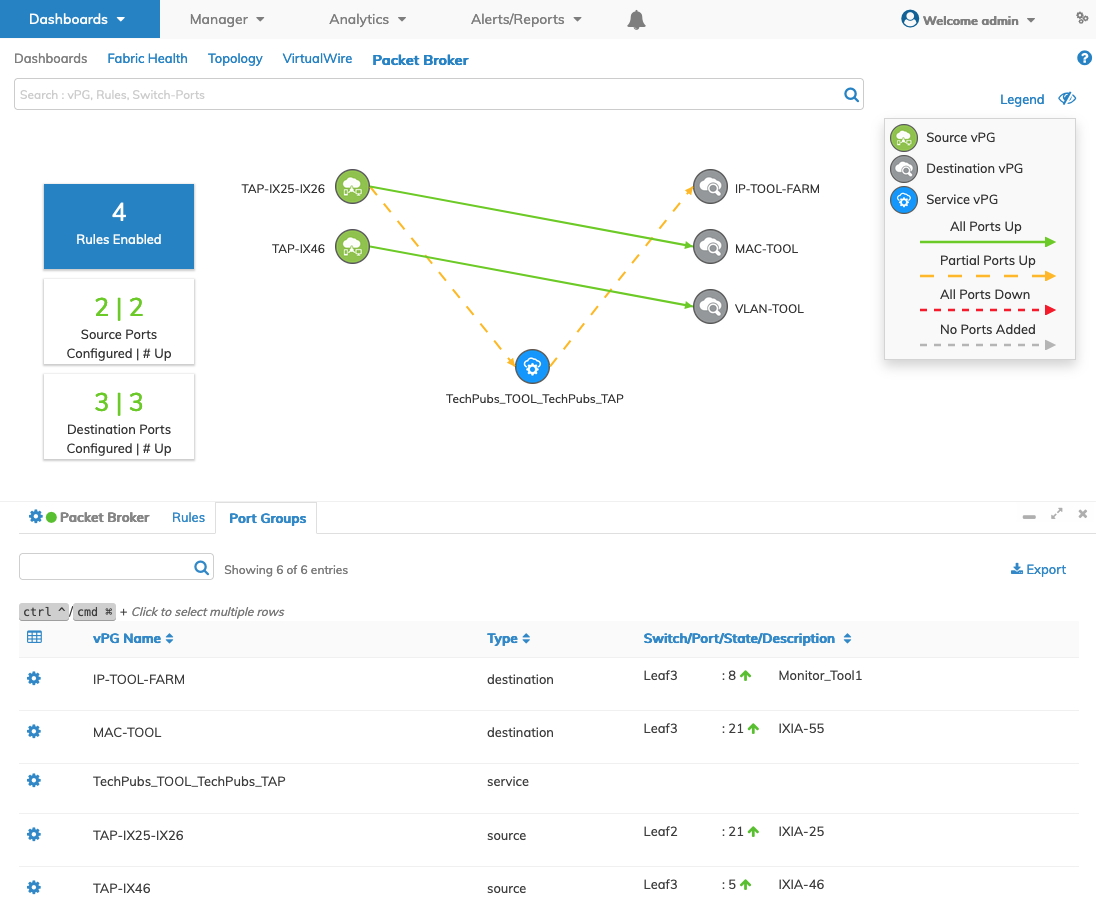
The Packet Broker Port Groups dashboard displays vPG Name, Type, and Switch/Port/State/Description.
Each vPG Name entry displays a status arrow indicating the state of the connection, Up or Down, shown as ![]() or
or ![]() .
.
UNUM Packet Broker Populated Dashboard
Note: A Packet Broker Service vPG translates into one source and one destination vPG on the switch. All other vPGs are one-to-one.
Packet Broker Legend
The Packet Broker schema displays the status of Ports and Source vPG, Destination vPG, and Service vPG.

UNUM Packet Broker Legend
An example is illustrated below.
UNUM Packet Broker Dashboard and Legend
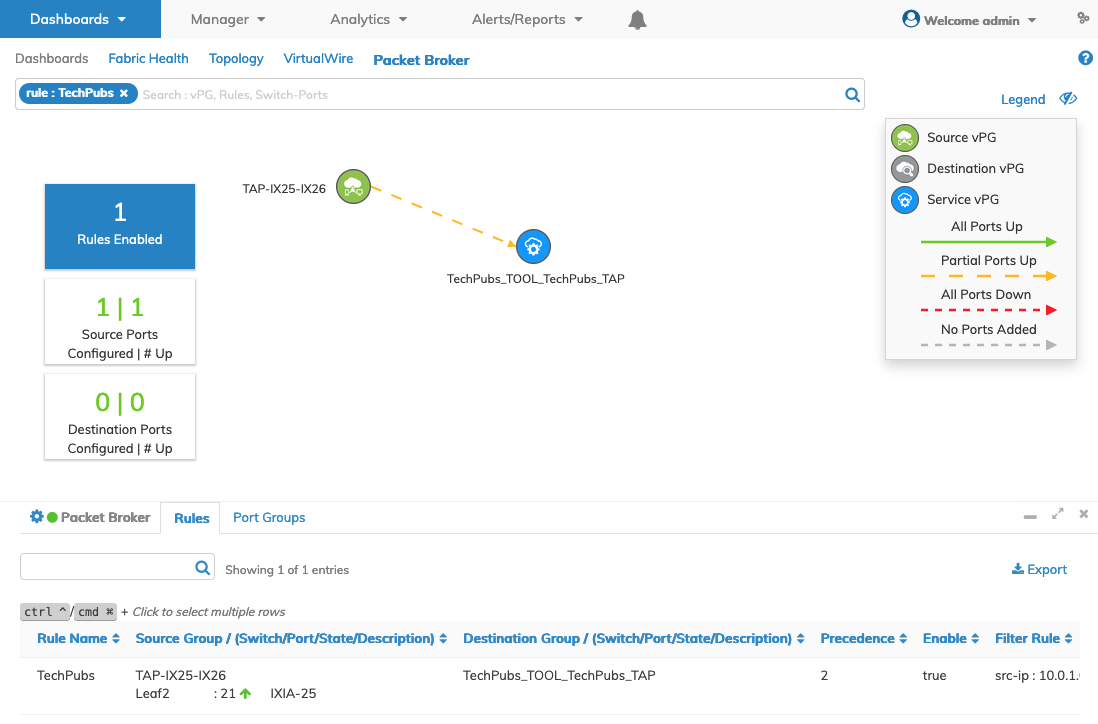
In the following example, the Partial Ports Up orange dashed line indicate the vPG exists with up and down ports. In this case, TAP-IX25-IX26 ports are up.
However, the TechPubs_Tool_TechPubs_TAP vPG has no assigned resources. The Port Groups details pane confirms this status, where TechPubs_Tool_TechPubs_TAP does not have a switch and port assignment.
UNUM Packet Broker Populated Dashboard -Partial Ports Up - Example
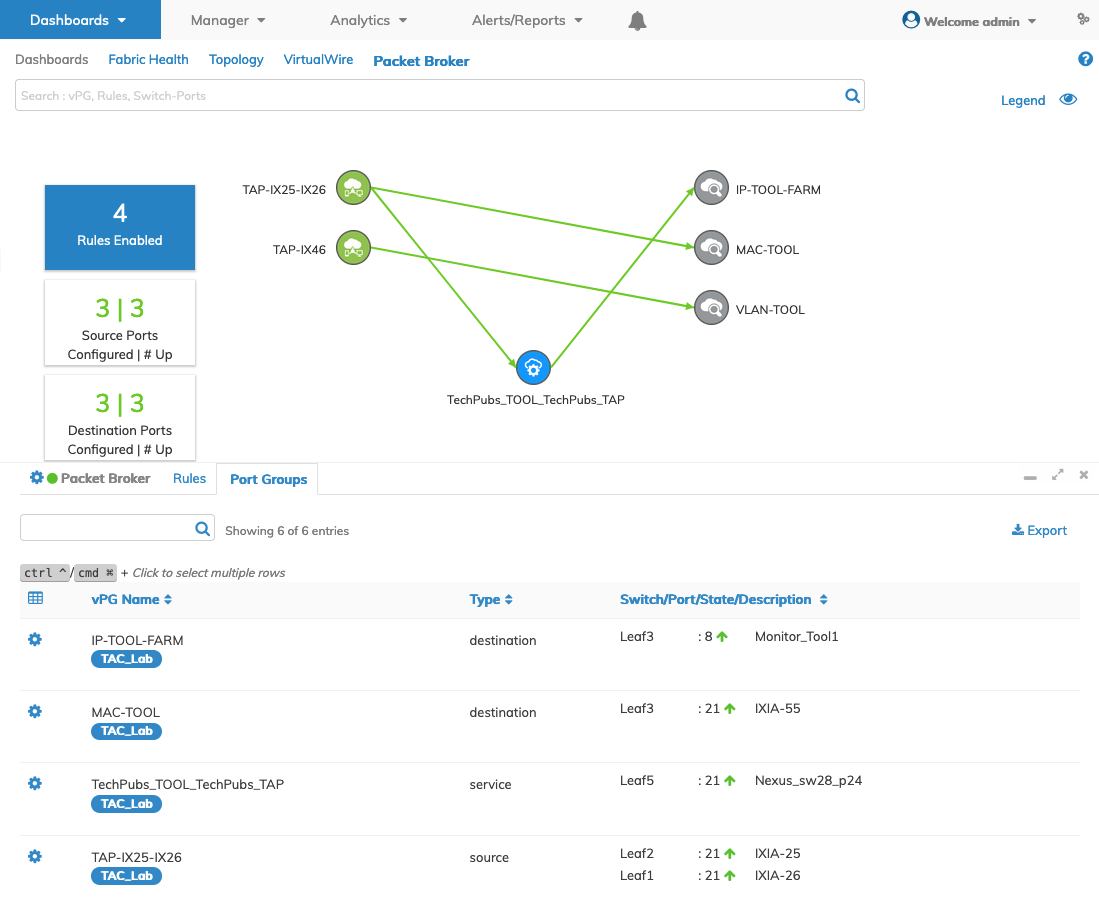
Assigning switch and enabled port resources to TechPubs_Tool_TechPubs_TAP results in an All Ports Up dashboard.
UNUM Packet Broker Populated Dashboard - All Ports Up - Example
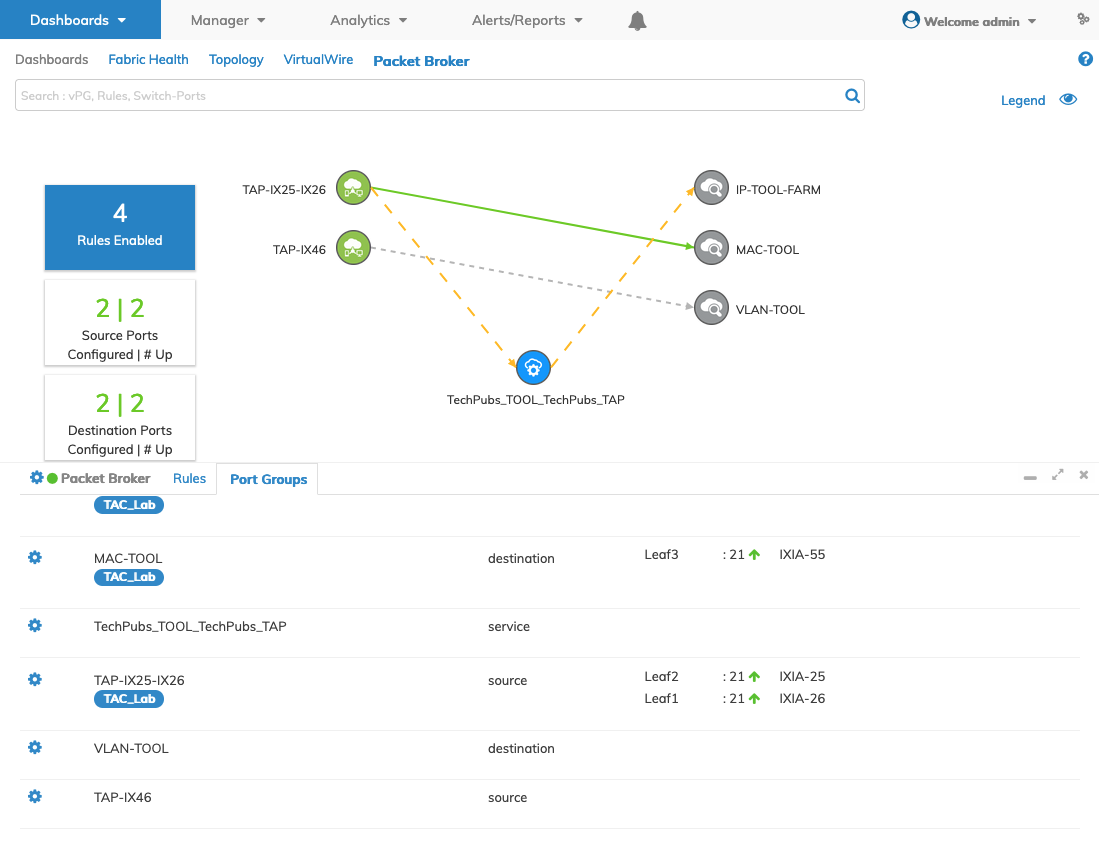
In the event multiple source and destination vPGs have no assigned resources, the dashboard displays the No Ports Added gray dashed line as shown below.
UNUM Packet Broker Populated Dashboard - No Ports Added - Example
When all ports are down, the dashboard displays the All Ports Down red dashed line.
UNUM Packet Broker Populated Dashboard - All Ports Down - Example
Search & Filtering
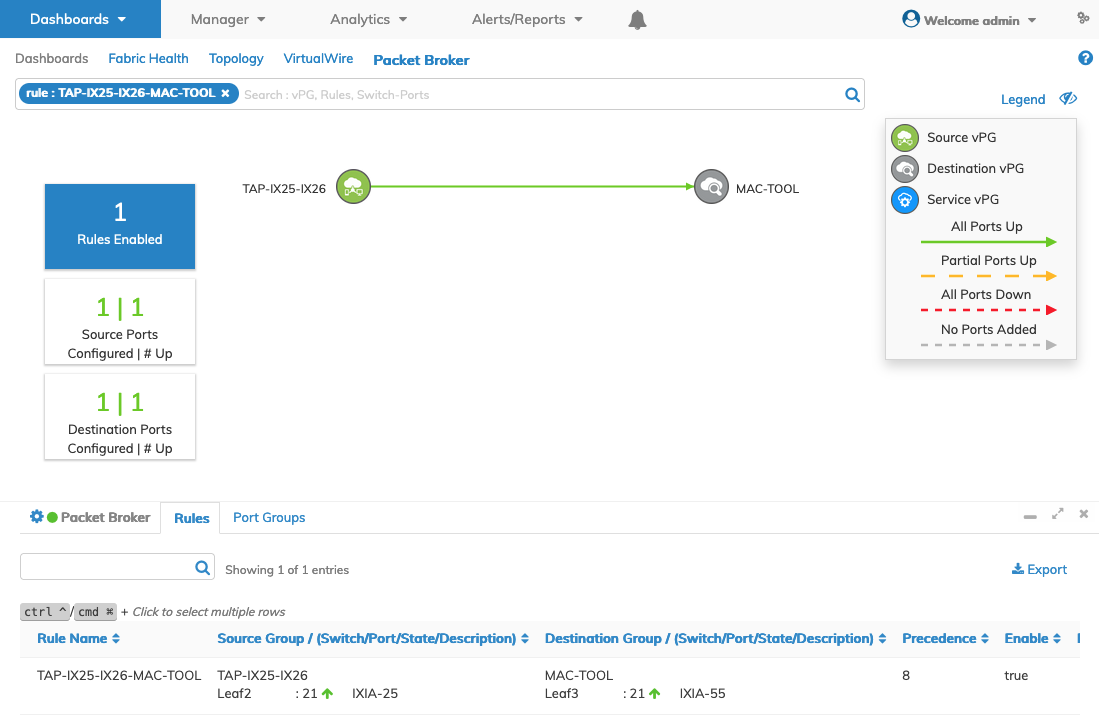
Click on a connection between the vPGs and the schema and dashboard updates with specific information about the selected link.
The Search window updates with the selected Rule.
UNUM Packet Broker Dashboard Filter & Link Example
UNUM Packet Broker Dashboard Filter & Link Up Example
Enter search criteria in the search box displays matching vPGs, Rules, and Switch-Ports.
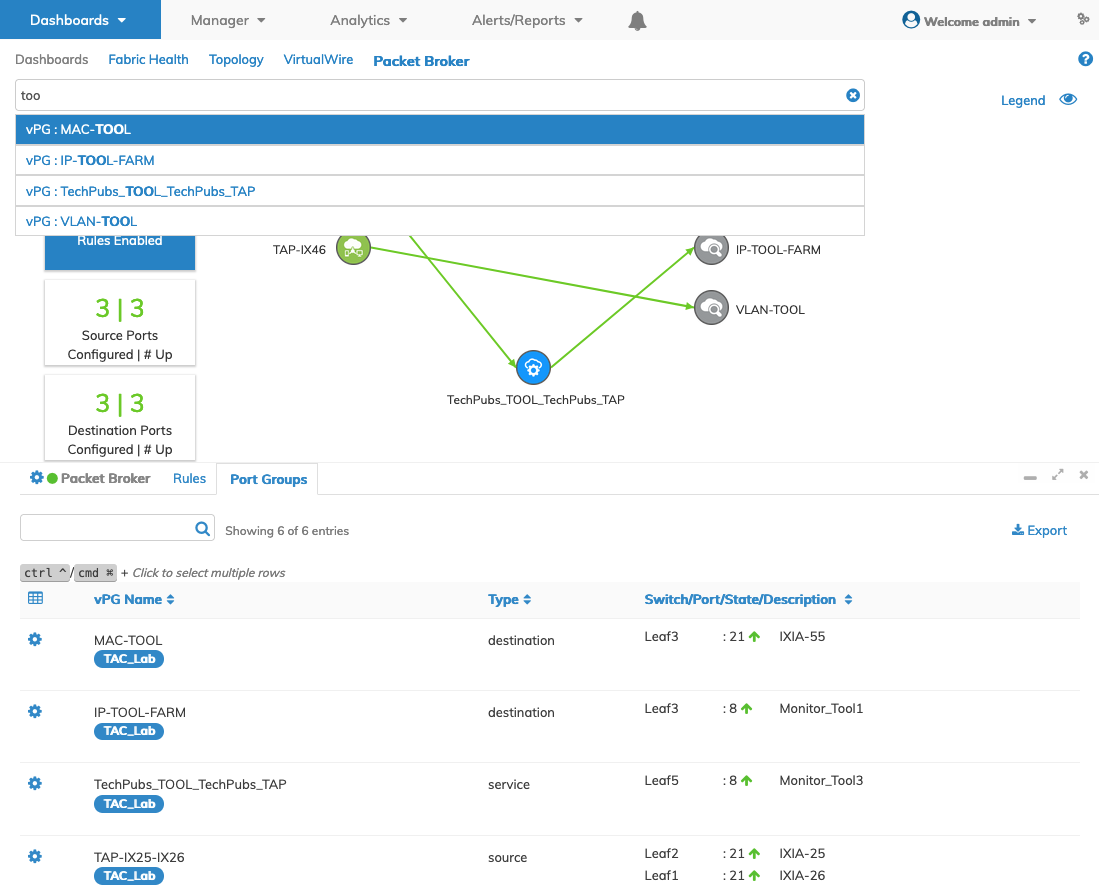
UNUM Packet Broker Dashboard Filter &Search
Selecting a search result or refining the search updates the dashboard accordingly.
Each vPG Name entry displays a status arrow indicating the state of the connection, Up or Down, shown as ![]() or
or ![]() .
.
UNUM Packet Broker Dashboard Filter &Search
Packet Broker Switch Selection
Select a switch from the left-hand navigation bar, and the schema updates with the settings associated with the individual switch selected, as illustrated in the illustration below.
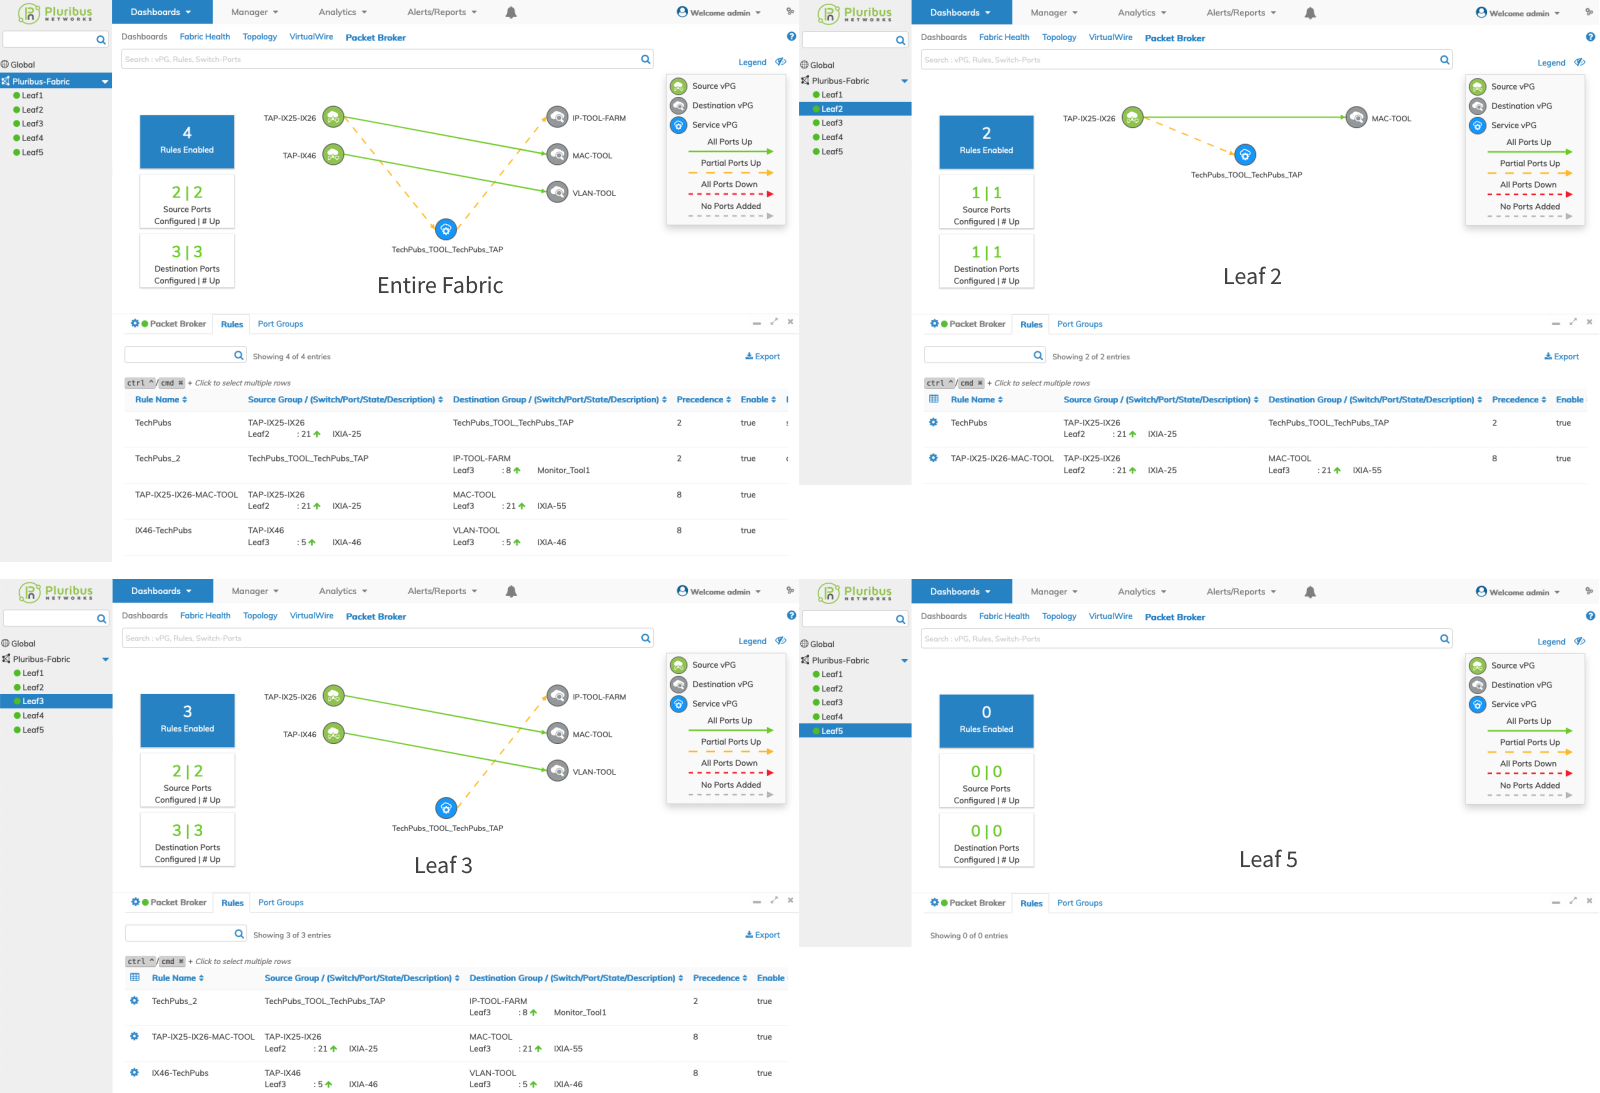
Packet Broker Fabric versus Individual Switch Examples
Schema Indicator Buttons
•Rules Enabled – Displays the number of rules enabled.
•Source Ports – Displays the number of Source Ports and status.
•Destination Ports – Displays the number of Destination ports and status.
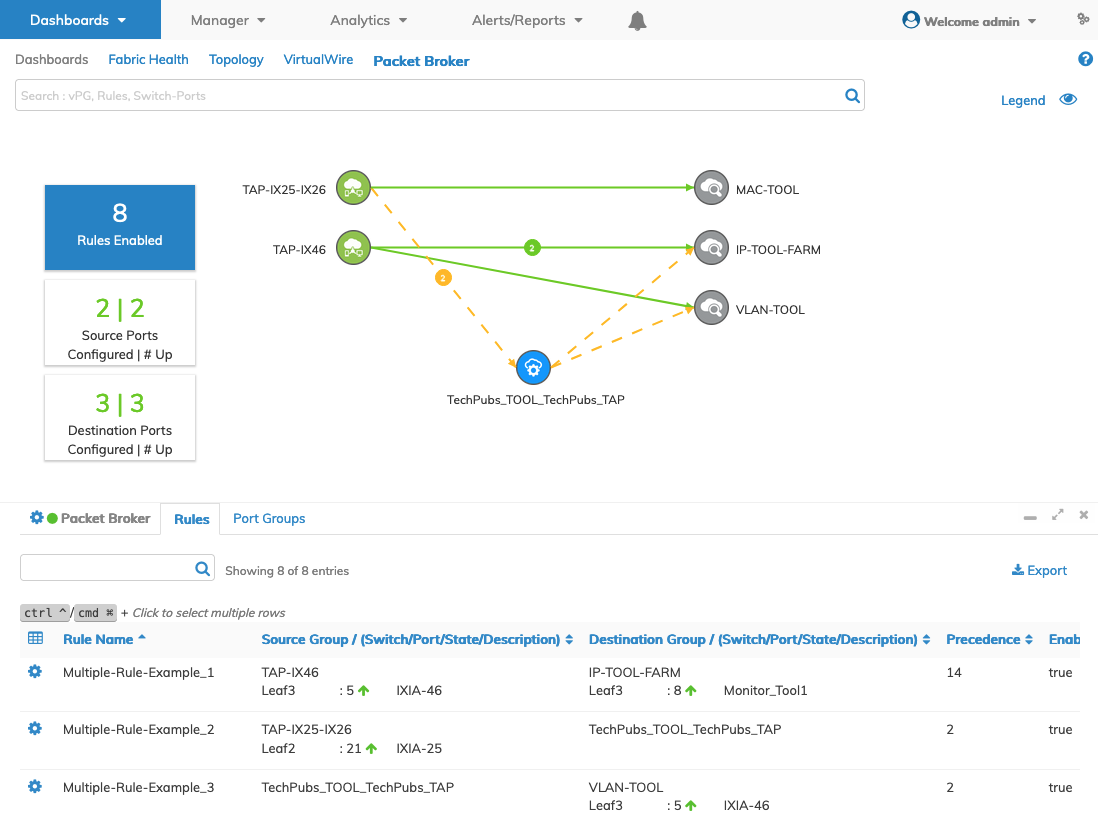
Cycling through the Rules Enabled, Source Ports, and Destination Ports indicator buttons update the schema as shown in the illustration below.
![]()
UNUM Packet Broker Dashboard Buttons
Schema Icons - Interactive Rule Creation
Using the schema icons interactively create a Packet Broker Rule for Source and Destination by selecting an icon.
Note: A Tool Group is synonymous with a Destination Port(s) or Tool Port(s) and is a Destination vPG.
Click on the first icon and then select the second icon while holding the Ctrl and Command key on your keyboard, as illustrated below.
![]()
UNUM Packet Broker Icons Create Filter
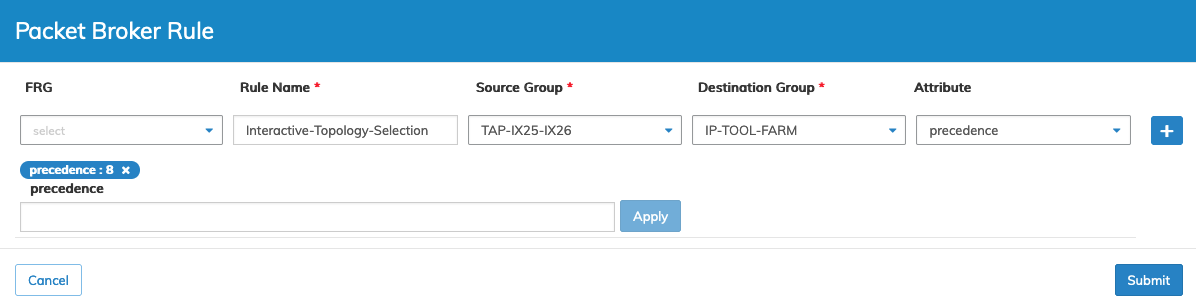
A Packet Broker Rule dashboard displays.
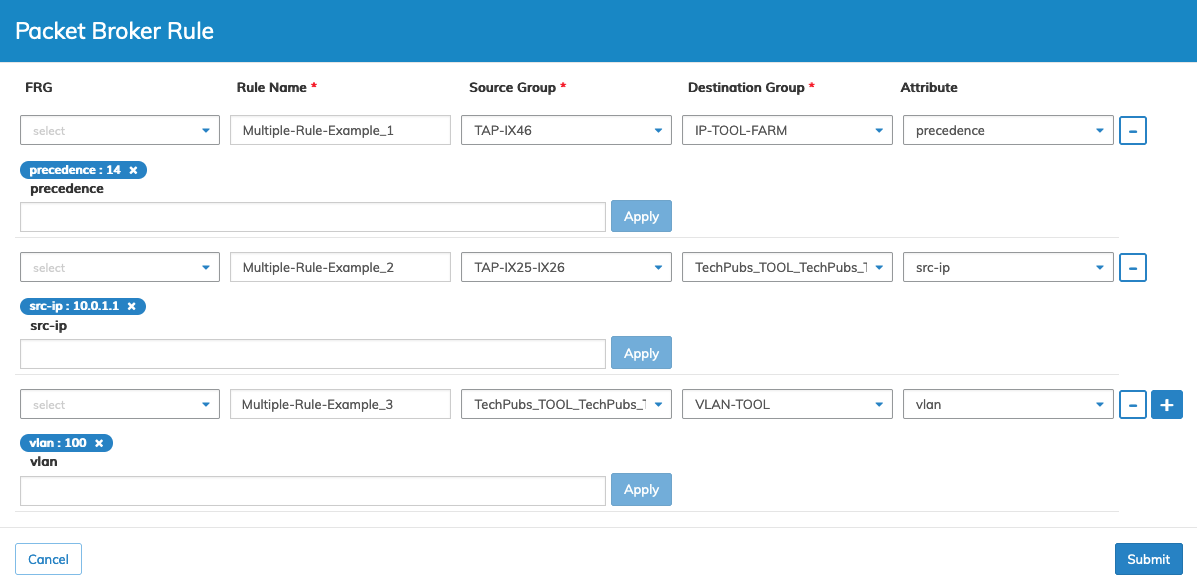
Enter the required parameters which include:
•Rule Name – Name of the rule.
•Source Group – Select the Source Group from the created Port Groups.
•Destination Group – Select the Destination Group from the created Port Groups.
•Attribute – Select the applicable field parameter.
•Value – Enter the value for the attribute.
Attributes
The Additional Fields drop-down selection box allows you to enter the following options:
•tos – ToS number for the vFlow.
•precedence – Traffic priority value between 2 and 15.
•src-ip – Source IP address for the vFlow.
•dst-ip – Destination IP address for the vFlow.
•src-mac – Source MAC address.
•dst-mac – Destination MAC address.
•dscp – 6-bit Differentiated Services Code Point (DSCP) for the vFlow with range 0 to 63.
•src-ip-mask – Source IP address wildcard mask for the vFlow.
•dst-ip-mask – Destination IP address wildcard mask for the vFlow.
•src-mac-mask – Source MAC address to use as a wildcard mask.
•dst-mac-mask – Destination MAC address to use as a wildcard mask.
•in-port – Incoming port for the vFlow.
•vlan – VLAN number for the vFlow.
•src-port – Source port.
•dst-port – Destination port.
•proto – Layer 3 protocol for the vFlow including: ip, icmp, igmp, tcp, udp, and icmpv6.
•ether-type – EtherType for the vFlow including: ipv4, arp, wake, rarp, vlan, ipv6 ,lacp, mpls-uni, mpls-multi, jumbo, dot1x, aoe, qinq, lldp, macsec, ecp, ptp, fcoe, fcoe-init, and qinq-old.
•setvlan – Changes the VLAN of a tagged packet.
•add-outer-vlan – Add a VLAN to the untagged packet and convert a single tagged packet to a double tagged packet.
•inner-vlan – Used to filter QinQ packets based on inner-vlan.
•tcp-flags – Used to filter traffic based on tcp flags such as: SYN, FIN, RST, PUSH, ACK, URG, ECE and CWR.
•vxlan – VXLAN number for the vFlow.
•set-dmac – Set the directional medium access control.
•loopbackport – Used only in conjunction with set-dmac.
•metadata – Metadata number for the vFlow. Supports the use of ICAP fields.
Enter the required parameters and click the ![]() icon to Add Field or Add Filter Attribute.
icon to Add Field or Add Filter Attribute.
Note: You must add the filter using the ![]() icon before clicking Submit.
icon before clicking Submit.
Multiple Packet Broker Rules
Add multiple PB rules are added by repeating the process adding more fields and rules.
UNUM Packet Broker Packet Broker Rule Example
Click Submit to continue or Cancel to return to the previous screen without making any changes.
The Packet Broker Rule adds to the dashboard and the Rules Enabled updates.
UNUM Packet Broker Rule Added to Dashboard Example
Packet Broker Dashboard Functions
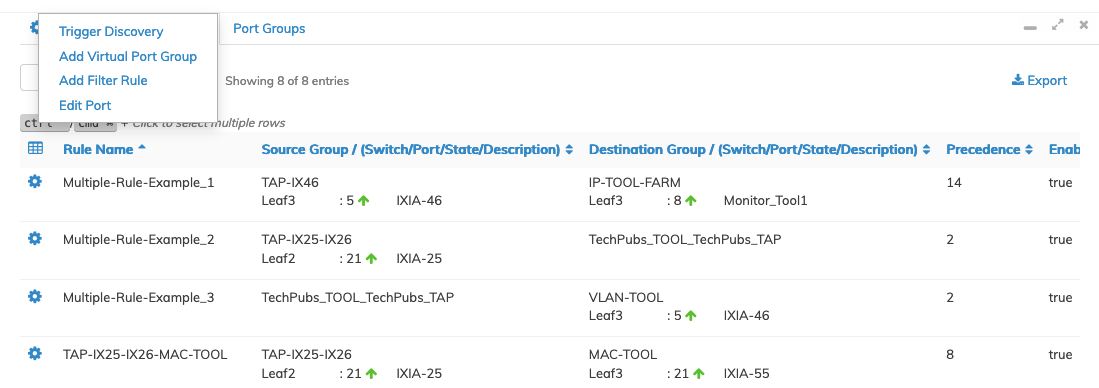
Select the Cog ![]() icon and the applicable function:
icon and the applicable function:
•Trigger Discovery – Trigger a Packet Broker discovery selecting Trigger Discovery.
•Add Virtual Port Group – Add a new Virtual Port Group.
•Add Filter Rule – Add a Filter rule.
•Edit Port – Edit a port in a vPG.
Each Rule Name entry displays a status arrow indicating the state of the connection, Up or Down, shown as ![]() or
or ![]() .
.
UNUM Packet Broker Dashboard Functions
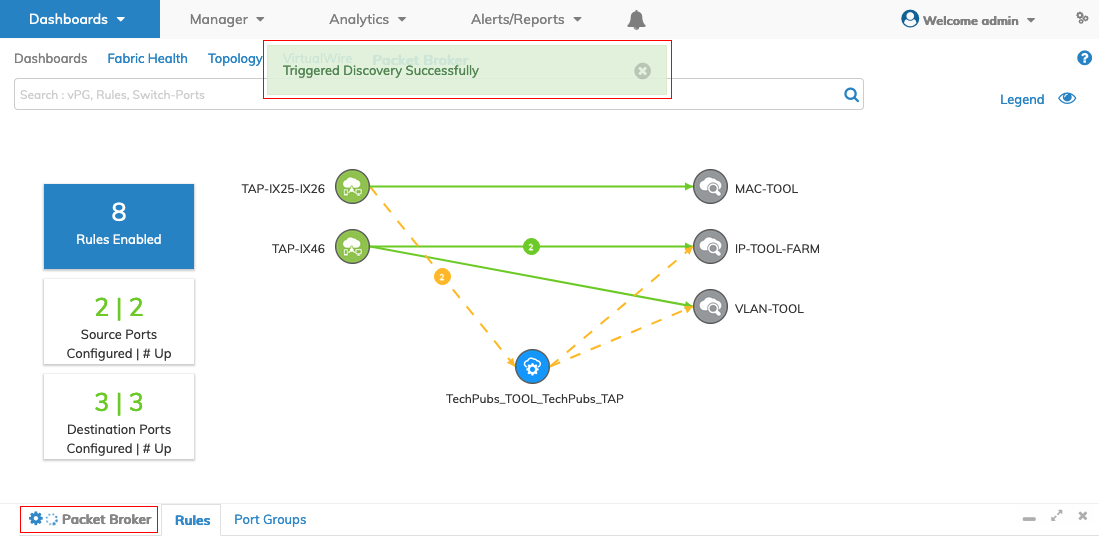
Trigger Discovery
Trigger a Packet Broker discovery selecting Trigger Discovery.
UNUM Packet Broker Dashboard Functions Trigger Discovery
Discovery Status Messages
Following a discovery process the Details dashboard displays a status message when rolling over the Packet Broker status icon.
Success Message

Dashboards Packet Broker - Packet Broker Discovered - Status Message - Success
Failure Message
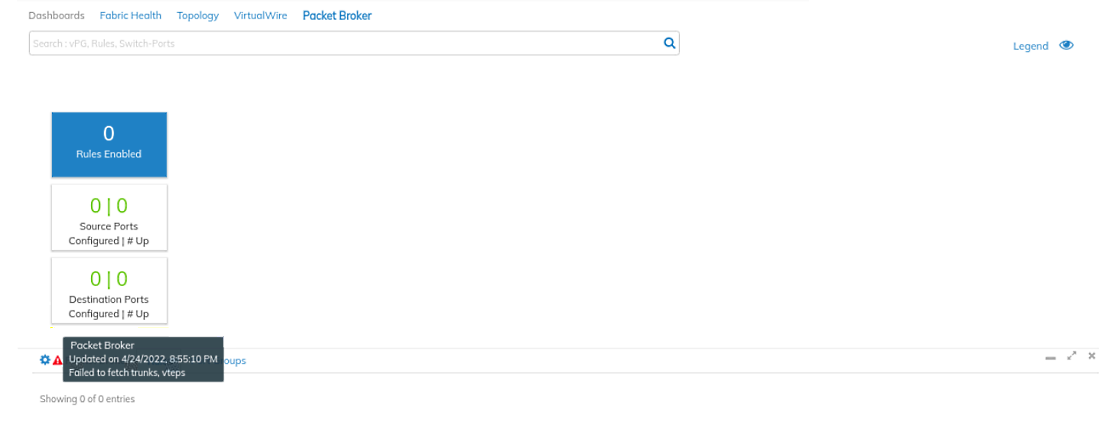
Dashboards Packet Broker - Packet Broker Discovered - Failure Message
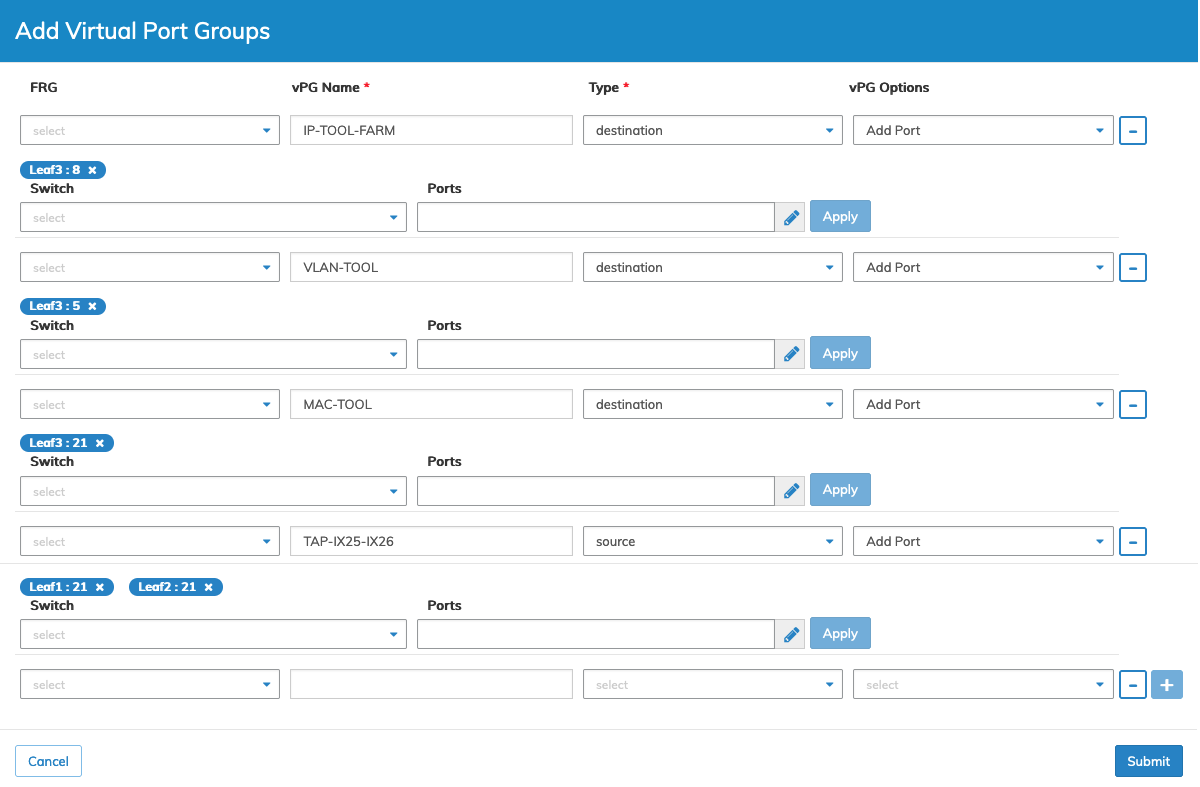
Add Virtual Port Group
Add a new Virtual Port Group selecting Add Virtual Port Group.
Enter the required parameters and click the ![]() icon to Add Port or Add vPG.
icon to Add Port or Add vPG.
Note: You must add the port or vPG using the ![]() icon before clicking Submit.
icon before clicking Submit.
Repeat the process to add more ports and vPGs each time clicking Apply. Verify the port settings appear in the configuration dashboard.
UNUM Packet Broker Dashboard Functions Add vPG
Click Submit to continue or Cancel to return to the previous screen without making any changes.
The Packet Broker dashboard updates with the new vPGs.
UNUM Packet Broker Dashboard Functions Added vPG Dashboard
You create a Filter Rule using by interactively selecting the schema icons.
UNUM Packet Broker Dashboard Functions Added vPG Dashboard
Enter the required parameters and then click the ![]() icon to Add Field or Add Filter.
icon to Add Field or Add Filter.
Note: You must add the filter using the ![]() icon before clicking Submit.
icon before clicking Submit.

UNUM Packet Broker Dashboard Functions Add vPG Filter
Repeat the process to add more fields and rules, as required.
Add Filter Rule
Create a Filter Rule by selecting Add Filter Rule.
Enter the required parameters which include:
•Rule Name – Name of the rule.
•Source Group – Select the Source Group.
•Destination Group – Select the Destination Group.
•Attribute – Select the applicable field parameter.
•Value – Enter the value for the additional field.
Enter the required parameters and then click the ![]() icon to Add Field or Add Filter.
icon to Add Field or Add Filter.
Note: You must add the filter using the ![]() icon and click Apply before clicking Submit.
icon and click Apply before clicking Submit.
Repeat the process to add more fields and rules.
Click Apply to add each filter. The filter must appear as a highlighted blue item otherwise it will not apply. Verify the filter settings appear in the configuration dashboard.
UNUM Packet Broker Add Packet Broker Rule
Click Submit to continue or Cancel to return to the previous screen without making any changes.
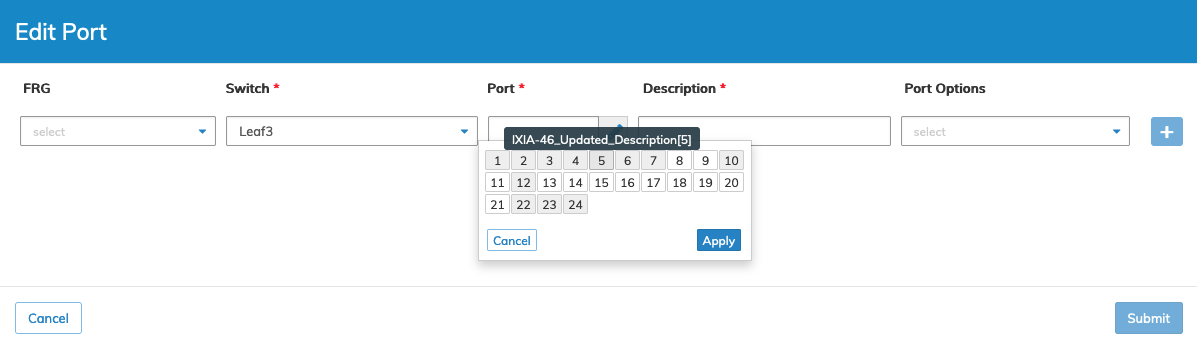
Edit Port
Using the Cog ![]() icon select Edit Port.
icon select Edit Port.
As shown in the following examples, entering a new description for the port and clicking submit updates the Packet Broker dashboard with the new port description.
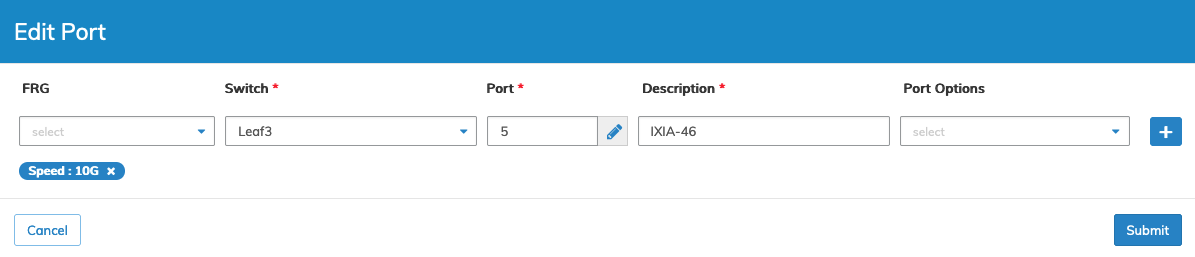
UNUM Packet Broker Edit Port - Original Port Description
Enter a new description.
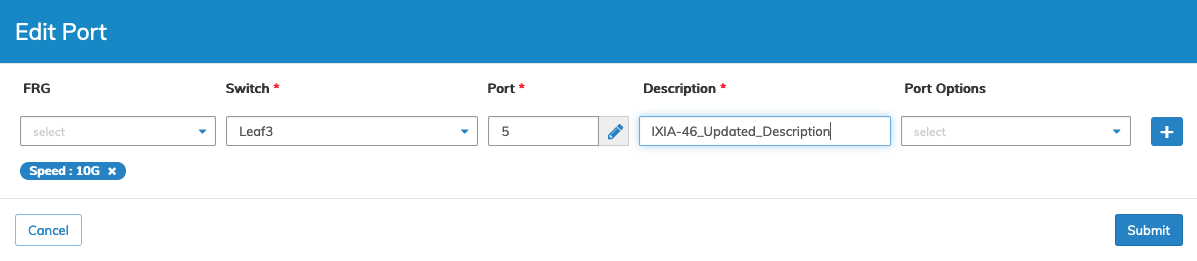
UNUM Packet Broker Edit Port - New Port Description
Click Submit to continue.
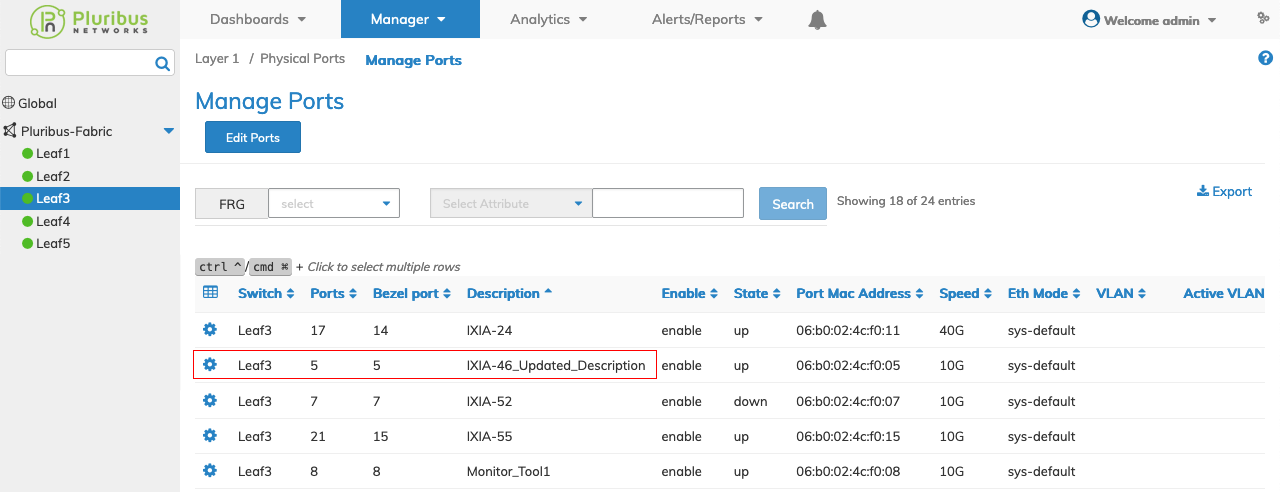
The Packet Broker dashboard updates with the new information.
UNUM Packet Broker Edit Port - Updated Packet Broker Dashboard
The port description appears in the port roll-over from now on until it is changed again.
UNUM Packet Broker Edit Port - Edit Port Updated Rollover Details
The port description details appear in the Manage Ports dashboard.
UNUM Packet Broker Edit Port - Manage Ports DEscription Details
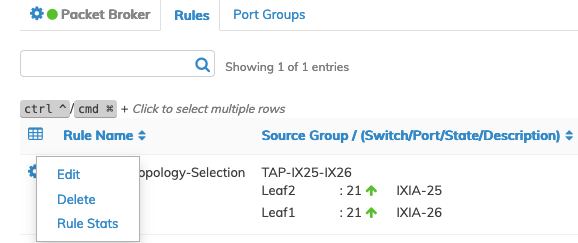
Rules Details Dashboard Functionality
Select the Cog ![]() icon and select the applicable function:
icon and select the applicable function:
•Edit – Modify a Packet Broker Rule.
•Delete – Delete a Packet Broker Rule.
•Rule Stats – Real time display of Rule Stats.
Each Rule Name entry displays a status arrow indicating the state of the connection, Up or Down, shown as ![]() or
or ![]() .
.
UNUM Packet Broker Rules Menu
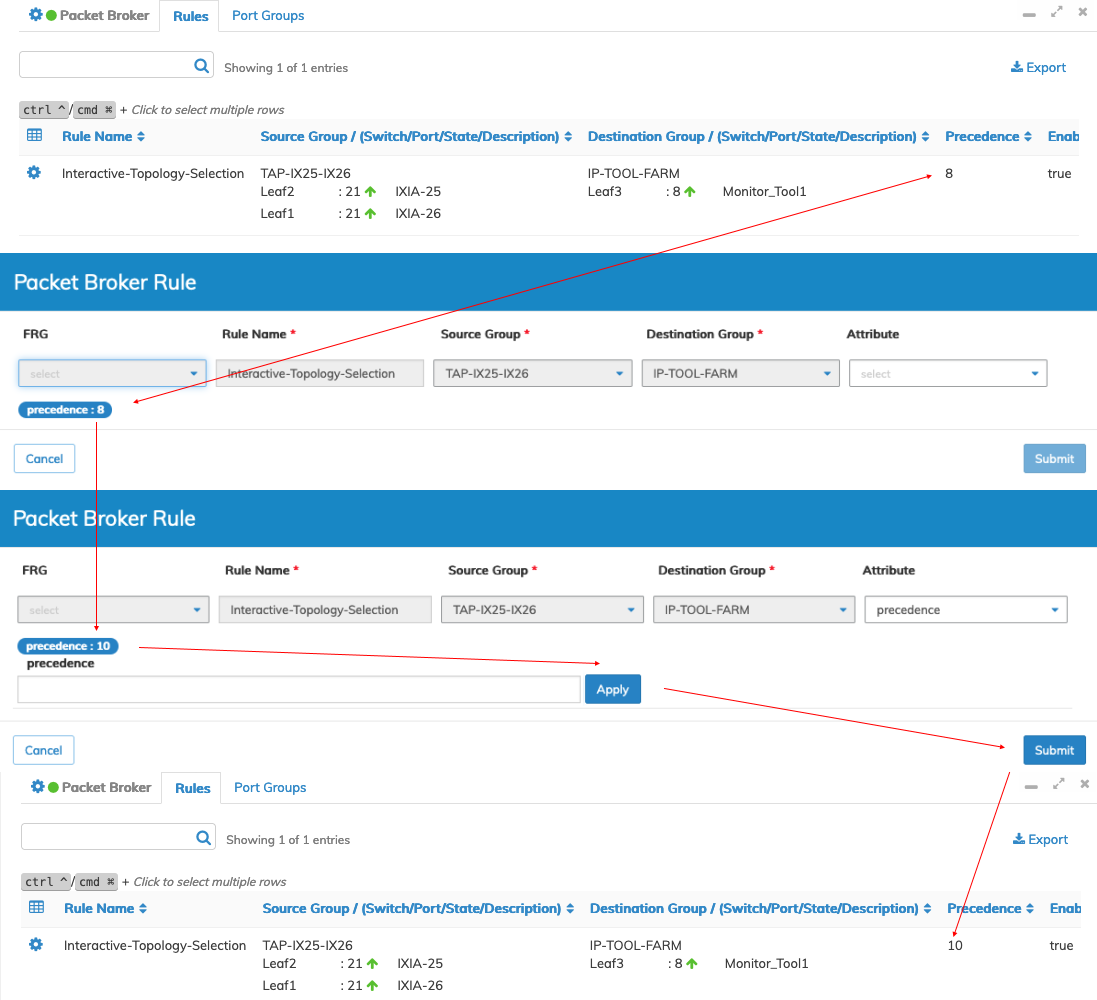
Edit Rule
Select Edit to modify a Packet Broker Rule.
Enter the updated parameters and then click Apply.
Note: You must update the values using Apply before clicking Submit.
UNUM Packet Broker Modify Packet Broker Rule Example
Click Submit to continue of Cancel to return to the previous screen.
The Packet Broker Rules dashboard updates with the changes.
UNUM Packet Broker Modify Packet Broker Rule Example
Rule Stats
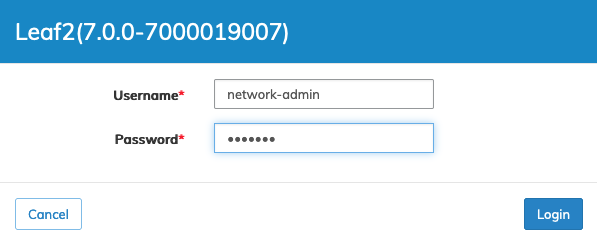
Select Rule Stats and select the applicable rule in the dashboard
Login to the switch.
UNUM Packet Broker Login
Click Login to continue of Close to return to the previous screen.
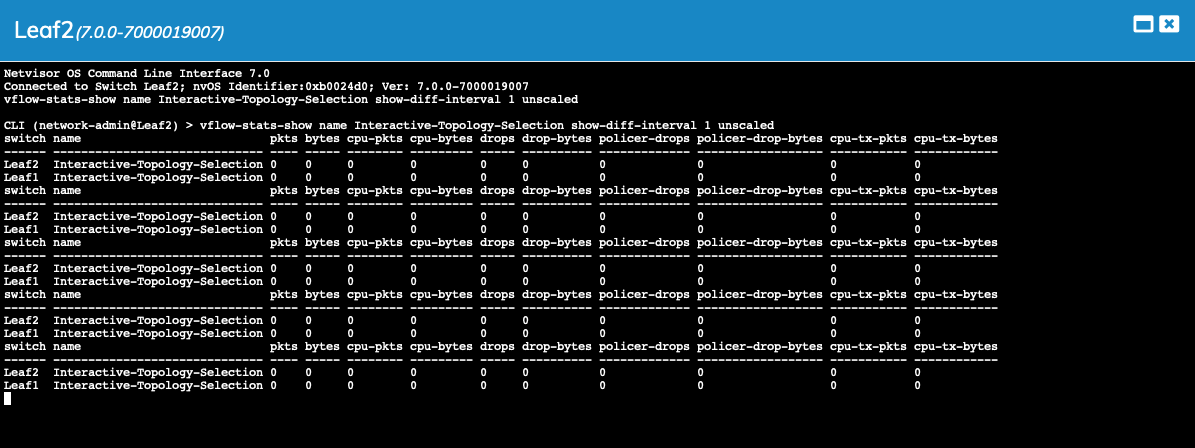
A real-time console session window displays the vflow-stats.
UNUM Packet Broker Switch vFlow Real Time Stats
Delete Rule
To delete a Packet Broker Rule select Delete.
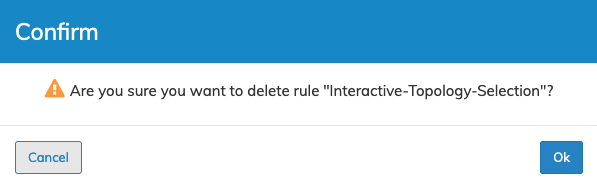
UNUM Packet Broker Delete Rule
Confirm the deletion by clicking OK. Click Cancel to return to the previous screen without making any changes.
The dashboard updates with the changes.
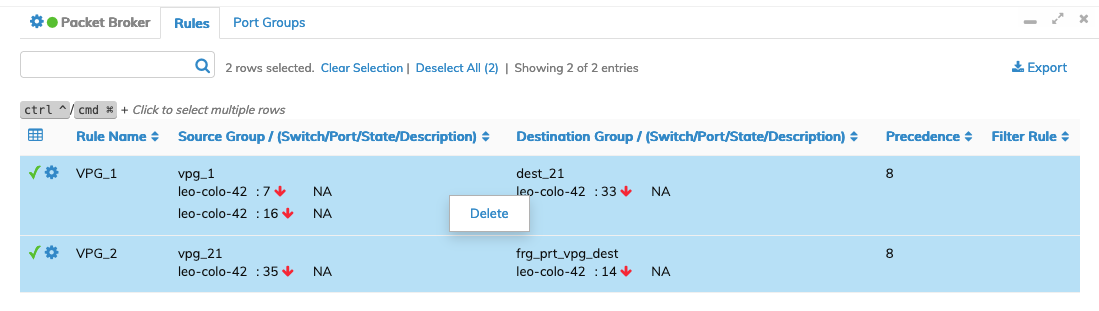
Bulk Delete Rules
Using the Packet Broker Rules Details pane, select each port group by holding CTRL / Command and click on a row or multiple rows to highlight the rule entries.
The dashboard displays the selected rules, the number of rows chosen, and the total number of entries.
Right click and select Delete.
UNUM Packet Broker Bulk Delete Rules
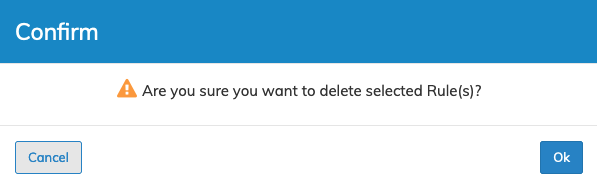
Confirm the deletion.
UNUM Packet Broker Bulk Delete Rules -Confirm
Click OK to continue or Cancel to return to the previous screen without making any changes.
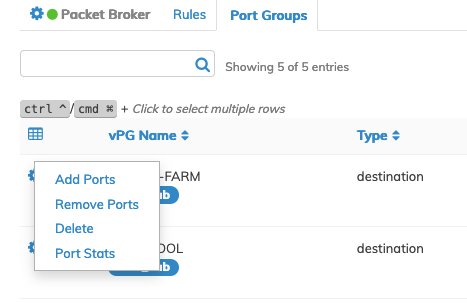
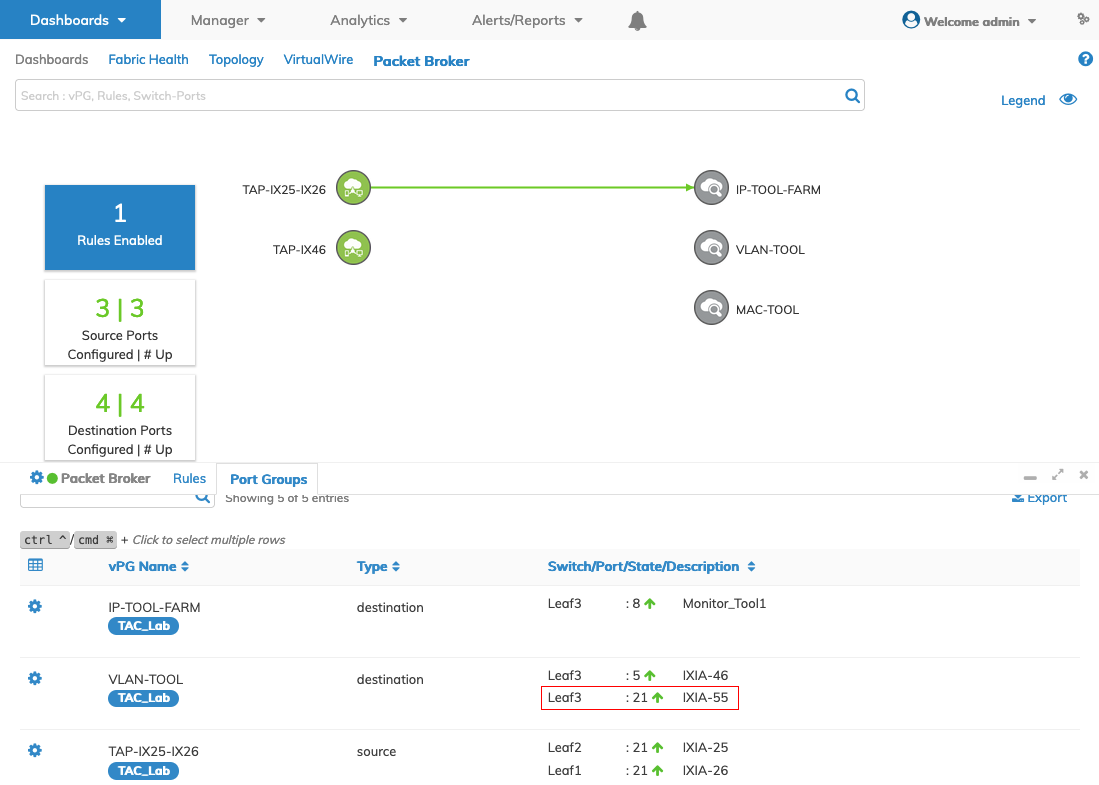
Port Groups Dashboard Functions
Select the Cog ![]() icon and select the applicable function:
icon and select the applicable function:
•Add Ports – Add ports to a Port Group.
•Remove Ports – Remove ports from a Port Group.
•Delete – Delete a group.
•Port Stats – Real time Tool Port statistics.
UNUM Packet Broker Port Groups Menu
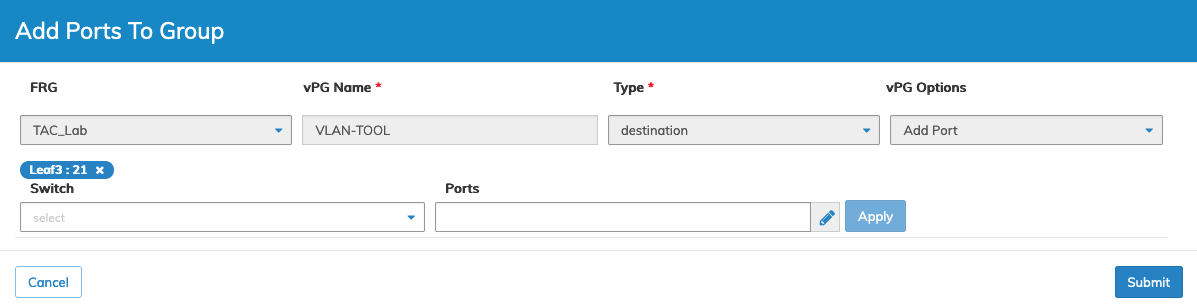
Add Ports to Port Groups
Select Add Ports to add additional ports to a service group.
The vPG Name is pre-populated, select the Type and vPG Options from the drop-down lists and select the Switch and Ports using the interactive port selector.
Enter the required parameters and then click Apply to add the port to the Service Group.
Note: You must click Apply before clicking Submit.
UNUM Packet Broker Port Groups - Add Ports To Group
Click Submit to continue of Cancel to return to the previous screen.
The added port appears in the dashboard.
UNUM Packet Broker Port Groups Ports Added to Dashboard
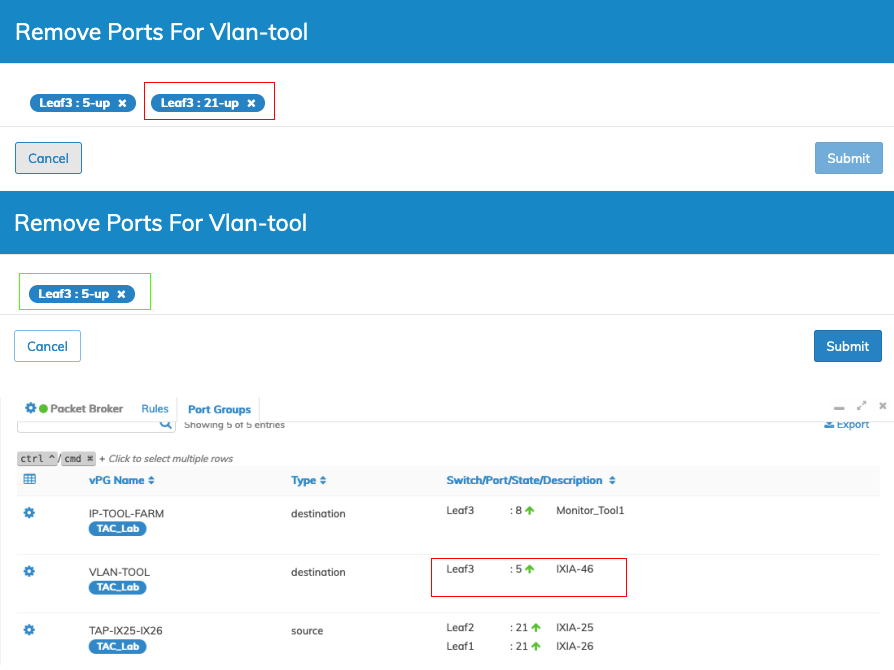
Remove Ports from a Port Group
Select Remove Ports from the menu and delete the applicable port. Click the respective entry using the ![]() to remove the port(s).
to remove the port(s).
UNUM Packet Broker Port Groups Ports Added to Dashboard
Click Submit to continue or Cancel to return to the previous screen without making any changes.
The dashboard updates with the new port data.
Note: In the example above, the port highlighted in red is designated for deletion. The untouched port(s) highlighted in green.
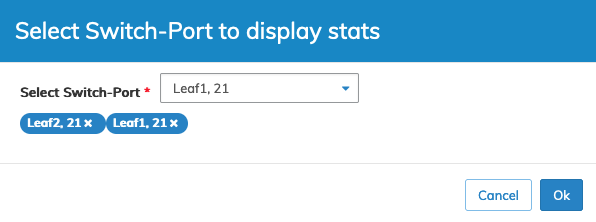
Port Stats
Select Port Stats and select the applicable Switch-Port from the drop-down list.
UNUM Packet Broker Switch Port Display Stats
Click OK to continue or Cancel to return to the previous screen.
Login to the switch.

UNUM Packet Broker Switch Port Login Screen
Click Login to continue of Close to return to the previous screen.
A real-time console session window displays the switch-port stats.
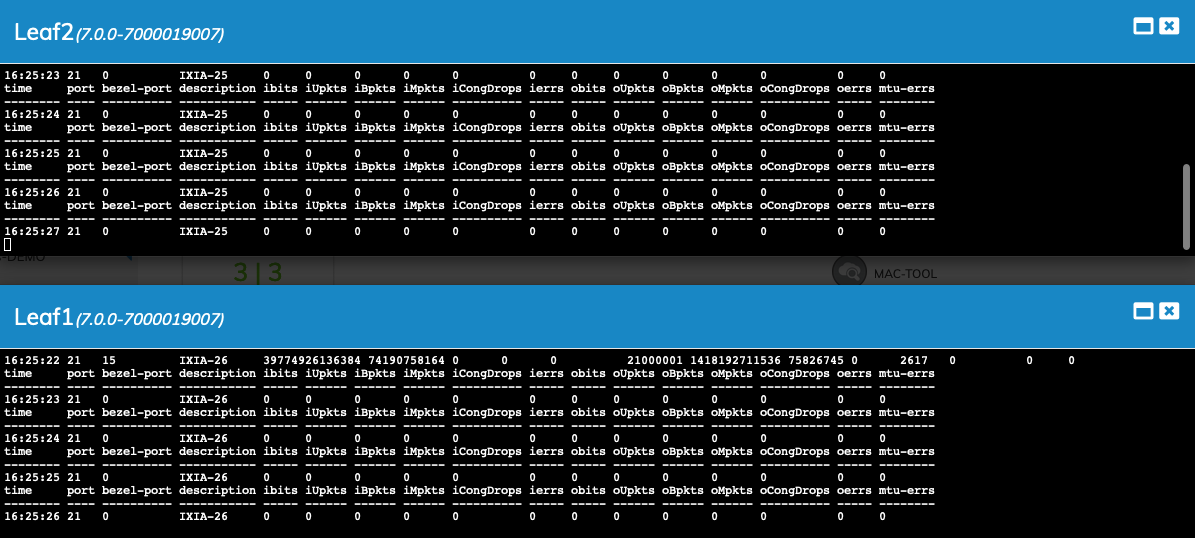
UNUM Packet Broker Switch Port Real Time Stats
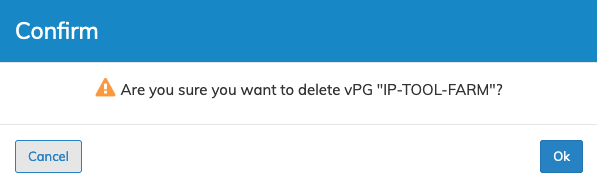
Delete a Port Group
Select Delete Group to delete a Port Group.
UNUM Packet Broker Delete Port Group
Click OK to continue or Cancel to return to the previous screen without making any changes.
Usage Note: You must first delete any rules associated with the Port Group before attempting to delete the Port Group; otherwise, you will receive an error message.
|
|
|
UNUM Packet Broker Delete Port Group Deletion Error Message |

Go to the Rules tab, select the rule associated with the Port Group, and Delete the rule.
Return to the Port Groups tab and select the Port Group associated initially with the rule.
After deleting the Port Group, a success message displays. The dashboard updates with the changes as illustrated below.
Bulk Delete Port Groups
Using the Packet Broker Details pane, select each port group by holding CTRL / Command and click on a row or multiple rows to highlight the port group entries as illustrated in the following examples.
The dashboard displays the selected Port Groups, the number of rows chosen, and the total number of entries.
UNUM Packet Broker - Bulk Delete - Select
Right click on select Delete.

UNUM Packet Broker - Bulk Delete - Confirm
You must first delete any rules associated with the Port Group before attempting to delete the Port Group; otherwise, you will receive an error message.
Multi-Tenancy Packet Broker
Virtual Port Groups can be grouped and assigned to Tenants. Each tenant is isolated and can independently manage Virtual Port Groups (vPG) and Rules.
In the following example, the TAC_Team UG is assigned privileges to the Packet Broker dashboard using Manage Groups.
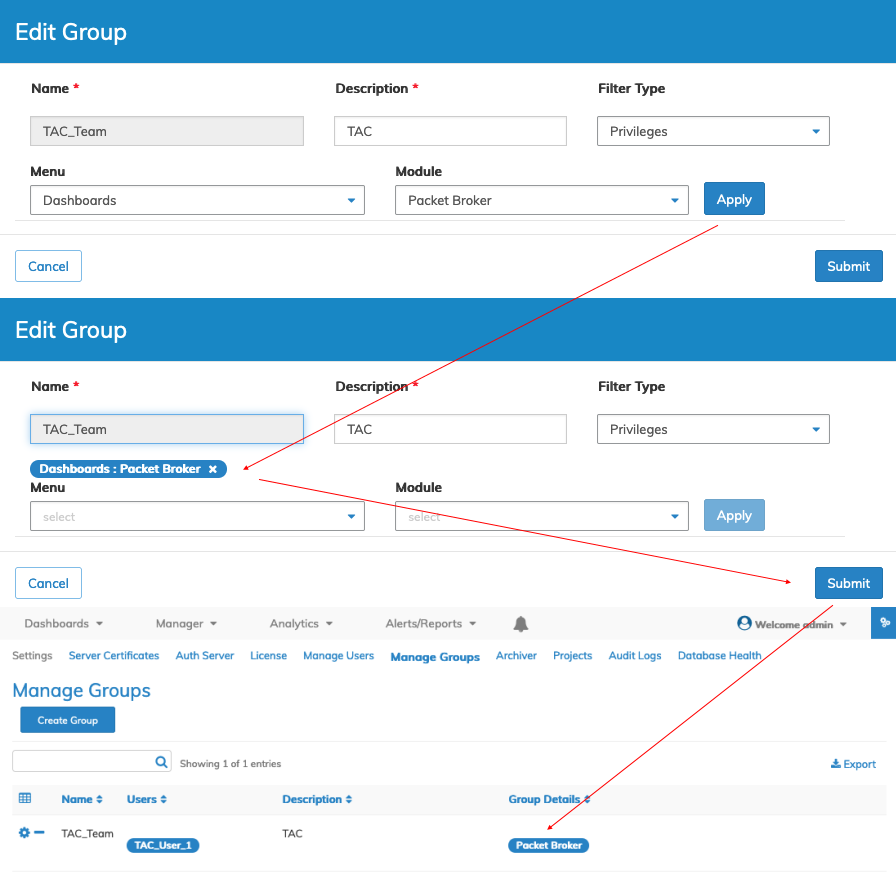
UNUM Packet Broker - Multi-Tenant - Group Assign- Dashboard
Use Manage Users to create and assign roles.
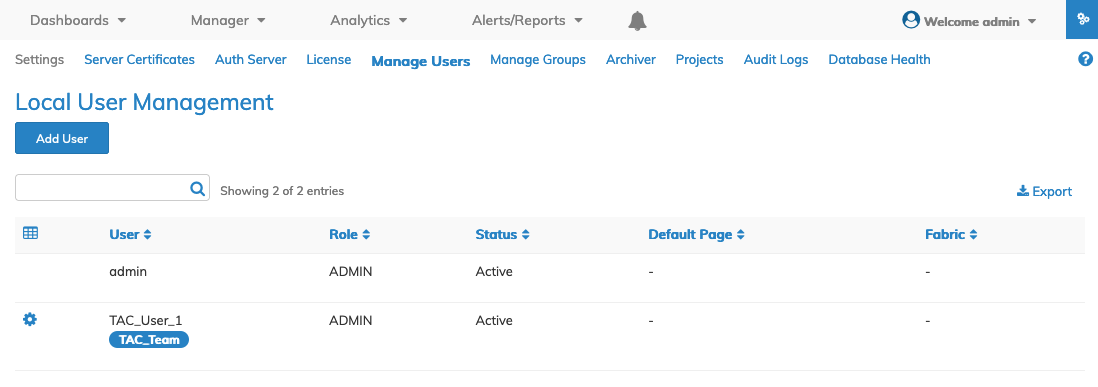
Packet Broker - User Role
Create the FRG and assign them to the UG.
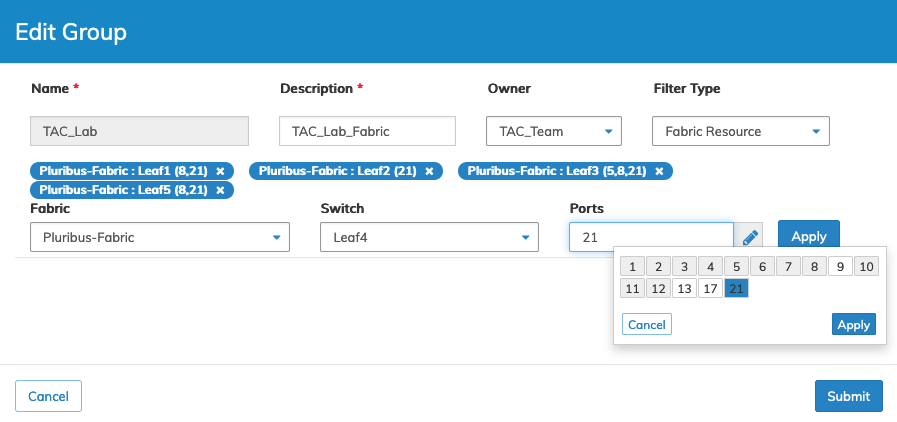
Packet Broker - Fabric Resource Group
Click Submit to continue.
The FRG appears on the dashboard.
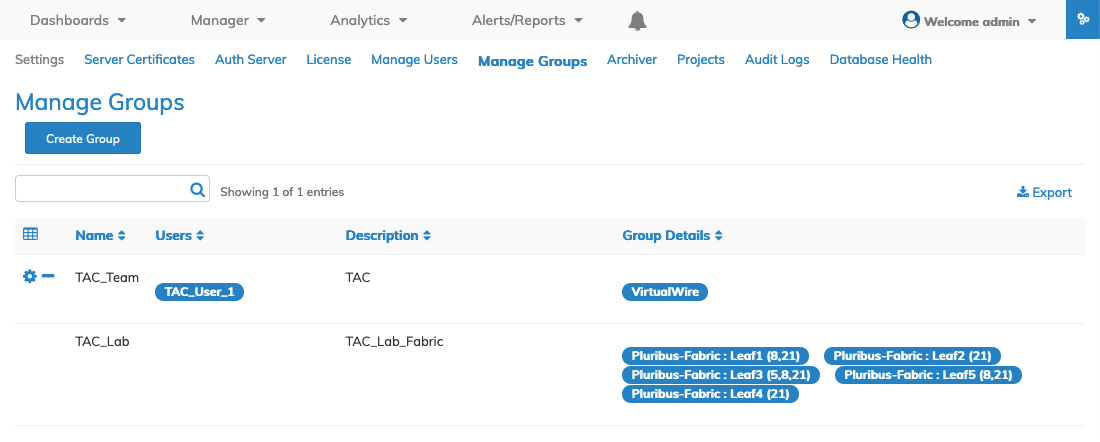
Packet Broker - Fabric Resource Group Manage Groups Dashboard
When TAC_User_1 logs in to UNUM, they are presented with their tenant dashboard limited to Packet Broker and the assigned Fabric and resources.
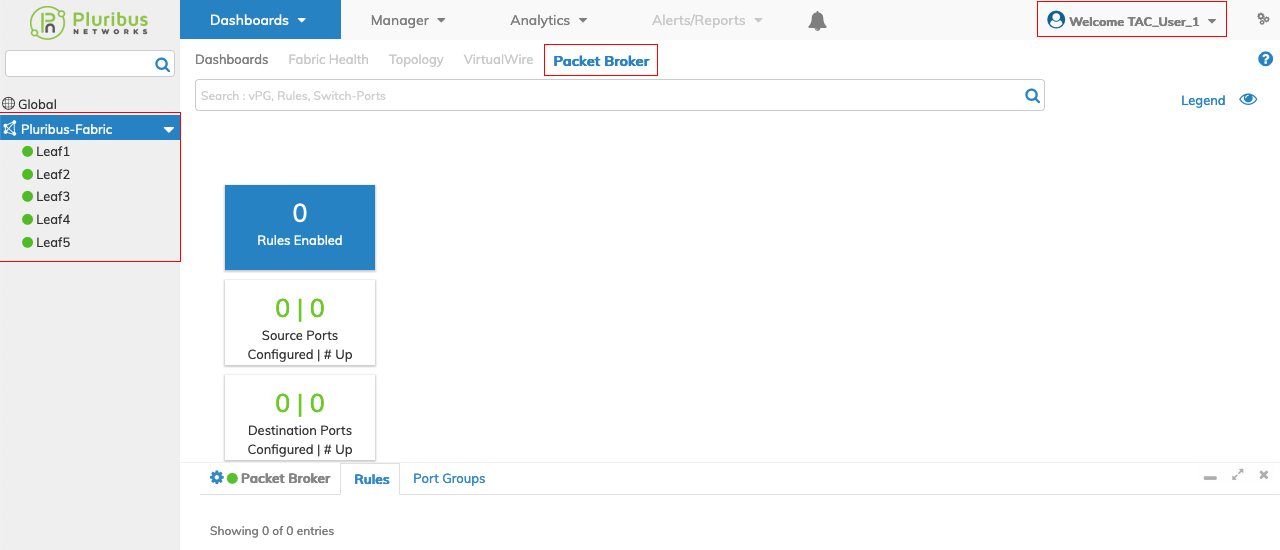
Packet Broker - UG Login
As illustrated below, the TAC_User_1 has access to all Packet Broker functions and can create Port Groups and Rules.
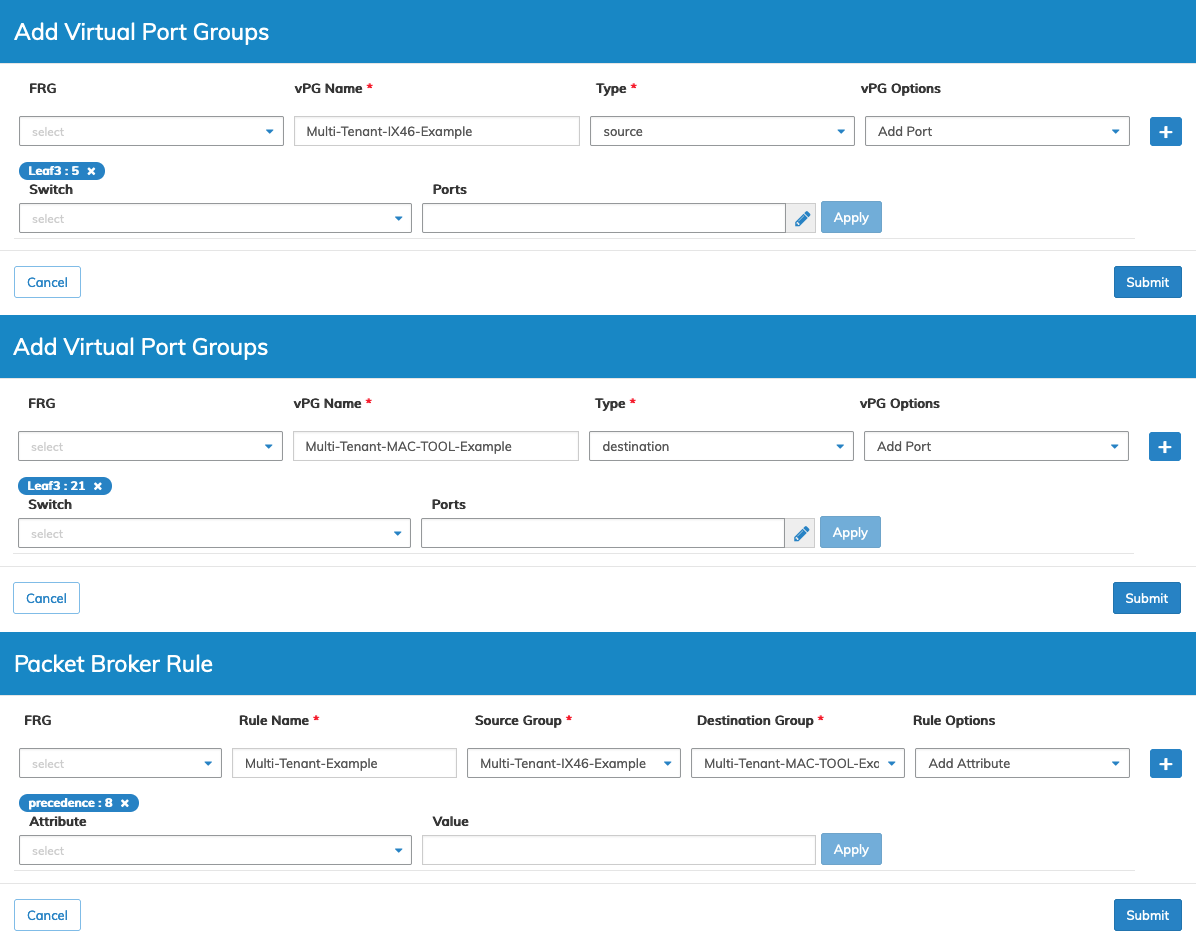
Packet Broker - UG Create Groups and Rules
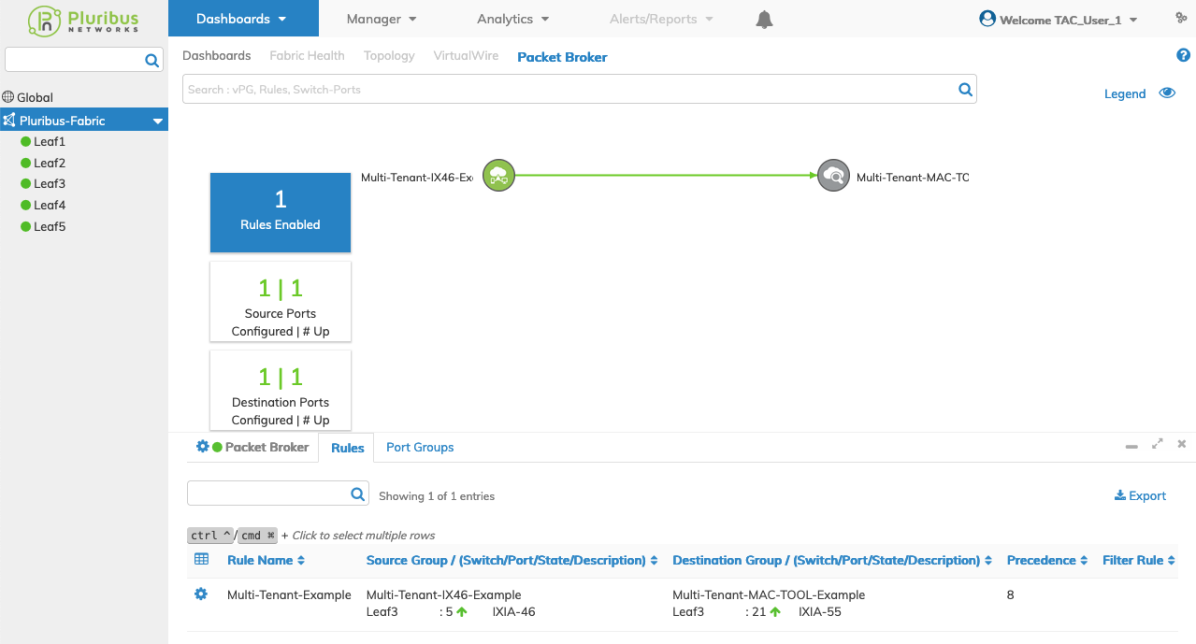
The vPGs and Rules appear in the Packet Broker dashboard.
Packet Broker - UG Dashboard with vPGs and Rules