
Micro-segmentation
Micro-segmentation
Caution: Micro-segmentation is an Early Field Trial (EFT) feature. EFTs are intended for test environments and are not supported for use in production networks. You should consult your local partner or Arista Networks account team before using any EFT feature or to provide feedback.
Note: NetVisor UNUM only supports the Micro-segmentation function on Fabrics containing Bluefield DPUs. NetVisor UNUM supports micro-segmentation on DPU platforms only when hardware offload is enabled. Micro-segmentation policies are implemented using special forwarding engine flow entries and configured using vFlow commands.
NetVisor UNUM Micro-segmentation on NVIDIA BlueField-2 DPUs
What is Micro-segmentation?
Emerging data centers and cloud security best practices promote the use of fine-grained security policies, which are a key component of zero-trust security strategies. NetVisor UNUM's micro-segmentation supports distributed granular security policies across the fabric on DPU-based server virtual ports (virtual function in PCIe parlance). This functionality is particularly beneficial in large server deployments with numerous virtual ports. It enables the network administrator to move security policies closer to the servers at the network's edge. Moreover, it supports the creation of logical groupings based on traditional network parameters and segmentation strategies, establishing group-to-group relationships, and configuring the corresponding communication policies.
Why Micro-segmentation?
Securing the network boundaries at the firewall level is often insufficient to implement granular security policies. Micro-segmentation can regulate if and how servers or applications in one network segment communicate with those in another network segment (the so-called "East-West" communication direction). This action may not be possible through a firewall; hence, pushing the security perimeter to the server (i.e., DPU) level is very convenient. Network segmentation depends on the IP addresses and ports of the devices. Micro-segmentation is thus a great way to create intelligent groupings of the workloads in your data center according to their characteristics. On the other hand, traditional/macro-segmentation solutions (like DMZ, physical network segments, etc.) cannot flexibly scale and effectively enforce security in a containerized/virtual environment, such as a Kubernetes cluster.
Using NetVisor UNUM Micro-segmentation
Note: Selecting Dashboards → Micro-segmentation displays information about a Fabric, assuming a fabric was created and added. For more information about creating and adding a Fabric, please refer to the ZTP - Zero Touch Provisioning section in this manual.
Depending on the configuration state of your NetVisor UNUM instance, the topology may display Micro-segmentation configurations if a Fabric and DPU Seed Switch have previously been configured.
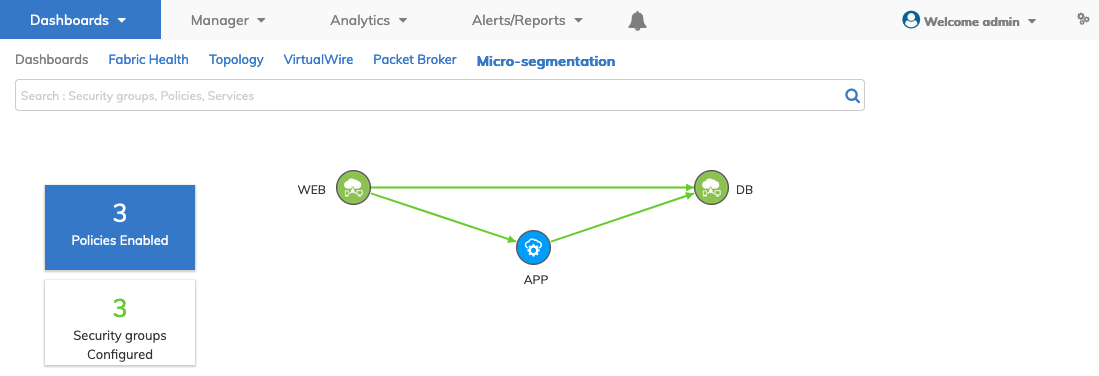
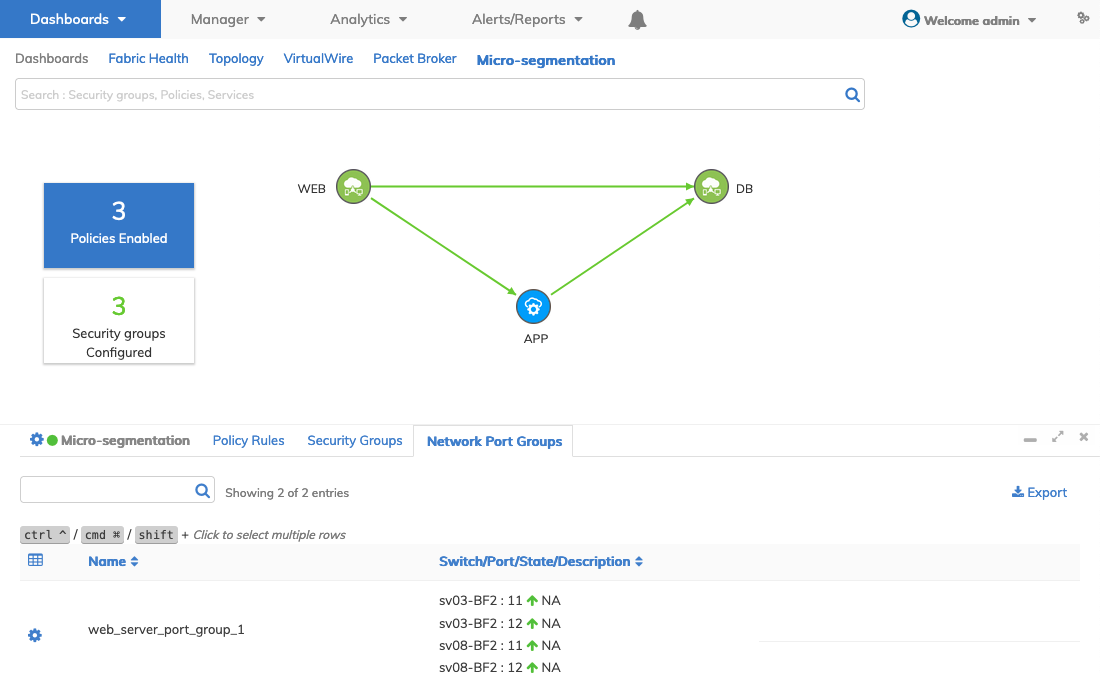
In the following example, UNUM NetVisor configured Micro-segmentation illustrating a typical three-tier system consisting of a presentation tier (WEB), an application tier (APP), and a database tier (DB). Security groups, network port groups, and policies are presented.
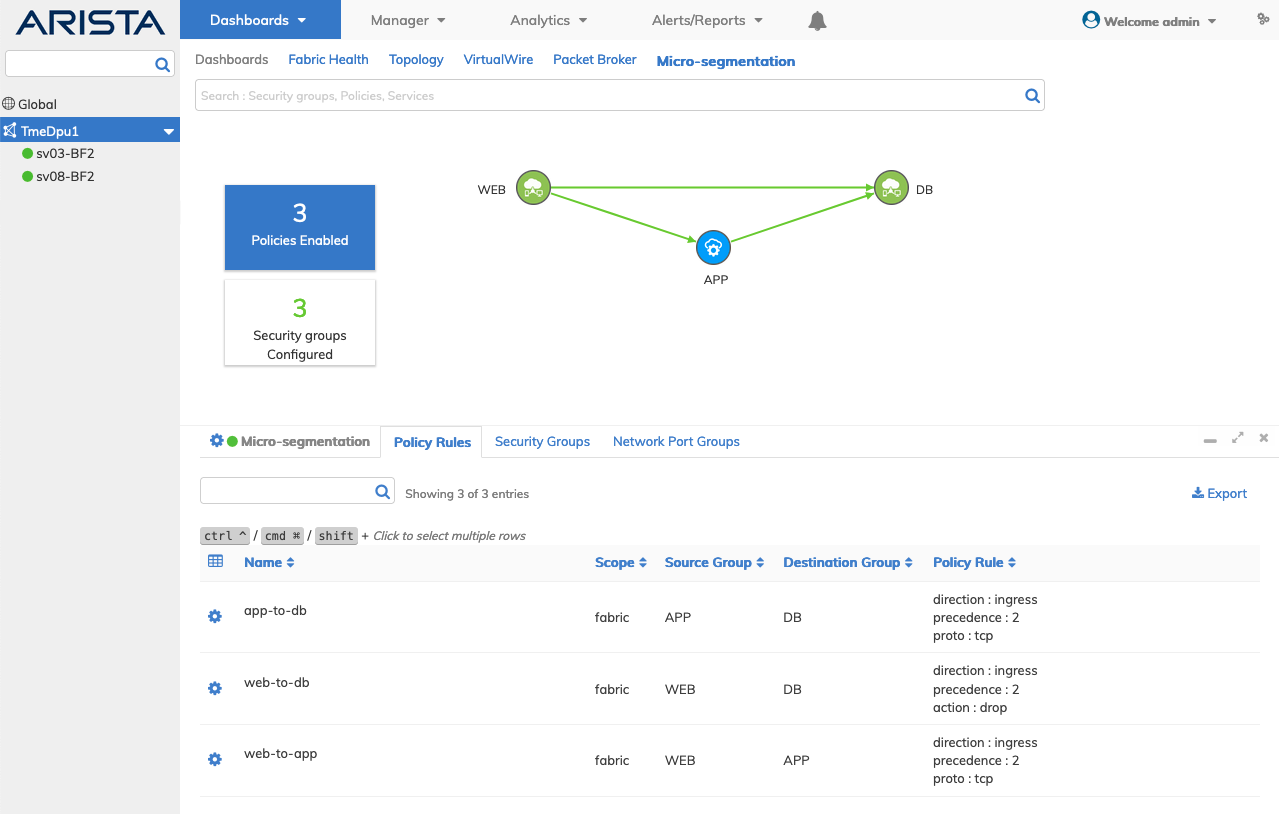
Dashboard - Micro-segmentation - Dashboard Example
Dashboard Status Buttons
•Policies Enabled – Displays the number of enabled policy rules.
Dashboard - Micro-segmentation - Dashboard Polices Enabled Button
•Security Group Configured – Displays the number of configured security groups.

Dashboard - Micro-segmentation - Dashboard Security Groups Configured Enabled Button
Topology Icons
|
|
Groups displayed in green are either a source or destination group. To create a new policy rule select a group icon. |
|
Dashboard - Micro-segmentation - Dashboard Group Icon - Source or Destination |
|
|
|
Groups displayed in blue are both a source and destination group.To create a new policy rule select a group icon. |
|
Dashboard - Micro-segmentation - Dashboard Group Icon - Source and Destination |
|
|
|
Policy rules displayed as green lines. Click on a connection line to filter and drill-down for more granular information. |
|
Dashboard - Micro-segmentation - Dashboard Connection Line - Policy Rule |
|
|
|
While holding the CTRL / Command key, click on a second group icon. The Create Policy Rule pop-up launches. |
|
Dashboard - Micro-segmentation - Dashboard Group Icons - Create Policy Rule |
|


Dashboard Tabs
Access menu items using the Cog ![]() icon
icon
•Micro-segmentation – The default display for micro-segmentation. Menu items include: Trigger Discovery, Create Network Port Groups, Create Security Groups, and Create Policy Rules.
•Policy Rules – Displays the policy rules in effect by Name, Scope, Source Group, Destination Group, and Policy Rule. Menu items include: Edit and Delete.
•Security Groups – Displays the security groups by Name, Scope, and Members. Menu items include: Add Member, Remove Member and Delete.
•Network Port Groups – Displays the network port groups by Name, Switch / Port / State / Description. Menu items include: Edit and Delete.
Trigger Fabric Discovery
To manually trigger a micro-segmentation discovery process select Trigger Fabric Discovery.
Network Port Grouping
Micro-segmentation security policies use a port group. It is a configuration entity that defines a globally scoped list of ports sharing common characteristics. Adding ports to a port group happens with a local scope because the addition is specific to the server/service/applications that is/are running locally. For example, an administrator can create global port groups based on specific services of interest: web, database, backup, etc. Then the administrator can locally add/remove member ports to/from the port groups according to each physical/virtual device’s function. Subsequently, security policies can be configured and applied depending on the dynamic port group membership.
VLAN Support with NPGs
Additionally, there exists a correspondence between network port groupings with VLAN IDs, as all ports that are part of a network port group are assigned a VLAN ID. Also, any modification to a network port group (such as port addition/removal, which is a local operation) propagates to all VLAN IDs with the same network port group configured.
Note: The association of VLANs with network port groups can be used independently of micro-segmentation policies as a helpful standalone functionality to define and manage port groupings.
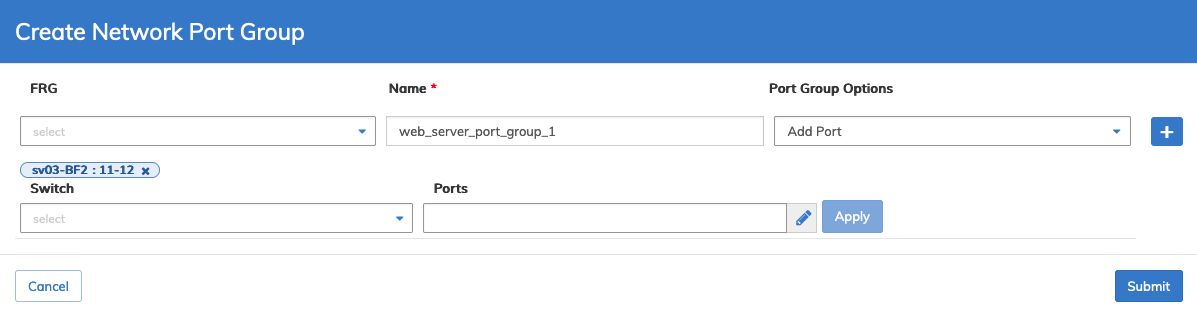
Create Network Port Groups
To create a network port group select Create Network Port Groups and enter the required parameters, FRG, Name, Port Group Options.
Click the ![]() icon to add more network port groups. Repeat until complete.
icon to add more network port groups. Repeat until complete.
Click Apply for each entry.
Dashboard - Micro-segmentation - Create Network Port Group
Click Submit to continue.
The dashboard displays the new entry.
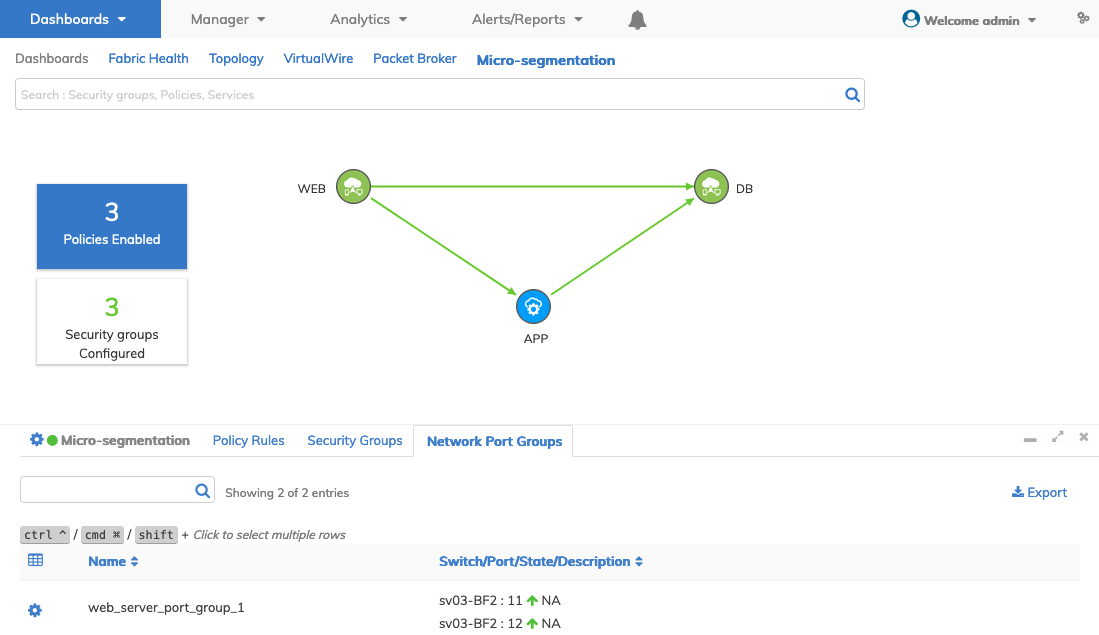
Dashboard - Micro-segmentation - Create Network Port Group - Updated Dashboard
Edit Network Port Group
Select Edit to modify a network port group and enter the required parameters, Switch and Ports.
Click Apply for each entry and repeat as required until complete.

Dashboard - Micro-segmentation - Edit Network Port Group
Click Submit to continue.
The dashboard displays the new entry.
Dashboard - Micro-segmentation - Edit Network Port Group - Updated Dashboard
Delete Network Port Group
Select Delete to remove a network port group and confirm the deletion.

Dashboard - Micro-segmentation - Delete Network Port Group
Click Confirm to continue or Cancel to return to the previous screen without making any changes.
Security Groups
The configuration of globally scoped security groups requires the network administrator to granularly group endpoints (based on shared characteristics and requirements) and to define and apply granular policies between the defined groups to control and secure the resources on the servers. Security groups can be configured based on port groups and on several parameters (such as addresses, VLAN IDs, VNIs, VRFs, etc.) that can make policies very granular. A key advantage of globally defined security policies is having a single point of configuration using NetVisor UNUM that also enables policy enforcement on ports distributed across multiple devices.
Configuring Security Groups
Security policies are configured through vFlow commands. You can create, delete, edit and view the security policies, which get automatically translated into flow entries used for hardware forwarding offload.
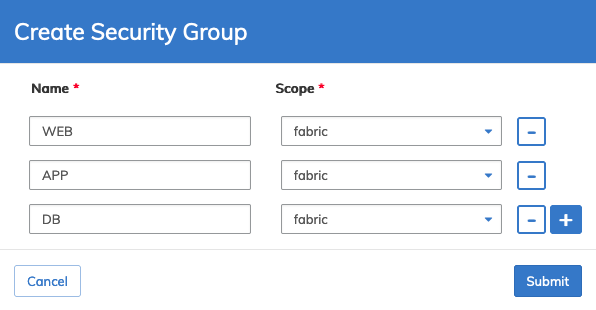
Create Security Groups
To create a security group select Create Security Groups and enter the required parameters Name and Scope.
Click the ![]() icon to add more security groups. Repeat until complete.
icon to add more security groups. Repeat until complete.
Dashboard - Micro-segmentation - Create Security Group
Click Submit to continue.
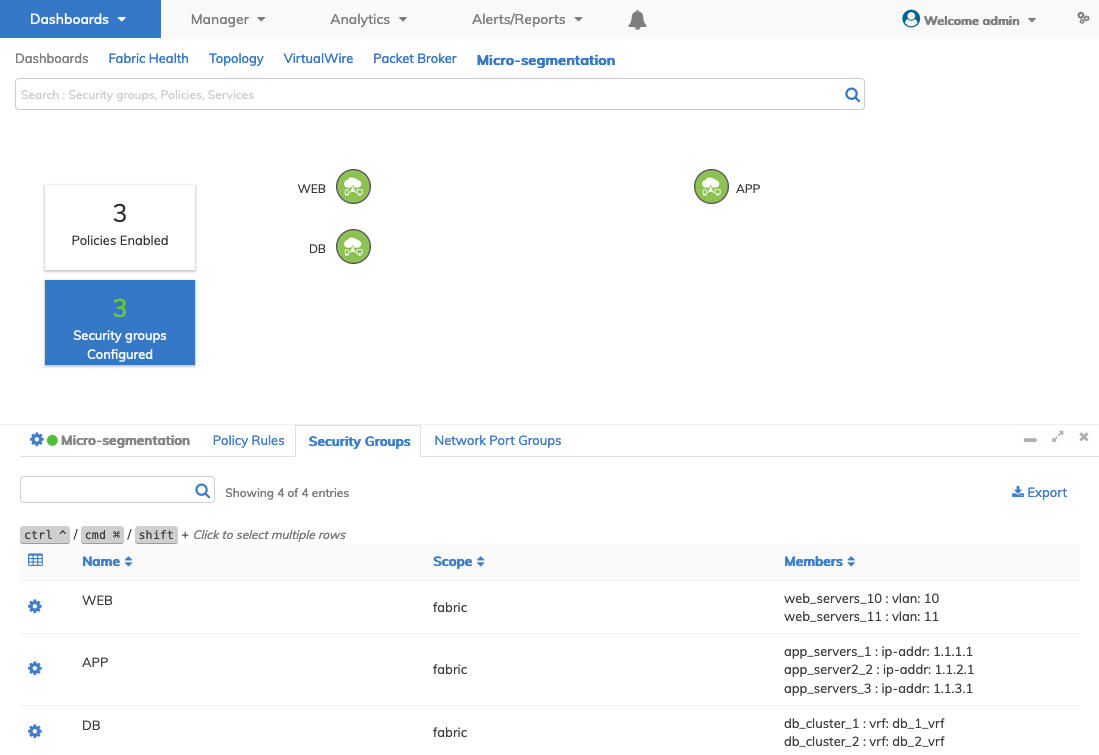
The dashboard displays the new entries.
Dashboard - Micro-segmentation - Security Groups Configured

Dashboard - Micro-segmentation - Security Group Updated Dashboard
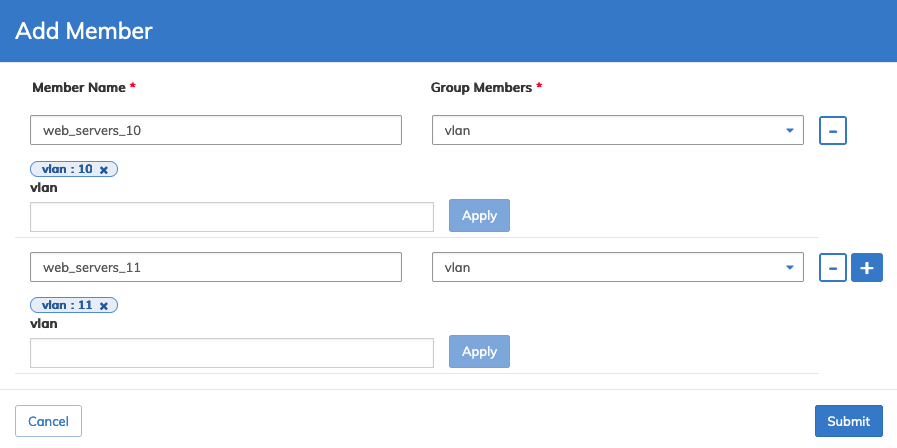
Add Member
Select Add Member to add members to a security group enter the required parameters for Member Name and Group Members from the drop-down list.
Click the ![]() icon to add more members.
icon to add more members.
Click Apply for each entry until complete.
Dashboard - Micro-segmentation - Security Group - Add Member
Click Submit to continue.
The dashboard updates with the new entries.
Dashboard - Micro-segmentation - Security Group - Add Member - Updated Dashboard
Remove Member
Select Remove Member to remove a member from a security group. Click an ![]() icon to remove a member.
icon to remove a member.

Dashboard - Micro-segmentation - Security Group - Remove Member
Click Submit to continue.
Delete Security Group
Select Delete to remove a security group and confirm the deletion.

Dashboard - Micro-segmentation - Security Group -Delete Security Group
Click Confirm to continue or Cancel to return to the previous screen without making any changes.
Policy Rules
Micro-segmentation policies use two key functionalities:
1)Endpoint identities (for example, based on IP/MAC/VLAN, etc.) and groupings.
2)Policy action definition (drop-list/allow-list).
With NetVisor OS, micro-segmentation policies are configured as vFlow rules with the added support for endpoint groupings:
•Source group
•Destination group
•Direction (ingress or egress)
In addition, NetVisor UNUM’s micro-segmentation uses the fabric’s control plane to automatically propagate distributed grouping and policy information to ease the configuration of policies, as described in the following section.
Note: For more information on the vFlow functionality, refer to the Configuring and Using vFlows chapter of the NetVisor OS Configuration Guide.
Create Policy Rules
To create a policy rule select Create Policy Rule and enter the required parameters Name, Scope, Source Group, Destination Group, Direction, and Attribute.
Attributes include:
•action – Select from the drop-down list: drop, none, copy-to-cpu, to-cpu, set-metadata, set-dscp, and trap.
•action-value – Enter an action value.
•tos – Enter a TOS value.
•precedence – Enter a precedence value.
•proto – Select from the drop-down list: ip, icmp, igmp, tcp, udp, icmpv6.
•ether-type – Select from the drop-down list: ipv4, arp, wake, rarp, vlan, ipv6, lacp, mpls-uni, mpls-multi, jumbo, dot1X, aoe, qinq, lldp, macsec, ecp, ptp, fcoe, fcoe-init, and qinq-old.
•tcp-flags – Select from the drop-down list: fin, syn, rst, push, ack, urg, ece, cwr.
•src-port – Enter a source port number.
•dst-port – Enter a destination port number.
Click the ![]() icon to add more policy rules. Repeat until complete.
icon to add more policy rules. Repeat until complete.
Click Apply for each entry until complete.

Dashboard - Micro-segmentation - Policy Rules - Create Policy Rule
Click Submit to continue.
The dashboard updates with the new entries.
Dashboard - Micro-segmentation - Policy Rules Dashboard
Edit Policy Rule
Select Edit to modify a policy rule and enter the required parameters Direction, and Attribute.
Click Apply for each entry and repeat as required until complete.
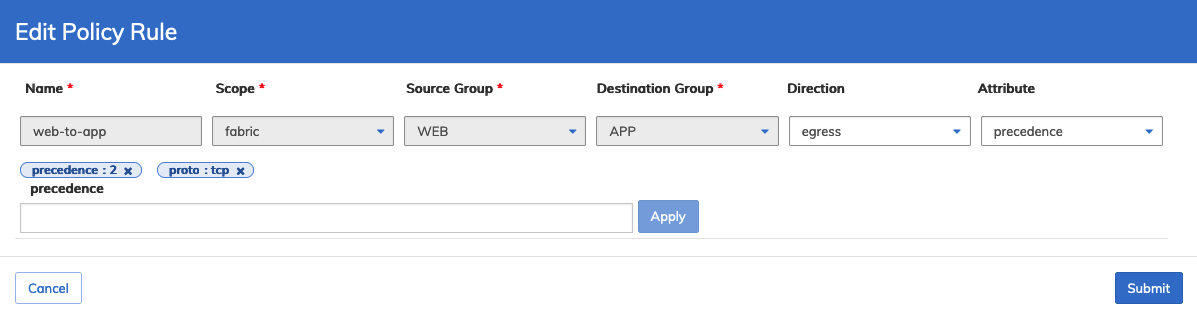
Dashboard - Micro-segmentation - Policy Rules - Edit Policy Rule
Click Submit to continue.
Delete Policy Rule
Select Delete to remove a policy rule and confirm the deletion.
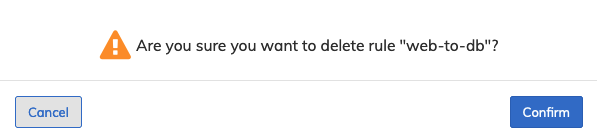
Dashboard - Micro-segmentation - Policy Rules -Delete Policy Rule
Click Confirm to continue or Cancel to return to the previous screen without making any changes.