
Settings
NetVisor UNUM Configuration Menu
There are features and functions used in Arista NetVisor UNUM and Insight Analytics that are common throughout the user interface (UI). Please refer to the Common Functions section for more information on the use of these functions and features.
The NetVisor UNUM Configuration Menu provides a convenient way to quickly setup the NetVisor UNUM Unified Management, Automation and Analytics Platform.
NetVisor UNUM Help Feature

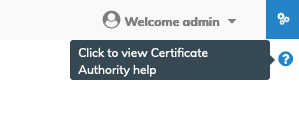
NetVisor UNUM Help Button
Rolling over the Help Button icon reveals the help page title.
Click on the Help Button icon to open the specific help file.
NetVisor UNUM Help Button Rollover
The help file page is displayed in a separate browser tab.
Note: The help page files may contain links to external resources. An Internet connection is required to access these external resources.
Settings
NetVisor UNUM Platform Settings Configuration Menu
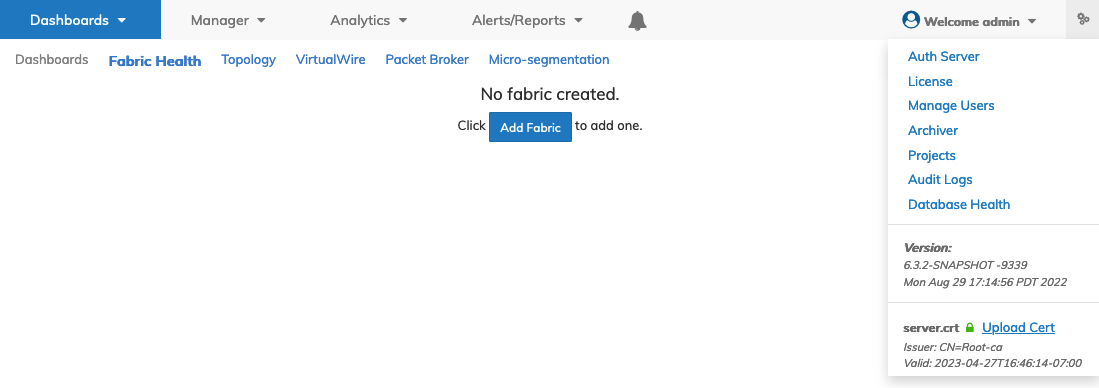
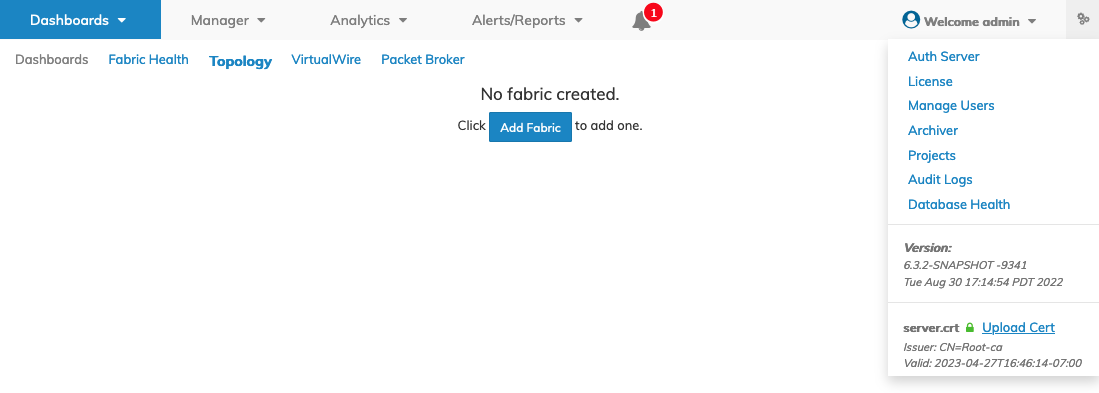
Selecting Menu Bar → ![]() launches the Settings and Configuration menu. Configuration items include:
launches the Settings and Configuration menu. Configuration items include:
•Auth Server – AD or LDAP Authentication Servers.
•License – NetVisor UNUM platform application licenses.
•Manage Users – User and Administrator accounts.
•Archiver – Archiver provides a convenient method of archiving NetVisor UNUM analytics and configuration data.
•Projects – Projects allows the creation of Virtualwire Device Under Test Lab Projects.
•Audit Logs – Review log data from switches
•Database Health – Information of overall NetVisor UNUM platform system health
By selecting on any of the configuration items you are taken directly to that dashboard.
Note: Upon the initial login and after a new OVA install of NetVisor UNUM, a visual notification alarm may be presented on the dashboard indicating no licenses have been activated.
Server Certificates
Selecting Menu Bar → ![]() → displays the Server Certificate name and status. Details about the server certificates running on NetVisor UNUM are presented to the administrator.
→ displays the Server Certificate name and status. Details about the server certificates running on NetVisor UNUM are presented to the administrator.
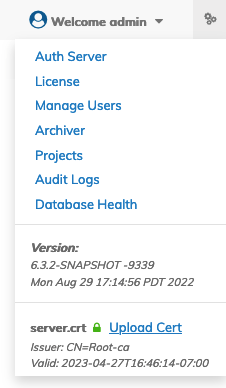
NetVisor UNUM Platform Settings Server Certificate Details
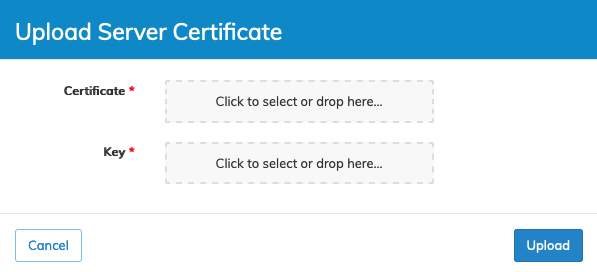
Upload Server Certificate
To add a Server Certificate, click the Upload Cert link.
The following warning message displays.
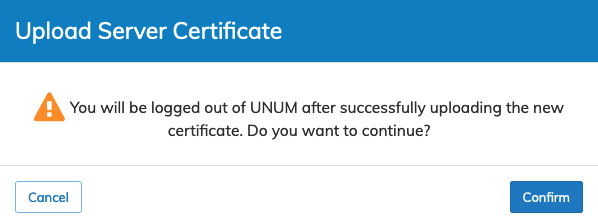
NetVisor UNUM Platform Upload Server Certificate Warning Message
To upload a Server Certificate, click Confirm or Cancel to return to the previous screen without making any changes.
The following interface launches.
NetVisor UNUM Platform Configuration Certificate Authority Upload Server Certificate
Drag and drop the certificate and key files in the appropriate areas and click Upload.
Click Cancel to return to the previous screen without making any changes.
NetVisor UNUM will log you out of the system and you must login to resume using NetVisor UNUM.
Replacing a Server Certificate
NetVisor UNUM deploys with a "self-signed" certificate to support HTTPS SSL connectivity.
Admins wishing to replace the NetVisor UNUM default self-sign certificate with a signed external Certificate Authority (CA) should use the following process:
•Create the CSR (Certificate Signing Request) and a Private Key.
•Submit the CSR to a CA Authority to generate the certificate or generate a self-signed certificate.
•Use NetVisor UNUM to upload the certificate and the private key.
The following example details the steps for creating the server.crt and server.key files using either an online CSR and key generator provider or OpenSSL command from your NetVisor UNUM instance.
Step One:
Generate the CSR and private key using either an online provider or OpenSSL.
Online provider - https://www.ssl.com/online-csr-and-key-generator/ - Complete the requisite information and download the CSR and private key.
OpenSSL - Login to your NetVisor UNUM instance and run the following command. Substitute your custom values for key and CSR names and complete the form per the OpenSSL instructions.
|
openssl req -new -nodes -keyout private.key -out unum.csr |
Step Two:
Submit the CSR to your CA signing authority to create the required .pem certificate file, for example, unumcert.pem, and download the new certificate.
Self-signing a certificate is an option. Follow the steps provided by your self-signing tool to generate the self-signed certificate. For example:
|
openssl req -newkey <key-algo>:<key-size> -x509 -<message-digest-algorithm> -days <no of days for which certificate is valid> -nodes -out <certificate-filename>.crt -keyout <private-key-filename>.key |
Caution: When self-signing a certificate, you will need to manually install the self-signed certificate on each machine running the browser which accesses NetVisor UNUM to avoid security warnings.
Step Three:
Upload the certificate and private key using the NetVisor UNUM per the instructions documented above.
Step Four:
Verify the certificate installation in the NetVisor UNUM Server Certificate dashboard.
Alternatively, using your local OpenSSL command, view the certificate details using the following command in the directory containing the certificate file:
|
openssl x509 -in unumcert.pem -text |
Note: To avoid browser access security errors messages a FQDN entry must exist for the NetVisor UNUM instance in your DNS server or local hosts file.
License Activation – Activate Licenses
To remove the visual alarm condition activate a license.
NetVisor UNUM Platform Configuration Visual Alarm