Cluster - Manage Cluster
Layer 2 Configuration – Clusters
There are features and functions used in Arista NetVisor UNUM and Insight Analytics that are common throughout the user interface (UI). Please refer to the Common Functions section for more information on the use of these functions and features.
Manage Cluster
Selecting Manager → Layer 2 → Manage Cluster displays the Manage Cluster dashboard with a list of any existing Cluster entries.
Select the applicable Fabric from the left-hand navigation bar and the dashboard updates showing all Cluster entries from all switches within the Fabric.
Note: If no entries exist a "No Data Exists" message is displayed. You must first configure an entry on a switch. Prerequisite settings and configuration may be required.

Manage Clusters Fabric Dashboard - No Data
Create New Cluster
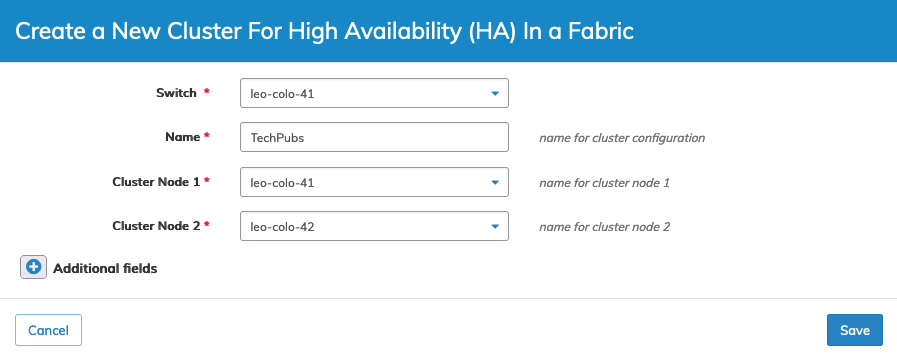
To create a new cluster click Create a New Cluster for High Availability (HA) in a Fabric and enter or select the cluster parameters which include:
•Switch – Select the switch from the drop down list.
•Name – Name for cluster configuration.
•Cluster Node 1 – Name for the first cluster node.
•Cluster Node 2 – Name for the second cluster node.
Additional field parameters are modified by clicking on the ![]() icon for Additional Fields.
icon for Additional Fields.
•VXLAN – VXLAN id for Cluster over Tunnel.
•Validate – Validate the cluster link (checkbox).
•Node1 Ip – Cluster node 1 IP address.
•Node2 Ip – Cluster node 2 IP address.
•Cluster Sync Timeout – Cluster sync timeout(ms).
•Cluster Sync Offline Count – Number of missed syncs after which cluster will go offline.

Manage Create a New Cluster
Click Save to continue or Cancel to return to the previous screen without saving any changes.
The dashboard displays a list of existing Cluster entries by Switch. Additional parameters include: Name, State, Cluster Node 1, Cluster Node 2, Tid, Mode, Ports, and Remote Ports.

Manage Clusters Fabric Dashboard
Select the applicable switch from the fabric and the dashboard updates automatically with Cluster settings.
The dashboard displays a list of existing Cluster entries. Parameters include: Switch, Name, State, Cluster Node 1, Cluster Node 2, Tid, Mode, Ports, and Remote Ports.

Manage Clusters Switch Dashboard
Modify a Cluster
Caution: When building a Fabric with NetVisor UNUM automation, clusters form in the fabric, and in general, they should be left alone.
To modify a Cluster click Edit by selecting the Cog ![]() icon. Update the parameters, as required, which include:
icon. Update the parameters, as required, which include:
•Cluster Sync Timeout – Cluster sync timeout(ms).
•Cluster Sync Offline Count – Number of missed syncs after which cluster will go offline.
•Enable – Enable or disable STP.
•Stp Mode – STP mode.
•Bpdus Bridge Ports – BPDU packets to bridge specific port.
•Bridge Id – STP bridge id.
•Bridge Priority – STP bridge priority Multiples of 4096 default 32768.
•Hello Time – STP hello time between 1 and 10 secs default 2.
•Forwarding Delay – STP forwarding delay between 4 and 30 secs default 15.
•Max Age – Maximum age time between 6 and 40 secs default 20.
•Mst Max Hops – Maximum hop count for mstp bpdu default 20.
•Mst Config Name – Name for MST Configuration Instance.
•Root Guard Wait Time – Root guard wait time between 0 and 300 secs default 20 0 to disable wait.
Additional field parameters are modified by clicking on the ![]() icon for Additional Fields.
icon for Additional Fields.
•VXLAN – VXLAN id for Cluster over Tunnel.
•Node1 Ip – Cluster node 1 IP address.
•Node2 Ip – Cluster node 2 IP address.
•MST Config Revision – MST Revision from 0 to 65535.
Click Save to continue or Cancel to return to the previous screen without saving any changes.
Delete a Cluster
To delete a Cluster click Delete by selecting the Cog ![]() icon. A confirmation message requires an acknowledgment to continue deletion.
icon. A confirmation message requires an acknowledgment to continue deletion.
Caution: When building a Fabric with NetVisor UNUM automation, clusters form in the fabric, and in general, they should be left alone.
Click OK to continue or Cancel to return to the previous screen without making any changes.

Manage Delete Cluster Confirmation
