
Configuring Network Packet Broker
Note: The Arista Network Packet Broker (NPB) solution is available on all Dell, Edgecore, and Freedom series platforms supported by Arista Networks.
An example of Arista Network Packet Broker topology is depicted in the figure below and will be used to illustrate the configuration steps:
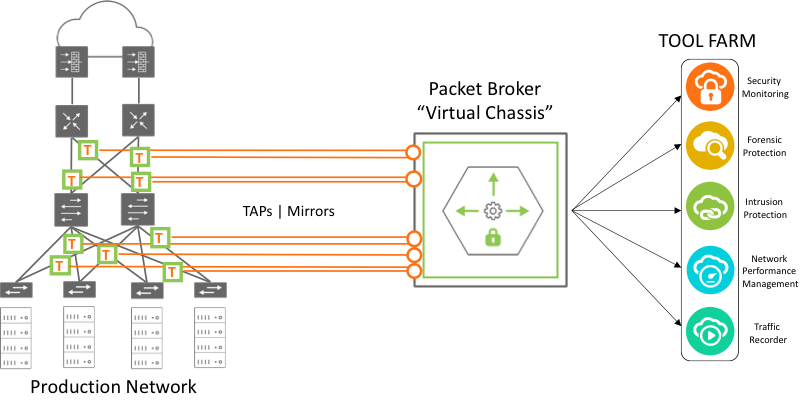
Figure 11-2: Network Packet Broker Architecture
The monitoring fabric can have any physical topology, including leaf/spine, ring, hub and spoke, mesh, and tree. NetVisor OS supports the virtual Port Group (vPG) CLI construct to define a set of ingress or source ports and of destination ports so that the hardware will flood the traffic that arrives at the source ports to (multiple) desired destination ports where the monitoring tools are connected. This type of vPG configuration is referred to as a unidirectional vPG topology (as the monitored traffic flows in one direction only).
Refer to the Configuring Virtual Port Group section of the Configuring Advanced Layer 2 Transport Services chapter.
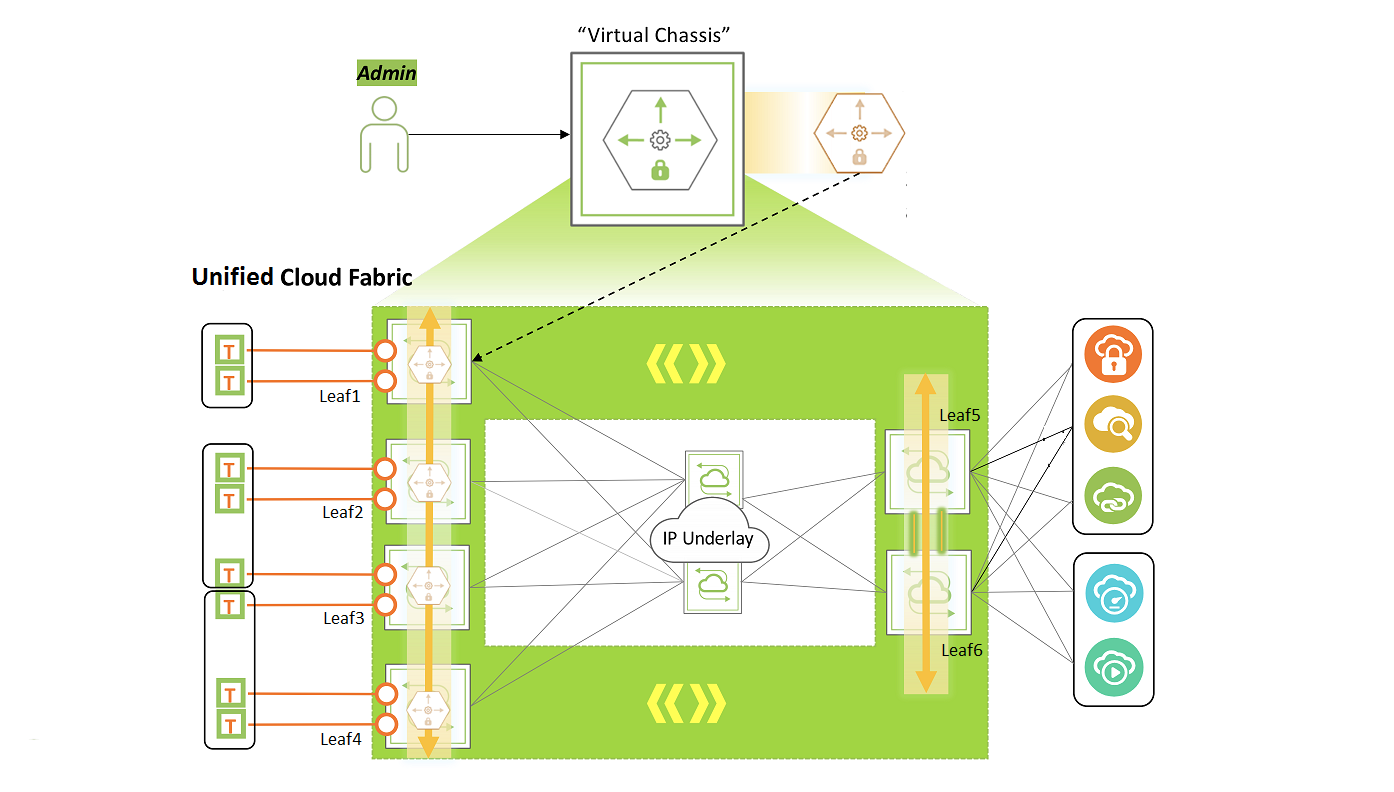
Figure 11-3: Monitoring Fabric Topology
Consider, for example, a monitoring fabric with a leaf-spine topology as shown above in Figure 11-3. Network taps copy traffic from the production network to the source ports or trunks on Leaf1, Leaf2, Leaf3, and Leaf4. These ports constitute the source vPGs: TAP-GROUP-1, TAP-GROUP-2, and TAP-GROUP3. The switches Leaf5 and Leaf6 form a cluster. The monitoring tools are connected to ports on Leaf5 and Leaf6 which constitute the destination vPGs: TOOL-GROUP-1 and TOOL-GROUP-2.
This section describes the steps to configure source and destination vPGs and to create a forwarding policy.
Before creating the vPGs, you must configure a VXLAN underlay network and VTEPs for the overlay. For details, refer to the sections, Configuring the VXLAN Underlay Network and Configuring VTEP Objects with Automatic Fabric Connections
Also, to deploy the Packet Broker fabric that spreads across geographical locations, you must create a Fabric over Layer 3 configuration. For details, refer to the section, Configuring a Fabric over a Layer 3 Network
Follow the steps below to configure the port groups and to send traffic from a source port group to a destination port group:
1. Configuring Source vPGs
Create vPGs for the source ports of the monitoring fabric, by using the command vpg-create.
CLI (network-admin@switch1) > vpg-create
|
vpg-create |
Creates a virtual Port Group (vPG) |
|
vnet vnet-name |
Specify the name of the vNET that you want to associate with this vPG. |
|
name name-string |
Specify the name of the vPG. |
|
type source|destination|bidirectional |
Specify the type of the vPG as source, destination, or bidirectional. |
|
ports port-list |
Specify the ports assigned to this vPG. |
|
port-desc port-desc-string |
Specify a previously configured port description to add the ports with that description to the vPG. |
|
monitor-ports port-list |
Specify the monitoring ports for destination or bidirectional vPGs. |
Below is an example configuration as per Figure 11-3.
CLI (network-admin@Leaf1) > vpg-create name TAP-GROUP-1 type source
CLI (network-admin@Leaf1) > vpg-create name TAP-GROUP-2 type source
CLI (network-admin@Leaf1) > vpg-create name TAP-GROUP-3 type source
Add the source ports to the vPGs by using the vpg-port-add command:
CLI (network-admin@Leaf1) > vpg-port-add
|
vpg-port-add |
Adds ports to a vPG. |
|
vpg-name name-string |
Specify a name for this vPG. |
|
ports port-list |
Specify the source ports for this vPG. |
|
port-desc port-desc-string |
Specify a previously configured port description to add the ports with that description to the vPG. |
The switches Leaf1, Leaf2, and Leaf3 form trunks (Link Aggregation Groups) with network taps, with trunk IDs 273, 274, and 275 as shown in Figure 11-3.
CLI (network-admin@Leaf1) > vpg-port-add vpg-name TAP-GROUP-1 ports 273
CLI (network-admin@Leaf1) > switch Leaf2 vpg-port-add vpg-name TAP-GROUP-2 ports 274
CLI (network-admin@Leaf1) > switch Leaf3 vpg-port-add vpg-name TAP-GROUP-2 ports 22
CLI (network-admin@Leaf1) > switch Leaf3 vpg-port-add vpg-name TAP-GROUP-3 ports 25
CLI (network-admin@Leaf1) > switch Leaf4 vpg-port-add vpg-name TAP-GROUP-3 ports 275
Note: The source vPG can include ports from all the nodes in the fabric. However, this port group can only include at most one port or trunk from each node.
To view the vPG configuration, use the command vpg-show.
CLI (network-admin@Leaf1) > vpg-show
|
vpg-show |
Displays vPG configuration details. |
|
scope |
The scope of the vPG. |
|
vnet vnet-name |
vNET name associated with this vPG. |
|
name name-string |
The name of the vPG. |
|
type source|destination|bidirectional |
The vPG type that was configured. |
|
ports port-list |
The ports assigned to this vPG. |
|
port-desc port-desc-string |
The port description. |
|
vni 0..16777215 |
The VNI or VXLAN identifier for auto BD configuration. |
|
vlan 0..4095 |
The VLAN identifier for auto BD configuration. |
|
monitor-ports monitor-ports-list |
The list of monitoring ports. |
CLI (network-admin@leaf1) > vpg-show
switch scope name type ports vni vlan
------ ------ ----------- ------ ----- --- ----
Leaf1 fabric TAP-GROUP-3 source none 0 0
Leaf2 fabric TAP-GROUP-3 source 25 0 0
Leaf3 fabric TAP-GROUP-3 source 275 0 0
Leaf4 fabric TAP-GROUP-3 source none 0 0
Leaf5 fabric TAP-GROUP-3 source none 0 0
Leaf6 fabric TAP-GROUP-3 source none 0 0
Leaf1 fabric TAP-GROUP-2 source none 0 0
Leaf2 fabric TAP-GROUP-2 source 274 0 0
Leaf3 fabric TAP-GROUP-2 source 22 0 0
Leaf4 fabric TAP-GROUP-2 source none 0 0
Leaf5 fabric TAP-GROUP-2 source none 0 0
Leaf6 fabric TAP-GROUP-2 source none 0 0
Leaf1 fabric TAP-GROUP-1 source 273 0 0
Leaf2 fabric TAP-GROUP-1 source none 0 0
Leaf3 fabric TAP-GROUP-1 source none 0 0
Leaf4 fabric TAP-GROUP-1 source none 0 0
Leaf5 fabric TAP-GROUP-1 source none 0 0
Leaf6 fabric TAP-GROUP-1 source none 0 0
2. Configuring Destination vPGs
Create destination tool groups by using the following commands:
CLI (network-admin@Leaf1) > switch Leaf5 vpg-create name TOOL-GROUP-1 type destination
CLI (network-admin@Leaf1) > switch Leaf5 vpg-create name TOOL-GROUP-2 type destination
Note: For destination vPG creation to be successful, you must add at least one port to the vxlan-loopback-trunk on all the nodes of the NPB fabric, including spine switches. For more details, refer to 'Configuring the VXLAN Loopback Trunk' topic of the 'Configuring VXLAN' chapter.
Add the ports connected to the monitoring tools into the tool groups by using the command vpg-port-add:
For example:
CLI (network-admin@Leaf1) > switch Leaf5 vpg-port-add vpg-name TOOL-GROUP-1 ports 22,34,45
CLI (network-admin@Leaf1) > switch Leaf6 vpg-port-add vpg-name TOOL-GROUP-1 ports 47,50
CLI (network-admin@Leaf1) > switch Leaf5 vpg-port-add vpg-name TOOL-GROUP-2 ports 17,32
CLI (network-admin@Leaf1) > switch Leaf6 vpg-port-add vpg-name TOOL-GROUP-2 ports 48,55
Note: Starting from NetVisor OS version 7.0.0, you can add the same port to multiple destination vPGs. This enhancement allows tool ports to receive partially overlapping traffic. For more information, see 'Use cases for Network Packet Broker' topic.
The vpg-port-add commands automatically create bridge domains for TOOL-GROUP1 and TOOL-GROUP-2. These bridge domains flood the arriving traffic to the ports in the respective tool groups.
Use the vpg-show command to view the configuration:
CLI (network-admin@leaf1) > vpg-show type destination
switch scope name type ports vni vlan
------ ------ ------------ ----------- ----- -------- ----
Leaf1 fabric TOOL-GROUP-2 destination none 12666666 2833
Leaf2 fabric TOOL-GROUP-2 destination none 12666666 2833
Leaf3 fabric TOOL-GROUP-2 destination none 12666666 2833
Leaf4 fabric TOOL-GROUP-2 destination none 12666666 2833
Leaf5 fabric TOOL-GROUP-2 destination 17,32 12666666 2833
Leaf6 fabric TOOL-GROUP-2 destination 48,55 12666666 2833
Leaf1 fabric TOOL-GROUP-1 destination none 12000000 2500
Leaf2 fabric TOOL-GROUP-1 destination none 12000000 2500
Leaf3 fabric TOOL-GROUP-1 destination none 12000000 2500
Leaf4 fabric TOOL-GROUP-1 destination none 12000000 2500
Leaf5 fabric TOOL-GROUP-1 destination 22,34,45 12000000 2500
Leaf6 fabric TOOL-GROUP-1 destination 47,70 12000000 2500
Note: NetVisor OS auto-generates a VNI and reserved VLAN ID for the destination vPGs.
3. Configuring the vFlow Policy
As the final step of the configuration, create a vFlow to forward traffic from the desired source port group to a destination port group. For example, use the following command to send traffic from TAP-GROUP-1 to TOOL-GROUP-2 with protocol transparency enabled:
CLI (network-admin@Leaf1) > vflow-create name TAP1-TOOL2 scope fabric src-vpg TAP-GROUP-1 dst-vpg TOOL-GROUP-2 transparency enable
This configuration floods the ingress traffic matching the vFlow to all the ports in TOOL-GROUP-2 over the VXLAN tunnel.
The above configuration also sends control plane traffic from source to destination as protocol transparency is enabled. In the absence of protocol transparency, the control plane traffic that originates from a switch is generally processed or dropped by the next hop switch. With protocol transparency, the traffic belonging to various Layer 2, Layer 3, and Layer 4 protocols can be sent to switches located anywhere within the fabric. These control plane protocols include:
- Layer 2: LLDP, STP, LACP, and VLAN
- Layer 3: IPv4 and IPv6
- Layer 4: TCP, UDP, and ICMP
- Layer 4 ports: HTTP, DNS, and DHCP
When you enable protocol transparency, NetVisor OS automatically configures additional vFlows to ensure that the control traffic reaches the destination vPG. This auto-configuration is necessary as system vFlows generally consume the protocol traffic and therefore, there must be pathways for the control traffic to bypass system vFlows. To display the vFlow configuration, use the vflow-show command:
CLI (network-admin@Leaf1) > vflow-show format all layout vertical
name: TAP1-TOOL2
id: b0022cd:1a9
scope: fabric
type: vflow
hidden: false
in-port: 275
burst-size: auto
precedence: 3
action-set-svp-value: 0x80000006
log-stats: no
stats-interval: 60
hw-stats: enabled
src-vpg: TAP-GROUP-1
dst-vpg: TOOL-GROUP-2
transparency: enable
enable: enable
table-name: System-VCAP-table-1-0
name: npb-system-bypass-proto
id: b0022cd:1a8
scope: fabric
type: vflow
precedence: 15
action: none
metadata: 1000
hw-stats: enabled
enable: enable
table-name: System-L1-L4-Tun-1-0
Note: The auto-configured vFlow, npb-system-bypass-proto having a high precedence of 15 bypasses system vFlow treatment for packets at the ingress side.
CLI (network-admin@Leaf6) > vflow-show format all layout vertical
name: npb-tunnel-decap-b0022cd:1a9-1
id: b0022cf:16e
scope: local
type: vflow
precedence: 15
action: none
vxlan: 12666668
from-tunnel-decap: yes
hw-stats: enabled
enable: enable
table-name: System-L1-L4-Tun-1-0
The auto-configured vFlow on the destination switch bypasses system vFlow treatment for the decapsulated packets at the egress end of tunnels.
Note: The running configuration for the vflow-create command has parameters such as in-port. However, while configuring a vFlow, you should not configure these parameters as these fields are auto-populated.
Additional CLI Commands
1. vpg-delete
Use this command to delete a vPG. You cannot delete a vPG that is associated with a vFlow. In such cases, you must delete the vFlow before you delete the vPG.
CLI (network-admin@Leaf1) > vpg-delete
|
vpg-delete |
Deletes a vPG. |
|
name name-string |
Enter the name of the vPG you want to delete. |
For example:
CLI (network-admin@Leaf1) > vpg-delete name <vpg-name>
2. vpg-port-remove
Use this command to remove ports from a vPG.
CLI (network-admin@Leaf1) > vpg-port-remove
|
vpg-port-remove |
Removes ports from a vPG. |
|
vpg-name name-string |
Enter the name of the vPG from where you want to remove the ports. |
|
ports port-list |
Specify the ports to be removed from the vPG. |
|
port-desc port-desc-string |
Specify the port description to remove the ports with that description from the vPG. |
For example:
CLI (network-admin@Leaf1) > vpg-port-remove vpg-name <vpg-name> ports <port-list>
Note: For a given switch, if you remove a port or trunk from a source vPG, the associated vFlow on that switch is disabled in hardware but it is retained by the software.
Guidelines and Limitations
- If you configure a protocol transparent vFlow, you cannot use the set-metadata keyword while modifying the vFlow thereafter. Conversely, if set-metadata is configured for a vFlow, you cannot enable protocol transparency for that vFlow.
- The metadata value of 1000 is reserved for protocol transparency and you cannot use this metadata value while configuring other vFlows.
- All control plane protocols are tunnel transparent if no additional filters are enabled. However, if you specify a vFlow filter, only the control plane packets pertaining to that filter is copied between the vPGs. For example, if you specify a VLAN filter, only the control plane packets belonging to that VLAN are copied. This limitation applies to the global vNET and any user-defined vNET in which vFlows are created with a VLAN filter. As a consequence of this limitation, adjacency over LLDP or LACP fails to be established.