
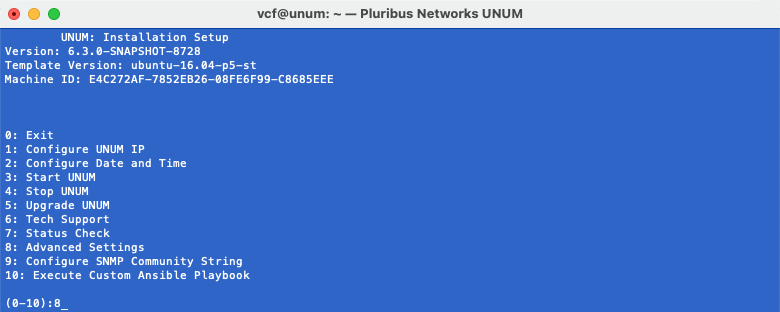
Advanced Settings
Option 8: Advanced Settings
Option 8: Advanced Settings, provides you access to additional tools:
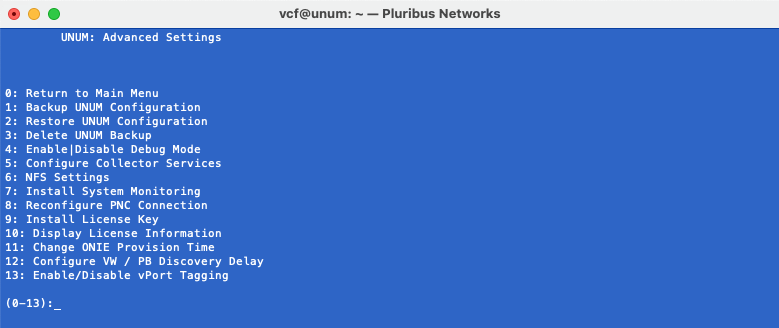
UNUM Options Menu
These advanced settings are:
|
Option 1: |
Backup your UNUM configuration. |
|
|
Option 2: |
Restore your UNUM configuration from a backup. |
|
|
Option 3: |
Delete a UNUM backup. |
|
|
Option 4: |
Enable or disable debug mode. Typically done after contacting Pluribus Networks Technical Support. |
|
|
Option 5: |
Caution: Please contact Pluribus Networks Technical Support before attempting to use this function. |
|
|
Option 6: |
Configure your NFS settings for backup and restore. |
|
|
Option 7: |
Install system monitoring tools. |
|
|
Option 8: |
Caution: Please contact Pluribus Networks Technical Support before attempting to use this function. |
|
|
Option 9: |
Note: Internal Pluribus Networks use only. |
|
|
Option 10: |
Display your UNUM licensing information. |
|
|
Option 11: |
Caution: Please contact Pluribus Networks Technical Support before attempting to use this function. |
|
|
Option 12: |
Caution: Please contact Pluribus Networks Technical Support before attempting to use this function. |
|
|
Option 13: |
Enable or disable Kubernetes and VMWare visibility in the Insight Analytics Connections and Switch Analytics vPort tables. |
UNUM Advanced Settings
Note: The Backup and Restore functionality is for Configuration Settings only. Analytical Data is not backed up.
Backup UNUM Configuration
Select Option 1 to backup your configuration.

Option 1 - Advanced Settings Backup Configuration - NFS Mount not configured
The Backup and Restore function configuration is dependent on the UNUM instance. A standalone UNUM instance requires an NFS mounted share.
Note: In a clustered UNUM environment data is replicated automatically across the nodes.
If an NFS mounted share is not configured an error message is displayed as shown in the above image.
To configure an NFS share, use the following steps to set up the Backup and Restore function.
Note: These instructions are intended as an example running under Linux. The actual configuration of an NFS mounted share may differ and is dependent on the systems used on your network. Configuration files in the /home/vcf/srv/vcf/config directory and the /home/vcf/srv/maestro directory are backed up to an NFS location under the /home/vcf/var/vcf/data/snapshots directory.
NFS Server Configuration
On the intended NFS server and at a Linux prompt perform the following steps:
1)Run sudo apt-get update
2)Run sudo apt install nfs-kernel-server
3)Create the share directory. For example: /var/remote_unum_backups
4)Add this directory to the /etc/exports file. using an editor such as nano and add the following line:
/var/remote_unum_backups *(rw,sync,no_subtree_check).
5)Run chmod 777 on the /var/remote_unum_backups folder.
6)Restart NFS services using sudo service nfs-kernel-server restart.
7)Run the command showmount -e to display the export list. In this example, the output is:
Export list for <my_nfs_server_name>:
/home/vcf/remote_unum_backups *
NFS Client Configuration on the UNUM Instance
On the standalone UNUM instance run the following process to mount the NFS storage:
Select Option 6 followed by Option 1 to configure your NFS Client.

Option 6 - Advanced Settings Backup Configuration
Note: Please stop UNUM before setting the NFS Client.
The following is an example configuration only. Configure the NFS settings per your specific requirements.
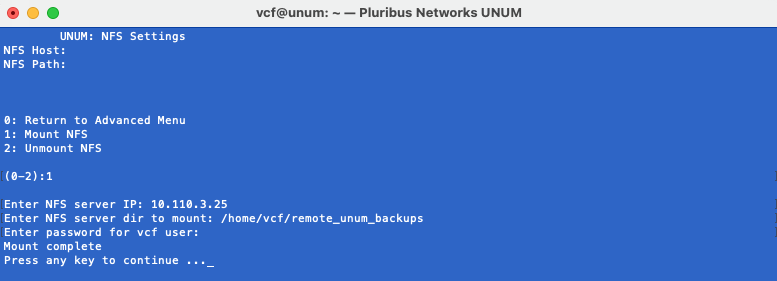
Option 6 - Advanced Settings Backup Configuration
Press any key to continue.
After the NFS mount finishes the menu screen updates with the NFS host and path settings.
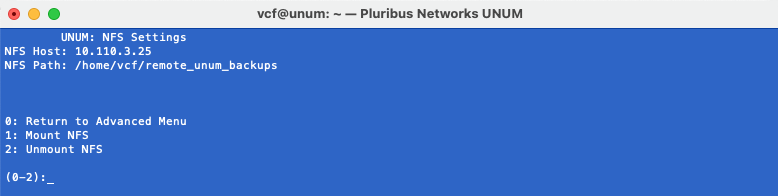
Option 6 - Advanced Settings NFS Configuration
When the NFS configuration completes, return to the Advanced Menu and then exit the Advanced Settings menu.
Use Option 3 to restart UNUM from the main menu.

Option 3 - Start UNUM
Backup UNUM Configuration
Return to the Advanced Menu and select Option 1 to backup your configuration.

Option 1 - Advanced Settings Backup Configuration
Press any key to continue.
Restore UNUM Configuration
The Backup and Restore functions and the configuration is dependent on the UNUM instance. A standalone UNUM instance requires an NFS mounted share. Refer to the instructions above to configure an NFS Server and the UNUM NFS Client.
Select Option 2 to restore your configuration.
Select the applicable backup file from the list of Available Backups and follow the on-screen instructions.
Note:UNUM automatically restarts during the process.

Option 2 - Advanced Settings Restore Configuration

Option 2 - Advanced Settings Restore Process
Press any key to continue.
Delete UNUM Backup
To delete a configuration backup select Option 3 and follow the on-screen instructions.

Option 3 - Advanced Settings Delete Backup

Option 3 - Advanced Settings Delete Backup Complete
Press any key to continue.
Enable | Disable Debug Mode
Caution: Please contact Pluribus Networks Technical Support before attempting to use the Enable | Disable Debug Mode function.
To enable or disable the Debug Mode select Option 4.
When enabling or disabling extended logging follow the on-screen instruction to Stop and Start UNUM services.

Option 8 - Enable / Disable Debug Mode

Option 8 - Debug Mode Enabled
Note: The restart dialog includes the warning debug services are enabled - WARNING: debug mode is enabled.
Disable Debug
Select Option 4 to disable the Debug mode and follow the on-screen instruction to Stop and Start UNUM services.

Option 8 - Debug Mode Disable

Option 8 - Debug Mode Disable Restart
Note: When Debug mode is disabled the restart dialog does not contain any references to Debug mode.
Configure Collector Services
Option 5 enables and disable UNUM Collector services.
Caution: Please contact Pluribus Networks Technical Support before attempting to use the Configure Collector Services function.
Mount NFS
Select Option 6 NFS Settings followed by Option 1 to mount your NFS Client.
Note: Please stop UNUM before setting the NFS Client.
The following is an example configuration only. Configure the NFS settings per your specific requirements.
Option 6 - Advanced Settings Mount NFS
Unmount NFS
Select Option 6 followed by Option 2 to unmount your NFS Client.
Note: Please stop UNUM before setting the NFS Client.

Option 6 - Advanced Settings NFS Settings
Option 2 - Advanced Settings Unmount NFS Complete
Install Monitoring System
When upgrading from a installed UNUM 5.2.0 version, the monitoring tools do not install automatically.
To install the monitoring tools, Select Option 7. Enter your UNUM password.
The monitoring tools install without any further user interaction.

Option 7 - Install Monitoring Tools

Option 7 - Monitoring Tools Installed
Press any key to continue.
Reconfigure PNC Connection
Caution: Please contact Pluribus Networks Technical Support before attempting to use this function.
Select Option 8, Reconfigure PNC Connection, to update the Pluribus Networks Cloud URL.
The current PNC URL is displayed.
Only if directed by Pluribus Networks Technical Support enter the new PNC URL.

Option 8 - Reconfigure PNC Connection
Press any key to continue.
Install License Key
Note: Internal Pluribus Networks use only.
Select Option 9, Install License Key, to install a UNUM license.
Enter your UNUM password and enter the License Key.
Entering an invalid license key results in an error.

Option 9 - Install License Key
Press any key to continue.
Display License Information
Select Option 10, Display License Information, to view installed UNUM license details.
Enter your UNUM password.
UNUM displays the license status.

Option 10 - Display License Information
Press any key to continue.
Change ONIE Provision Time
Caution: Please contact Pluribus Networks Technical Support before attempting to use this function.
To change the ONIE Provision Time setting, select Option 11.
Enter the new time in seconds. UNUM updates the time setting. Press any key to continue.

Option 11 - ONIE Provision Time
Configure VW / PB Discovery Delay
Caution: Please contact Pluribus Networks Technical Support before attempting to use this function.
To change the VW / PB Discovery Delay Time setting, select Option 12.
Enter the new time in seconds. UNUM updates the time setting. Press any key to continue.

Option 12 - Configure VW / PB Discovery Time
Note: The default setting is 60 seconds and should not be changed unless advised by Pluribus Networks.
Enable/Disable vPort Tagging
Enable or disable Kubernetes and VMWare visibility in the Insight Analytics Connections and vPort tables.
To Enable/Disable vPort Tagging setting, select Option 13.

Option 13 - Enable/Disable vPort Tagging
Select the required Fabric from the list of options.
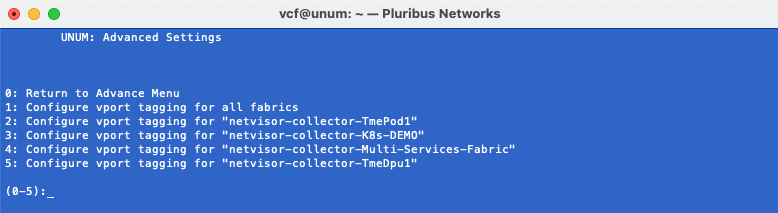
Option 13 - Enable/Disable Select Fabric(s)
Note: Option 1 enables tagging for all fabrics.
After selecting a Fabric, view Current Status or Enable/Disable tagging, as required.
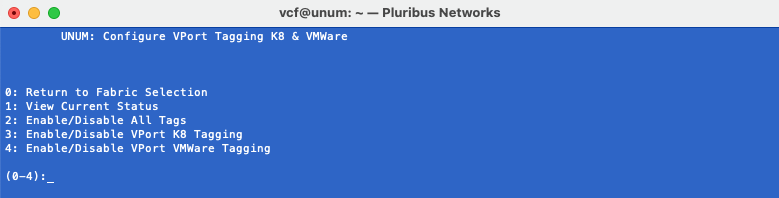
Option 13 - Tagging Status
Select Option 1 to review current status.
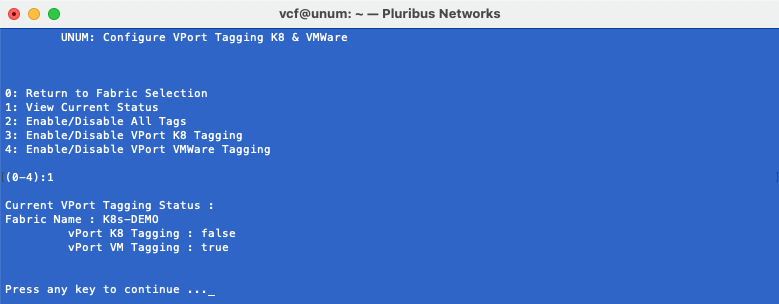
Option 13 - Tagging Current Status
To enable/disable tagging for Kubernetes or VMware, UNUM must first be stopped, as shown in the example below.
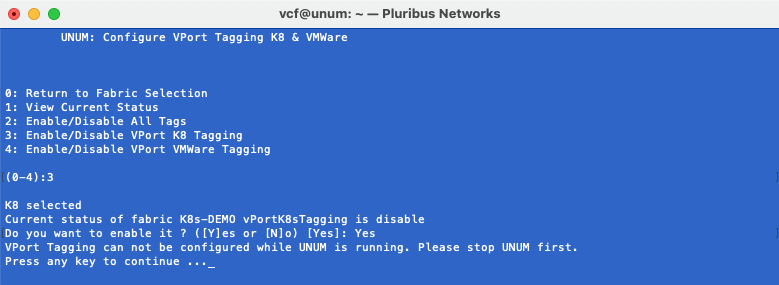
Option 13 - Enable Tagging