
VLAN / L2 OVL - Manage VLAN
Layer 2 Configuration - VLAN / L2 OVERLAY
Manage VLAN
There are features and functions used in UNUM Manager and UNUM Analytics that are common throughout the user interface (UI). Please refer to the Common Functions section for more information on the use of these functions and features.
Selecting Manager → Layer 2 → Manage VLAN displays the Manage VLAN dashboard with a list of any existing VLAN entries.
Select the applicable Fabric from the left-hand navigation bar and the dashboard updates showing all VLANs from all switches within the Fabric.
Note: If no entries exist a "No Data Exists" message is displayed. You must first configure an entry on a switch. Prerequisite settings and configuration may be required.
This feature table displays data based on the fabric's default Collector Switch. If no data displays in the dashboard, either select a switch from the Left-hand Navigation (LHN) pane or perform a Search by selecting an FRG (Fabric Resource Group) and a specific Attribute from the drop-down lists, as required.
The dashboard displays a list of existing VLANs entries by Fabric. Additional parameters include: Switch, Id, Scope, Description, Ports, Untagged Ports, Active Ports, VXLAN, AUTO VXLAN, and VXLAN Mode.
Note: An FRG must exist before being selectable in the FRG selection box. Refer to Manage Groups and Fabric Virtualization for more information on creating and using FRGs.
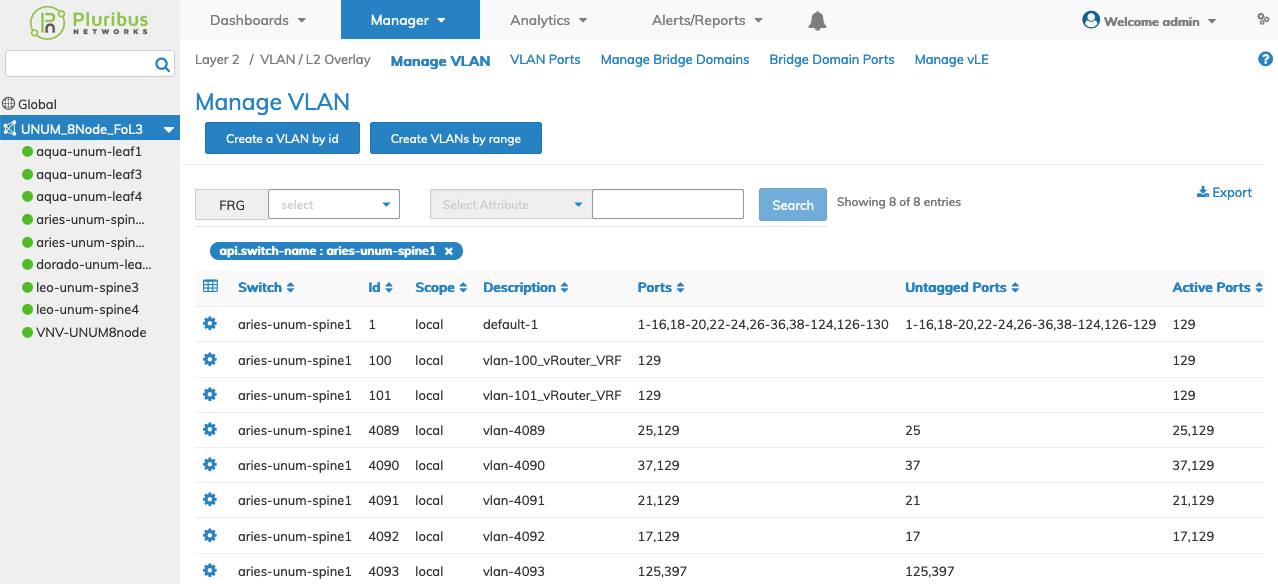
Manage VLANs Fabric Dashboard
Note: The number of VLANs on the Fabric Dashboard may not necessarily equal the number of VLANs on the Manage VLAN dashboard. When clicking on the fabric, the dashboard will show: Total Fabric level VLANs plus the sum of all local VLANs of each switch plus the total number of Cluster VLANs in the fabric. When clicking on the switch, the dashboard will show: Total Fabric level VLANs plus local VLANs of the switch plus Cluster VLANs on that switch (if any).
Manage VLAN Functions
VLANs are created by selecting Create a VLAN by ID and Create VLANS By Range.
Using the Cog ![]() icon:
icon:
•Delete a range of VLANS using Delete VLANS By Range.
•Modify a VLAN selecting Edit.
•Remove an individual VLAN entry using Delete.
The Advanced Search function provides a rapid method to search across Fabrics, Fabric Resource Groups and feature Attributes.
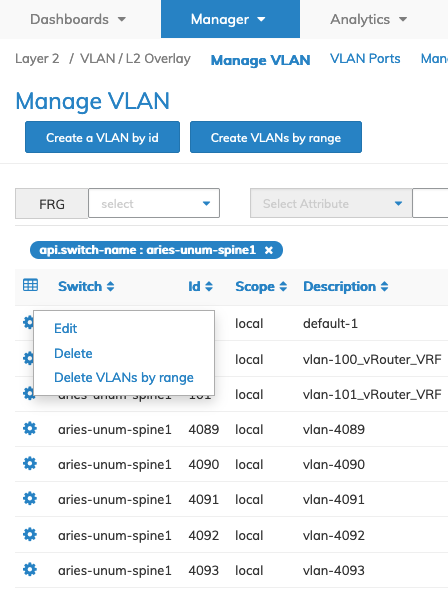
Manage VLANs - Details Pane Functions
Selecting an individual Switch from the fabric updates the dashboard with only the VLAN settings for that switch.
The dashboard displays a list of existing VLAN entries. Parameters include: Id, Scope, Description, Ports, Untagged Ports, Active Ports, VXLAN, Auto VXLAN, and VXLAN Mode.
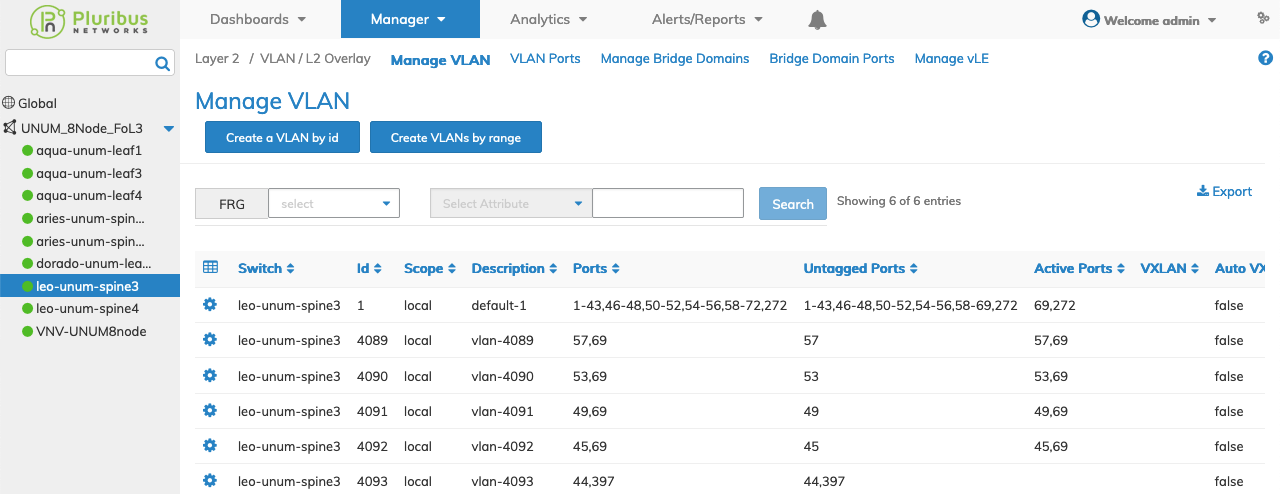
Manage VLANs - Switch Dashboard
CreateVLAN by ID
Select Create a VLAN by Id and enter the parameter settings for:
•Switch / FRG – Select the Switch or FRG (Fabric Resource Group) from drop-down list.
•Id – VLAN ID.
•Scope – Scope as local, fabric, or cluster. Only the local and fabric options are available when selecting FRG.
•Description – VLAN description.
•Ports – Ports assigned to VLAN.
•Untagged Ports – Untagged-ports assigned to VLAN (checkbox).
•Stats – VLAN statistics - to receive VLAN statistical information (checkbox).
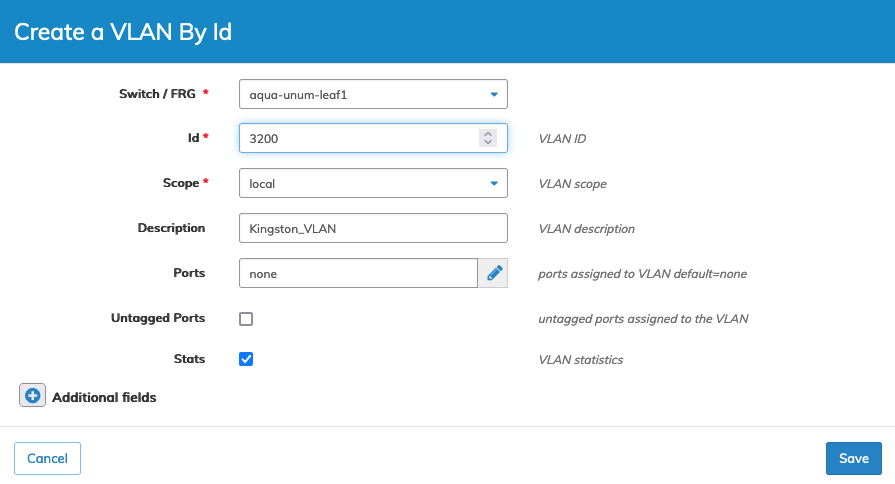
Manage VLANs - Create VLANS by ID
Note: The Ports selector field in the setup pane is disabled when selecting an FRG.
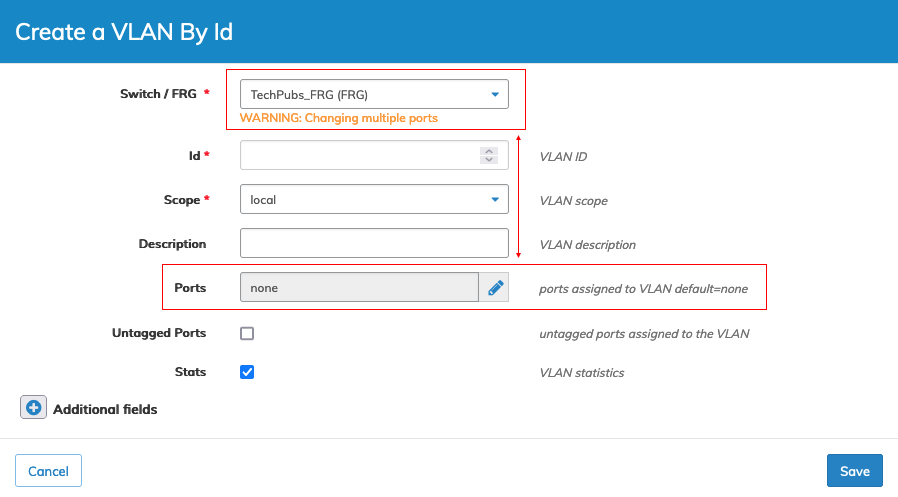
Manage VLANs - Create VLANS by ID - FRG Selected - Ports Selector Grayed Out
Click Save to continue or Cancel to return to the previous screen without saving any changes.
Additional fields are configured by clicking on the ![]() icon for Additional Fields.
icon for Additional Fields.
Additional fields include:
•Public VLAN – Public VLAN for vNET VLAN.
•vNET Id – vNET for this VLAN.
•VXLAN – VXLAN identifier for Tunnel value 0 indicates unconfigure VXLAN.
•Auto VXLAN – Automatically assign VXLAN and/or assign to VTEPs (checkbox).
•VXLAN Mode – VXLAN encapsulation mode.
•VXLAN Hybrid Mode – VXLAN encapsulation mapping to Tunnel in hybrid mode.
•Replicators – Replicator Group.
•Port Desc – Port assigned to VLAN.
•Untagged Port Desc – Untagged port assigned to VLAN.
Enter any required additional parameters and click Save to continue or Cancel to return to the previous screen without saving any changes.
The dashboard updates with the VLAN.
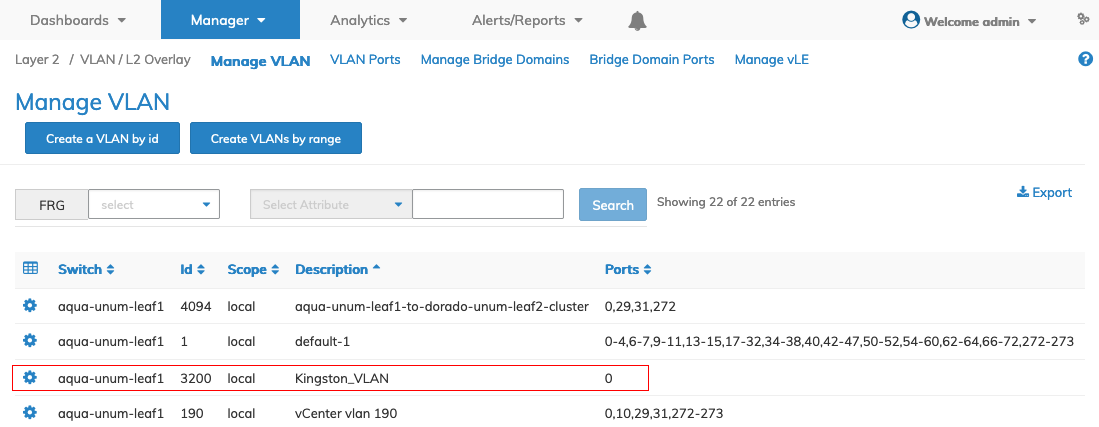
Manage VLANs - Updated Dashboard - VLAN Id
Note: When using Auto VXLAN, the Fabric automatically assigns AUTO-VXLAN identifier values when selected. The values assigned derive from the VXLAN IDs created in VXLAN - VTEP Auto-VXLAN.
Create VLANs By Range
Select Create a VLAN by Range.
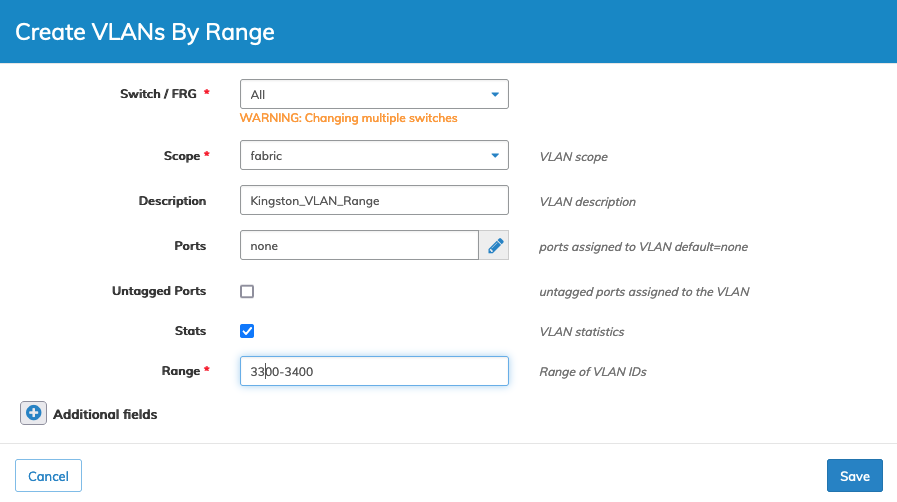
Manage Create VLANS by Range
Enter the parameter settings for:
•Switch – Select All or an individual switch.
•Scope – scope as local or fabric.
•Description – VLAN description.
•Ports – Ports assigned to VLAN.
•Untagged-ports – Untagged-ports assigned to VLAN.
•Stats – VLAN statistics - to receive VLAN statistical information (checkbox).
•Range – Range of VLAN IDs.
Click Save to continue or Cancel to return to the previous screen without saving any changes.
Additional fields are configured by clicking on the ![]() icon for Additional Fields.
icon for Additional Fields.
Additional fields include:
•Public VLAN – Public VLAN for vNET VLAN.
•vNET Id – vNET for this VLAN.
•VXLAN – VXLAN identifier for Tunnel value 0 indicates unconfigure VXLAN.
•Auto VXLAN – Automatically assign VXLAN and/or assign to VTEPs (checkbox).
•VXLAN Mode – VXLAN encapsulation mode.
•VXLAN Hybrid Mode – VXLAN encapsulation mapping to Tunnel in hybrid mode.
•Replicators – Replicator Group.
•Port Desc – Port assigned to VLAN.
•Untagged Port Desc – Untagged port assigned to VLAN.
Enter any required additional parameters and click Save to continue or Cancel to return to the previous screen without saving any changes.
The dashboard updates with the VLAN range.
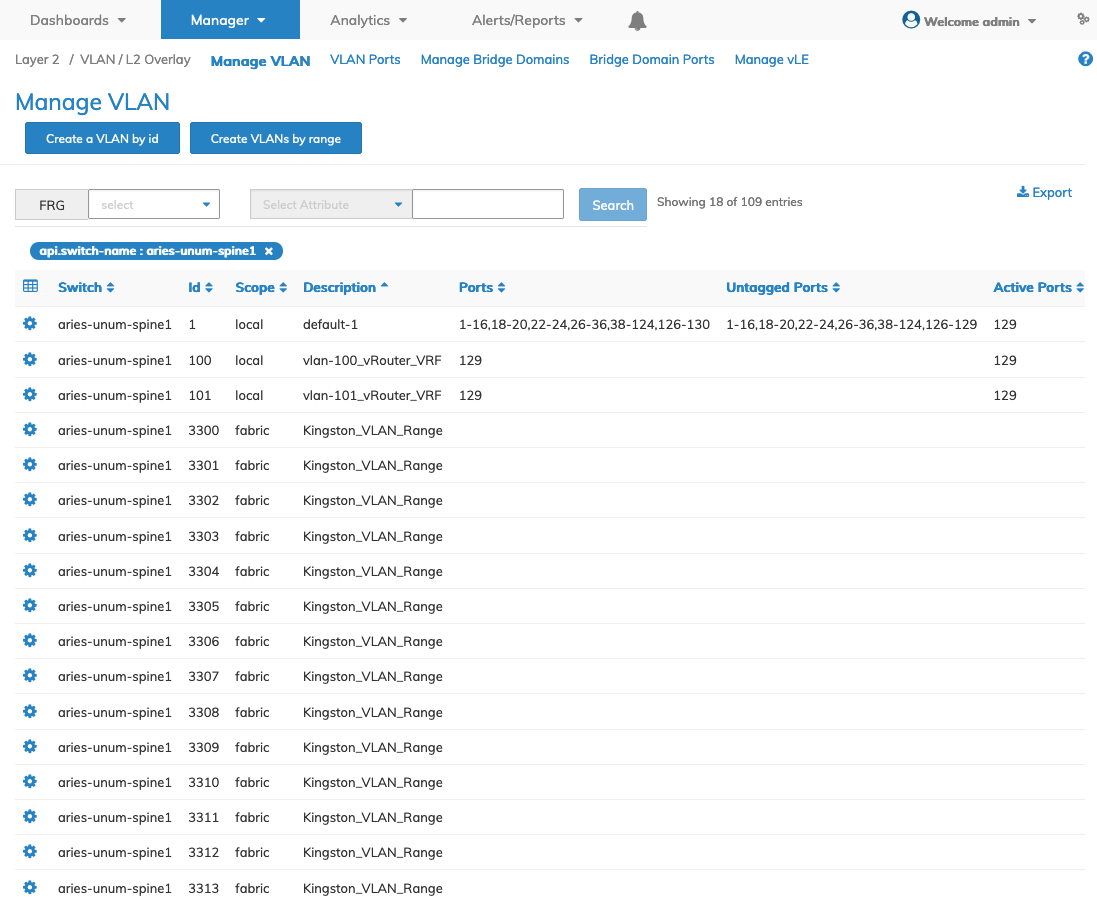
Manage VLANs - Updated Dashboard - VLAN Range
Modify a VLAN
To modify a VLAN click Edit by selecting the Cog ![]() icon to make changes to the VLAN description.
icon to make changes to the VLAN description.
Additional fields are configured by clicking on the ![]() icon for Additional Fields.
icon for Additional Fields.
See the Create a VLAN by Range list above for parameter details.

Manage VLAN - Modify a VLAN
Click Save to continue or Cancel to return to the previous screen without saving any changes.
Delete VLANS By Range
Select the Cog ![]() icon and delete a VLAN range by clicking Delete VLANs by Range.
icon and delete a VLAN range by clicking Delete VLANs by Range.
Enter the required parameter settings for:
•Selected Rows – Auto-populated with Seed Switch or switch selected from LHN (Left-hand Navigation( pane).
•Range – Range of VLAN IDs
•vNET-ID (from the drop-down box) – vNET for this VLAN
Click Submit to continue or Cancel to return to the previous screen without saving any changes.
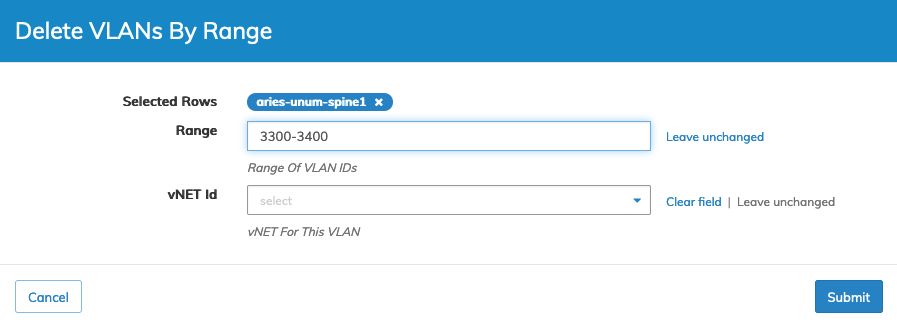
Manage VLAN - Delete VLANs by Range
Confirm the deletion.
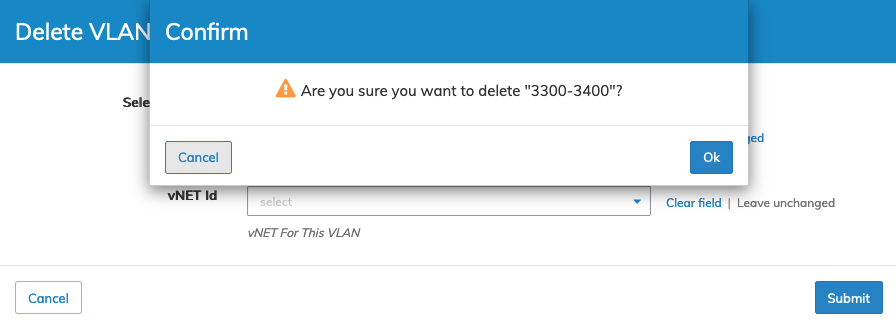
Manage VLAN - Delete VLANs by Range - Confirm Deletion
Click OK to continue or Cancel to return to the previous screen without making any changes.
Delete an Individual VLAN
Select the Cog ![]() icon and delete an individual VLAN by clicking Delete.
icon and delete an individual VLAN by clicking Delete.
A confirmation message requires an acknowledgment to continue deletion.

Manager Delete VLAN Confirmation
Click OK to continue or Cancel to return to the previous screen without making any changes.
