
Upgrade Fabrics Using Interleave Approach
Upgrading Fabrics using an Interleave Approach
There are features and functions used in Arista NetVisor UNUM and Insight Analytics that are common throughout the user interface (UI). Please refer to the Common Functions section for more information on the use of these functions and features.
Please review the Recommended Procedure section under Topology to better familiarize yourself with the Fabric Upgrade process using NetVisor UNUM.
To minimize data loss which results from upgrading switches in a Fabric, Arista Networks recommends the use of an interleave approach to upgrading groups of switches based on their assignments within the Fabric.
Cluster nodes should be upgraded separately. That is, first upgrade the secondary Cluster-node and then proceed to upgrade the primary Cluster-node.
In the examples depicted below, Cluster-node-1 contains the odd-numbered switches and Cluster-node-2, the even-numbered switches.
The Arista Networks' Cluster Nodes operate in an Active/Active mode. Using an Active/Active configuration ensures high availability and continuous data flow at all times.The Interleave upgrade method keeps data loss to a minimum.
Data interruption occurs when the Spine switch assigned as the Seed Switch undergoes an upgrade. Using best practices avoids any data interruption during Fabric upgrade, so, therefore, consider using Seed Switch Redundancy (WEB-HA).
Workflow
The following steps document the overall workflow.
•Identify and note all Spine Switches.
•Identify the Seed Switch or Seed Switches. Upgrade the seed switches last.
•Identify and note all Leaf Switches deployed as Cluster Primary nodes. Using best practices, these deploy as even-numbered switches.
•Identify and note all Leaf Switches deployed as Cluster Secondary or Backup nodes. Using best practices, these deploy as odd-numbered switches.
•Upgrade all Cluster secondary nodes while leaving all Cluster primary nodes online and operational.
•Verify regular operation when the Cluster secondary node upgrades finish and all switches reboot.
•Upgrade all Cluster primary nodes after successfully verifying the Cluster secondary nodes are operational.
•Verify regular operation when the Cluster primary node upgrades finish and all switches reboot.
•Verify and ensure Cluster pairs are fully operational and converged.
•Upgrade the Spine switches, one at a time. Do not upgrade all Spine switches simultaneously.
•Verify regular operation after each Spine switch reboots, and proceed to the next Spine switch.
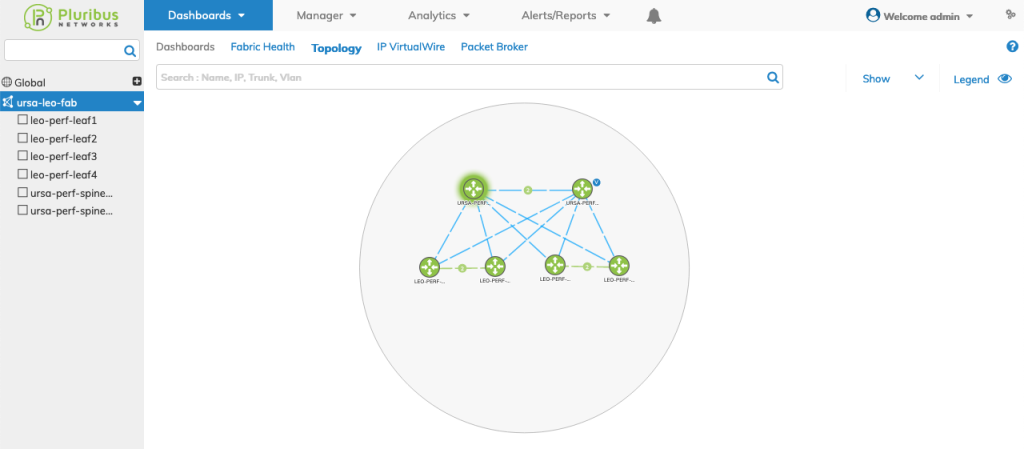
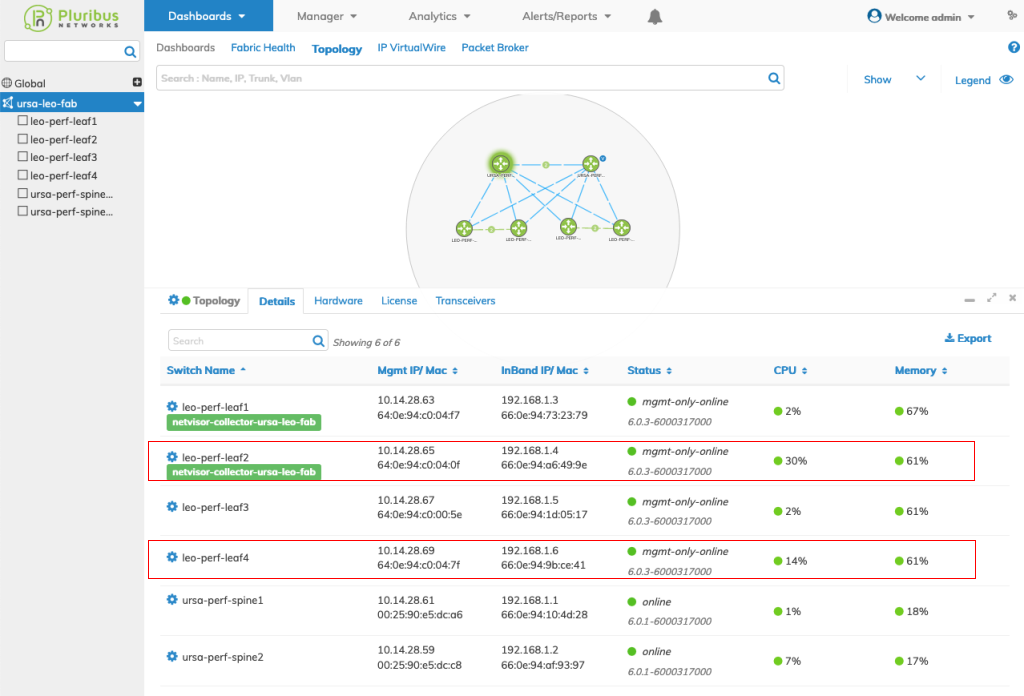
Step 1 - Identify Cluster Primary, Secondary Node Leaf Switches and Spine Switches
In the following example a 6-node Fabric consists of two cluster pairs and two Spine switches.
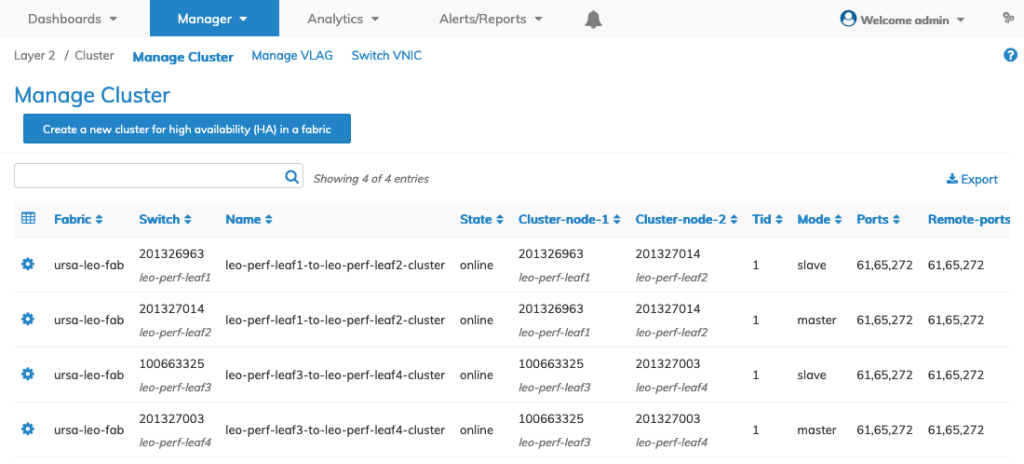
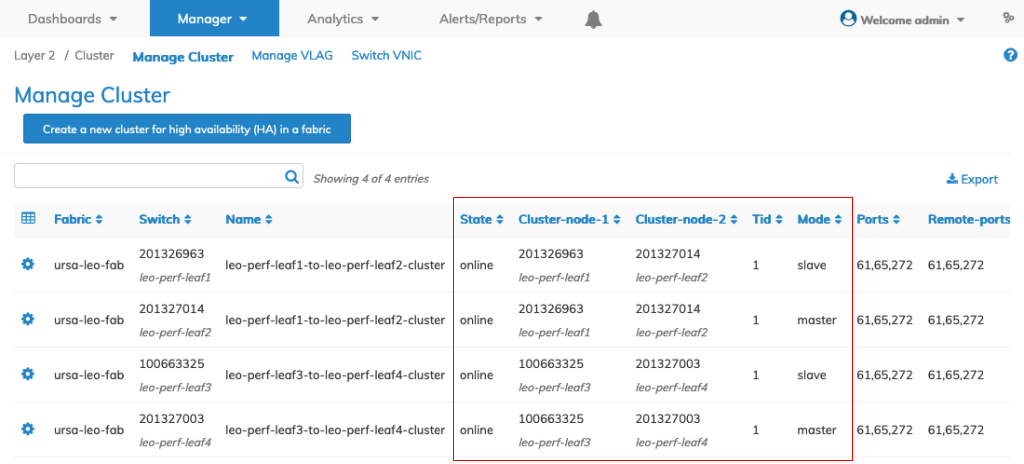
Select Manager → Layer 2 → Manage Cluster to display the Manage Cluster dashboard.
Note the Primary nodes labeled as an even-numbered switch, Secondary nodes labeled as an odd-numbered switches and the associated Ports.
Step 2 - Upgrade Secondary Node Switches
Note: Please refer to the Recommended Procedure before starting a software upgrade.
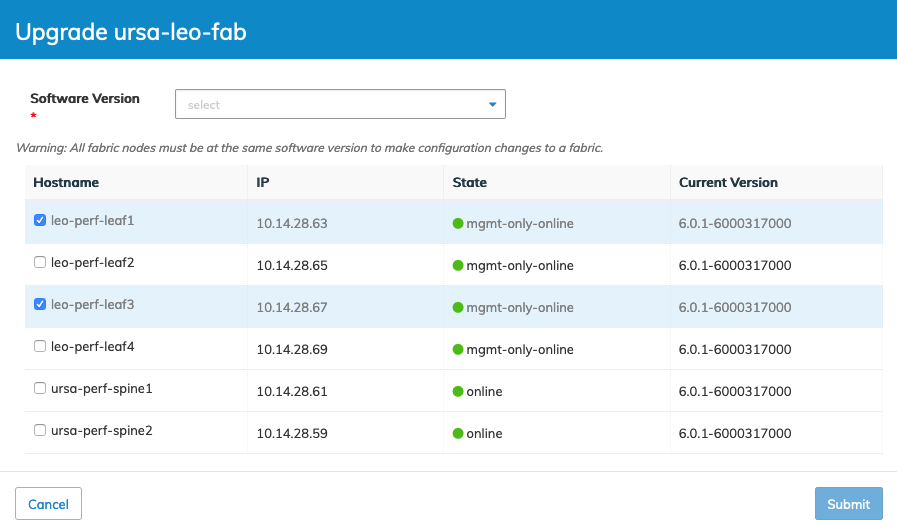
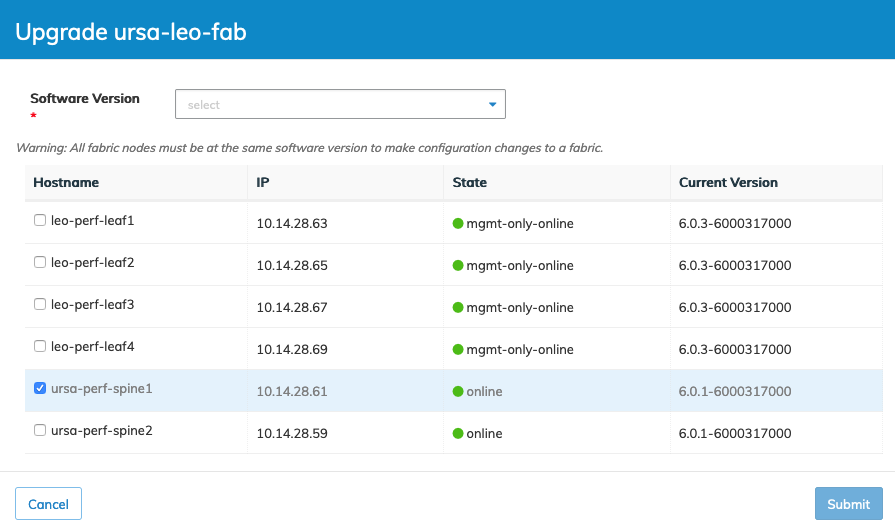
You can upgrade switch software versions by selecting Upgrade Fabric.
Using the left-hand navigation bar by highlighting a particular Fabric, right-clicking on that Fabric, and then selecting Upgrade Fabric.
The dashboard displays:
•Hostname – Name of the device.
•IP – The IP address of the device.
•State – The current state of the device, online or offline.
•Current Version – The current version of the device software.
Warning: All Fabric nodes must be at the same software version to make configuration changes to a Fabric.
Select only the Secondary Node switches as illustrated in the following example:
Verify Secondary Node Switch Status
As the upgrade completes, the details dashboard Upgrade Status updates.
Note: During the process, various notifications, including switches going offline, appear. The appearance of these messages is normal and expected behavior.
After the switches reboot, verify regular operation via the Topology Dashboard.
The example shown below are the two secondary node switches upgraded to a new version and online and healthy.
Note the use of Seed Switch Redundancy where the Secondary Node Seed Switch is now upgraded while the Primary Node Seed Switch remains at the original software version level.

Step 3 - Upgrade Primary Node Switches
Note: Please refer to the Recommended Procedure before starting a software upgrade.
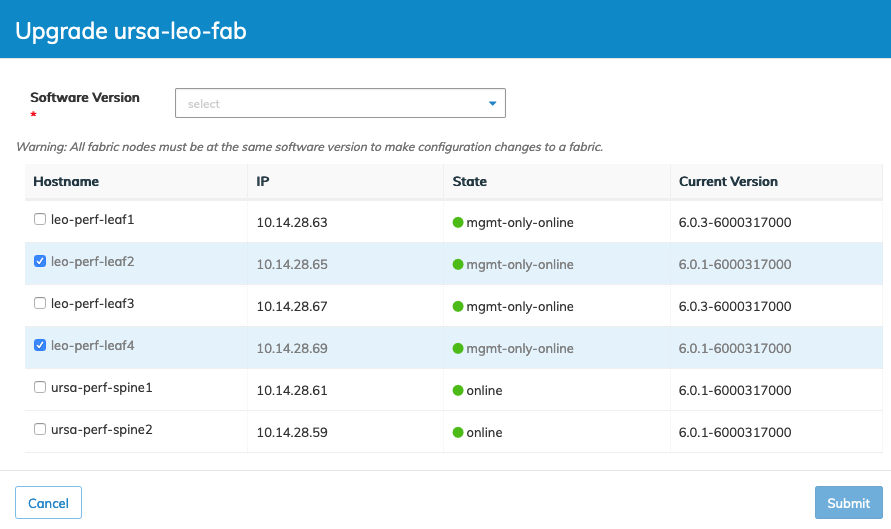
You can upgrade switch software versions by selecting Upgrade Fabric.
Using the left-hand navigation bar by highlighting a particular Fabric, right-clicking on that Fabric, and then selecting Upgrade Fabric.
The dashboard displays:
•Hostname – Name of the device.
•IP – The IP address of the device.
•State – The current state of the device, online or offline.
•Current Version – The current version of the device software.
Warning: All Fabric nodes must be at the same software version to make configuration changes to a Fabric.
Select only the Primary Node switches as illustrated in the following example:
Verify Primary Node Switch Status
As the upgrade completes, the details dashboard Upgrade Status updates.
Note: During the process, various notifications, including switches going offline, appear. The appearance of these messages is normal and expected behavior.
After the switches reboot, verify regular operation via the Topology Dashboard.
The example shown below are the two primary node switches upgraded to a new version and online and healthy.
Note the use of Seed Switch Redundancy where the Primary Node Seed Switch is now at the same software version level.
Step 4 - Verify Cluster Operation and Convergence
Select Manager → Layer 2 → Manage Cluster to display the Manage Cluster dashboard.
Verify each cluster node switch pair is online and configured as Primary (master) and Secondary (slave).
Step 5 - Upgrade Spine Switches or Seed Switches
Upgrade the Spine switches, one at a time. Do not upgrade all Spine switches simultaneously.
Note: Please refer to the Recommended Procedure before starting a software upgrade.
You can upgrade switch software versions by selecting Upgrade Fabric.
Using the left-hand navigation bar by highlighting a particular Fabric, right-clicking on that Fabric, and then selecting Upgrade Fabric.
The dashboard displays:
•Hostname – Name of the device.
•IP – The IP address of the device.
•State – The current state of the device, online or offline.
•Current Version – The current version of the device software.
Warning: All Fabric nodes must be at the same software version to make configuration changes to a Fabric.
Verify Spine Switch Status
As the upgrade completes, the details dashboard Upgrade Status updates.
Note: During the process, various notifications, including switches going offline, appear. The appearance of these messages is normal and expected behavior.
As detailed in the previous steps, after the switches reboot, verify regular operation via the Topology Dashboard.
The example shown below is one of the two Spine switches upgraded to a new version and online and healthy.
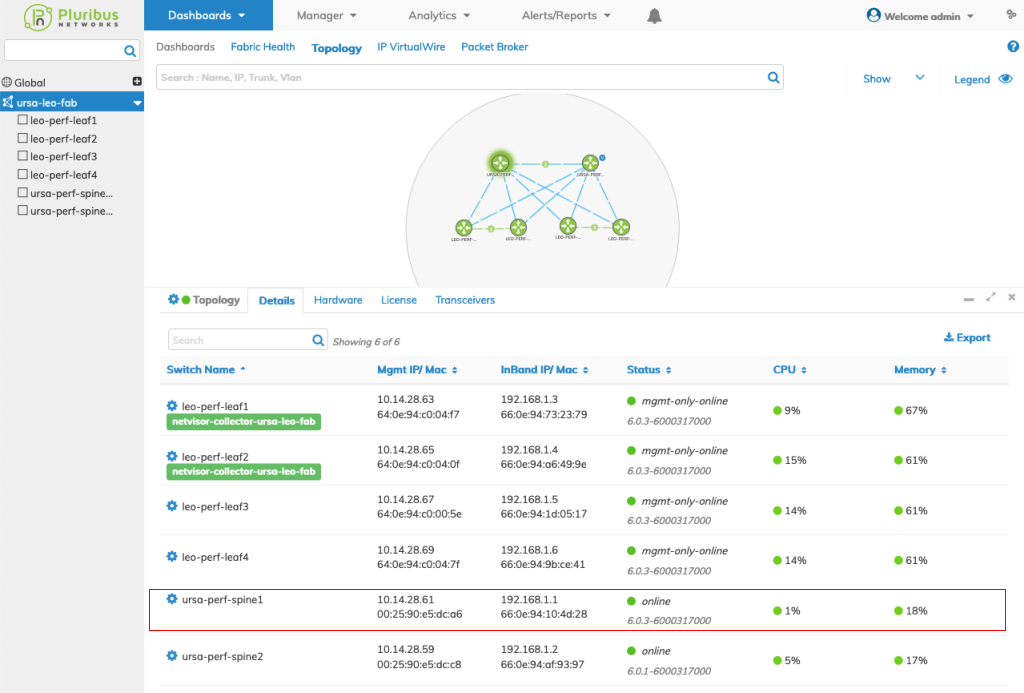
Repeat for each Spine switch until all upgrades are complete.
Caution: If you have not deployed Seed Switch Redundancy, and a Seed Switch is a Spine Switch, Arista Networks recommends upgrading that switch last.