
Seed Switch Redundancy
Seed Switch Redundancy (WEB-HA)
There are features and functions used in Arista NetVisor UNUM and Insight Analytics that are common throughout the user interface (UI). Please refer to the Common Functions section for more information on the use of these functions and features.
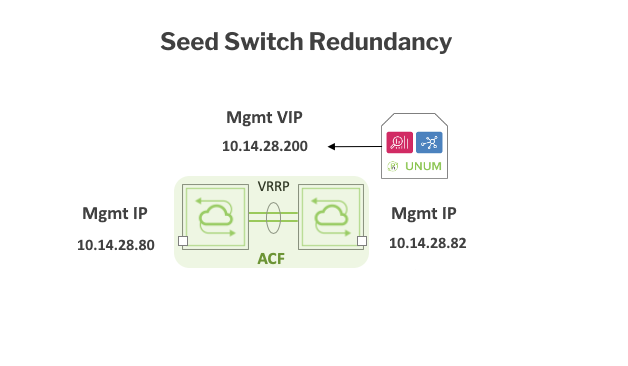
Arista Networks Unified Cloud Fabric provides High Availability for web (REST) through VRRP and a switch cluster pair.
Redundant seed switches operate in an active / standby manner accessed via a common VIP (Virtual IP address).
Seed Switch Redundancy
The following describes the basic workflow of enabling WEB-HA.
Prerequisites
If you use ZTP (Zero Touch Provisioning) to deploy NetVisor OS on your switches, Web / Rest services are automatically configured.
If you do not use ZTP to deploy NetVisor OS, you must activate Web / Rest services on the switch management or data interface connected to NetVisor UNUM using the CLI, on each switch in the fabric:
Out-of-Band Management
Use the following command:
CLI (network-admin@pubdev02) > admin-service-modify if mgmt web
InBand Management
Use the following command:
CLI (network-admin@pubdev02) > admin-service-modify if data web
Workflow
1)Configure the Management Interface for VRRP (performed through the NetVisor OS CLI).
2)Configure the Inband (data) interface for VRRP - Optional (performed through the NetVisor OS CLI).
3)Add the Fabric using NetVisor UNUM.
4)Manage WEB and VRRP from the Manage Admin Services using NetVisor UNUM (requires Web / Rest enabled on switches).
Example Configuration
Switch-Pair
•leo-colo-41 - 10.14.28.80
•leo-colo-42 - 10.14.28.82
Configure the Management Interface for VRRP
Login to each switch using requisite switch login credentials.
Run the fabric-node-show command:
Confirm the switch-pair on are on the same subnet.

WEB HA - Fabric Node Show - Confirm Subnet
Configuration Note: Run the commands on each switch in the switch-pair. The combined terminal session images below are for illustrative purposes only.
Run the switch-local command on each switch.
Turn on VRRP on each switch running the admin-service-modify if mgmt vrrp command.

WEB HA - Activate VRRP
Configure each switch with a VIP (Virtual IP Address) using the switch-vnic-create ip 10.14.28.200/23 vlan 1 vrrp-id 222 vrrp-primary vmgmt0 command.

WEB HA - Switch Local and Create VIP
Run the switch-vnic-show command on each switch to verify the VIP created on each switch.

WEB HA - Created VIP
Substituting your specific login credentials and from a terminal session on the same network, verify connectivity executing the example command:
curl -u network-admin:<your_password> -X GET http://10.14.28.200/vRest/software as shown below.

WEB HA - Test VIP
To perform a fail-over test select one switch from the switch-pair and run the following commands.
admin-service-modify if mgmt no-vrrp
admin-service-modify if mgmt vrrp
Caution: To perform this fail-over test, select one switch from the switch-pair and run the following commands. Perform this action on one switch only.
The first and second seed switches swap their roles.

WEB HA - Role Swap
Additional testing of the fail-over process is possible by rebooting the master switch using the switch-reboot command.
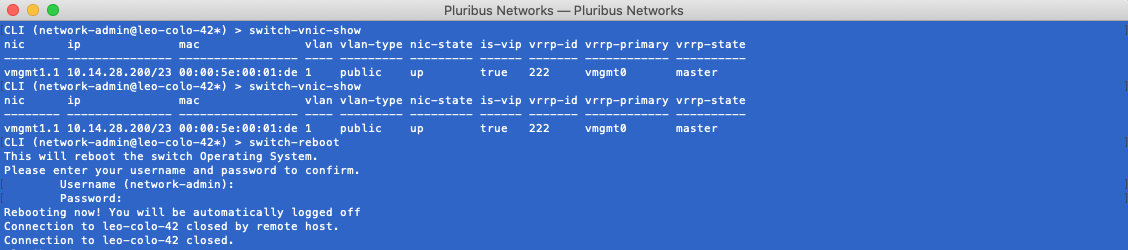
WEB HA - Switch Reboot
The former "master" switch is now listed as "offline" when running the fabric-node-show command.

WEB HA - Switch-Pair - Switch Offline
The role of master switch assigns to the other switch in the switch-pair.

WEB HA - Switch-Pair - Role Change
Adding WEB-HA Switch-Pair to NetVisor UNUM
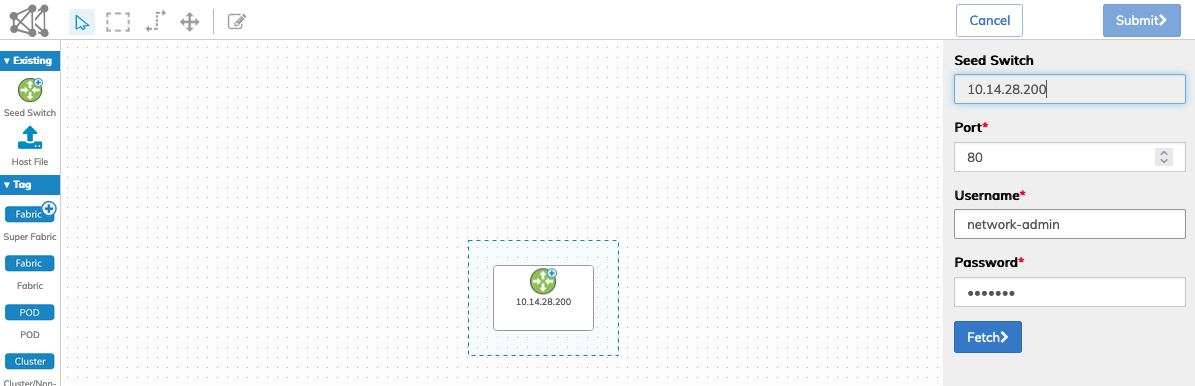
Select Manager → Fabric → Add Fabric Seed Switch
Click the Fabric Designer icon to add an existing Fabric.
![]()
NetVisor UNUM Platform Global - Fabric Designer
Drag and drop the Seed Switch icon on to the planning surface. Enter the VIP address as assigned in the configuration steps above and the applicable control Port (default is port 80), and the User Name and Password.
After entering the required information, click Fetch to begin the process.
NetVisor UNUM Platform Global - Fabric Designer User Interface
NetVisor UNUM Platform Global - Fabric Designer Switch Pair Details
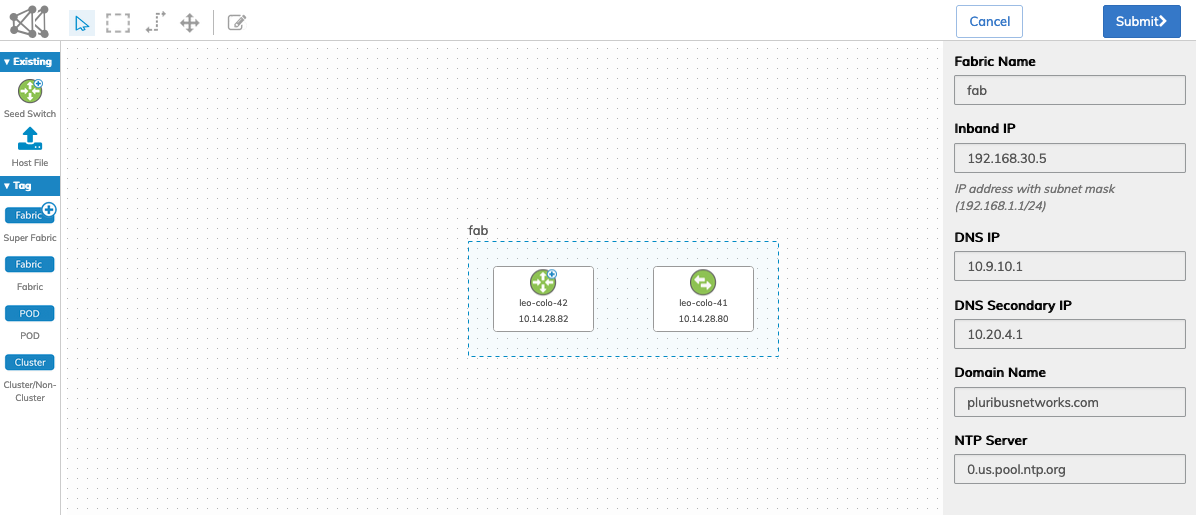
Click Submit and navigate to the Topology dashboard. The Fabric with the redundant switches displays.
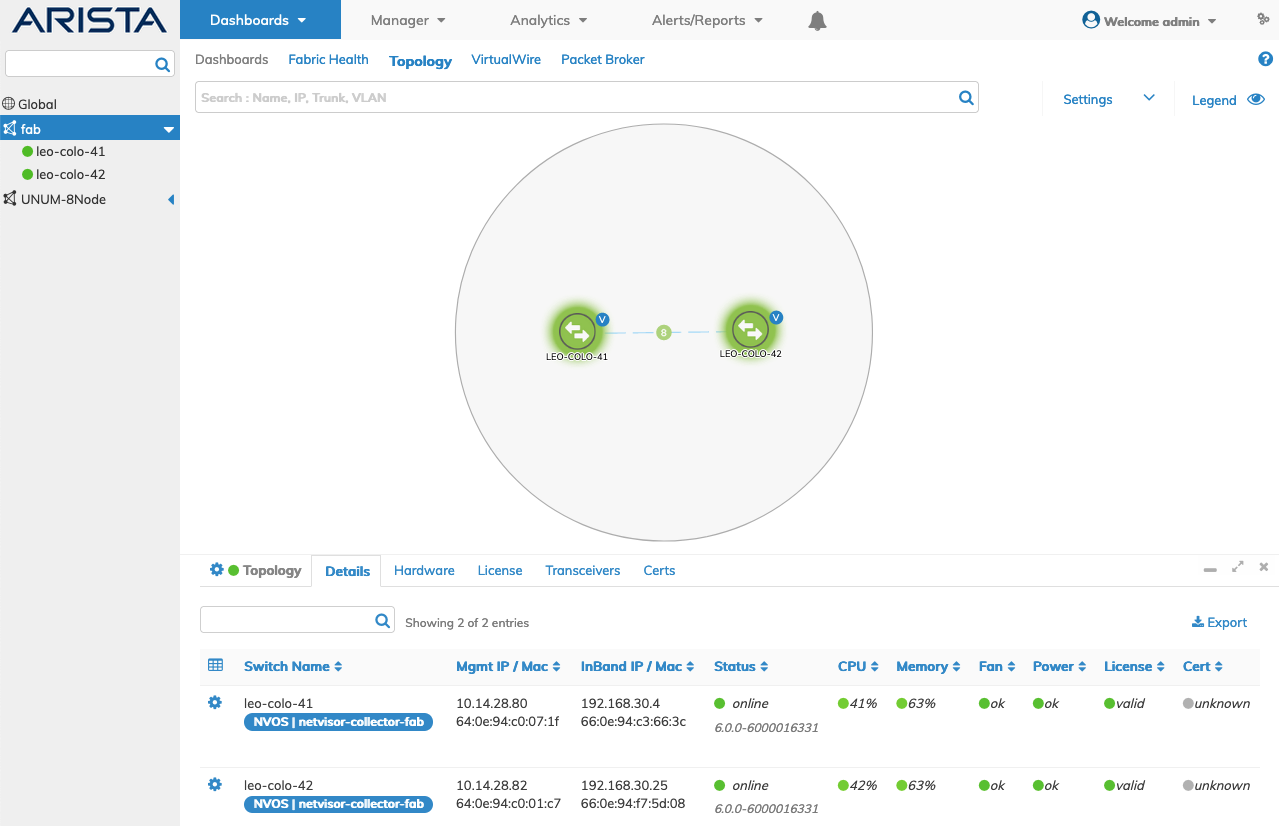
NetVisor UNUM Platform Global - Fabric Designer Switch Pair Details
Select Manager → Fabric → Collector → Manage Collector and, verify the collector created correctly by hovering on the redundant switch-pair and ensure that the tooltip shows the applicable VIP.
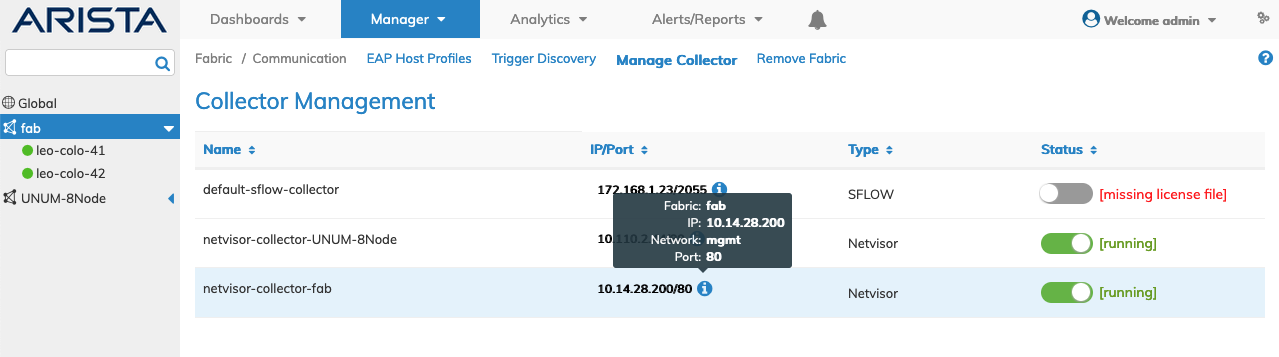
NetVisor UNUM Platform Global - Fabric Designer Switch Pair VIP Details
Selecting Manager → Services → Admin → Manage Admin Services.
Manager Services Dashboard
The dashboard shows Web and VRRP are enabled. Note the mgmt (management), web, and vrrp settings are true while the Inband (data) web setting is false, while vrrp is true.
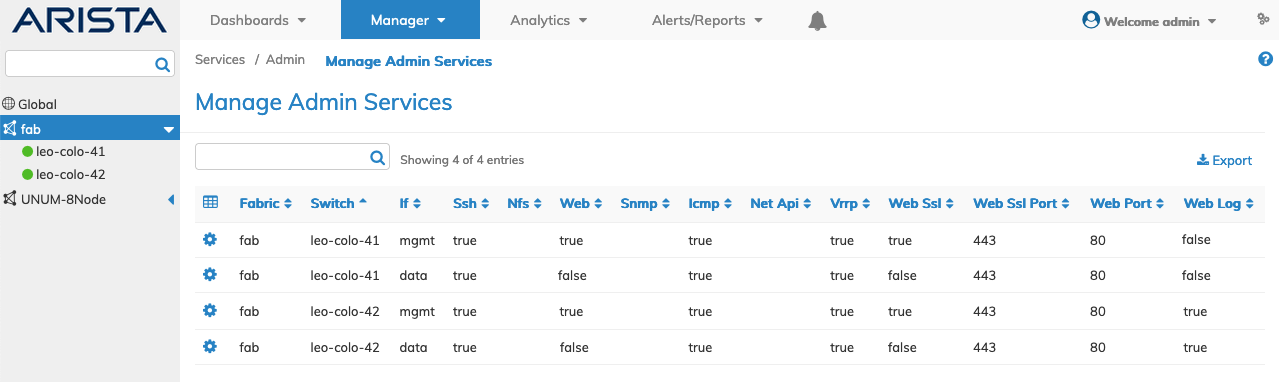
NetVisor UNUM Platform Global - Fabric Designer Switch Pair Admin Services Status
Failover Testing Using Manage Admin Services
Using the mgmt interface from Manage Admin Services, selecting Edit via the Cog ![]() icon and enabling/disabling the vrrp setting results in the switches failing over.
icon and enabling/disabling the vrrp setting results in the switches failing over.
Fabric Manager Services Admin - Manage Admin Services - Modify Admin Settings
Failed Seed Switch
In the event of a seed switch failure the Topology dashboard displays the error condition.
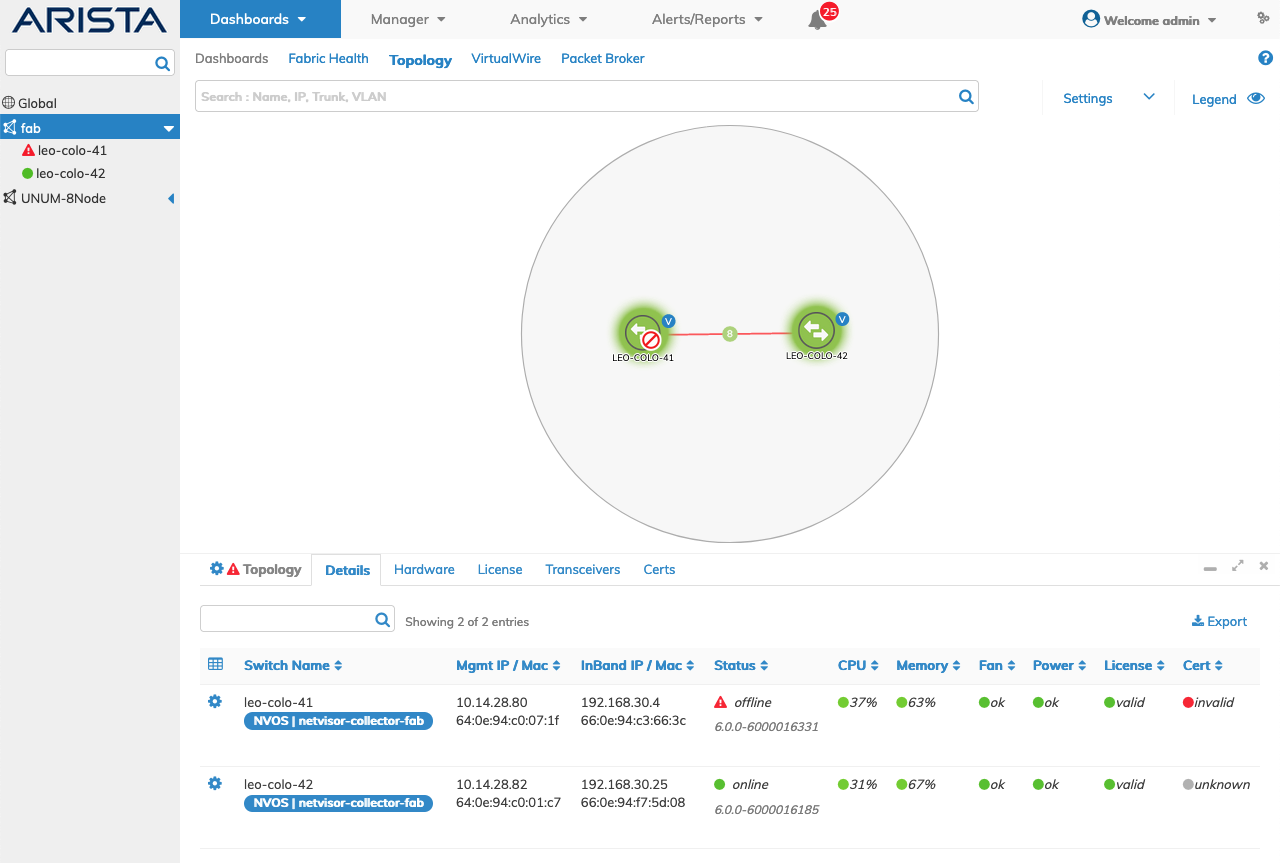
WEB HA - Switch-Pair - Node Failure Display
The All Notifications dashboard displays the failed switch details and the subsequent return to service.
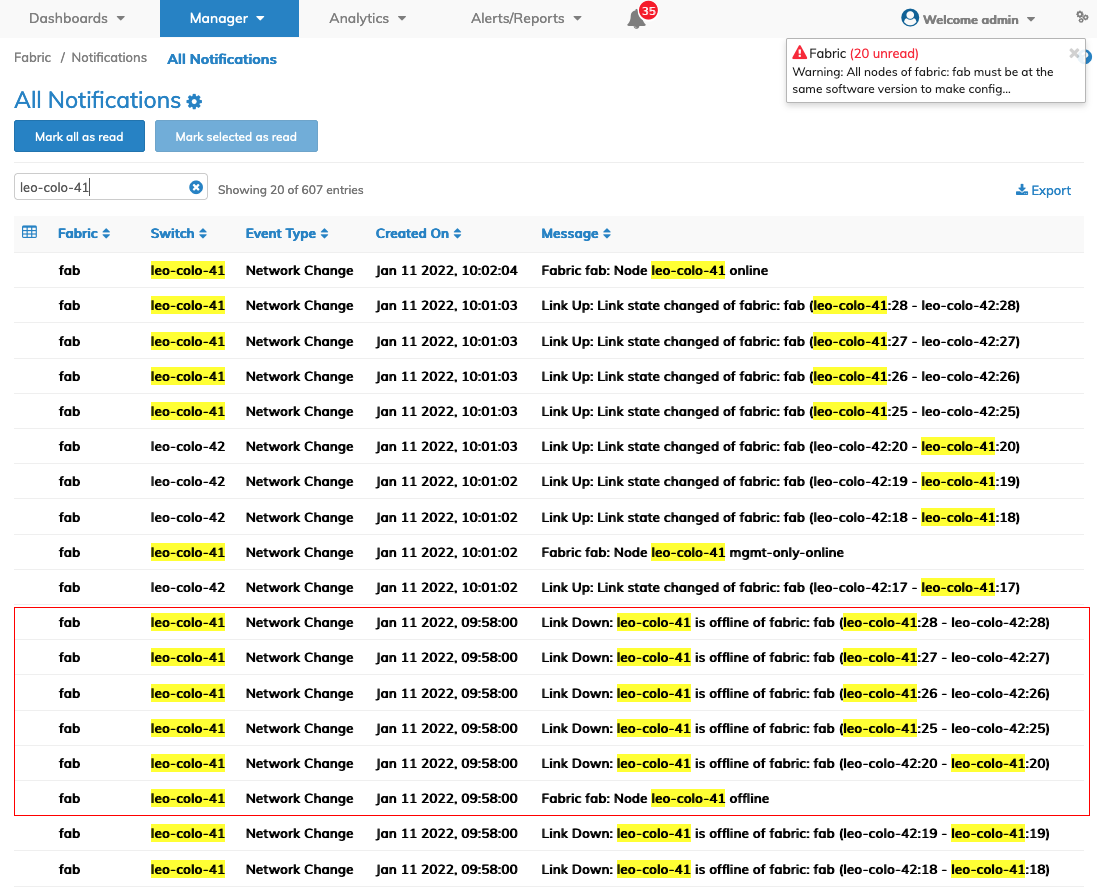
WEB HA - Switch-Pair - All Notifications - Node Failure Dashboard
Configure the Inband (data) Interface for VRRP
Similarly to configure the redundancy over the inband interface below are the steps to be followed.
Prerequisites
Inband connectivity requires console and a physical cable connection to each switch in the switch-pair.
Configure ETH2 of your NetVisor UNUM instance in the same subnet as the intended Inband network. For example: 192.16.6.150/24
Steps
1)Log in to each switch of the switch-pair.
2)Verify the two switches are in the same subnet running the cluster-show command.
3)Run the switch-local command on each switch.
4)Run the command admin-service-modify if mgmt vrrp
5)Run the command switch-vnic-create ip 192.16.6.200/24 vlan 1 vrrp-id 222 vrrp-primary vdata0 on each switch.
6)Verify the VIP is configured by running the switch-vnic-show command.
7)From a separate terminal session on the same /24 network execute the following command substituting your own credentials:
curl -u network-admin:<your_password> -X GET http://192.16.6.200/vRest/software
7)Verify a "success" return.
8)Perform a fail-over test by selecting one switch from the switch-pair and run the following commands.
admin-service-modify if mgmt no-vrrp
admin-service-modify if mgmt vrrp
Caution: To perform this fail-over test, select one switch from the switch-pair and run the following commands. Perform this action on one switch only.
9)Optionally, testing of the fail-over process is possible by rebooting the master switch using the switch-reboot command.