
DUT Endpoints
DUT Endpoints
There are features and functions used in UNUM Manager and UNUM Analytics that are common throughout the user interface (UI). Please refer to the Common Functions section for more information on the use of these functions and features.
DUT (Device Under Test) Endpoints allows the lab network administrator to configure ports connected to tools and devices under test, primarily intended for lab automation. Custom descriptions are permitted and searchable.
DUT Endpoints Menu Items
|
DUT Endpoints |
|
•Edit (Modify Device Under Test) •Port Stats (Real-Time) |
|
|
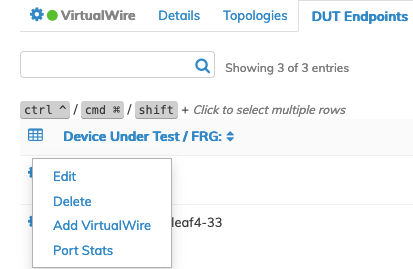
To configure DUT, use the Cog ![]() icon and select Add Device Under Test.
icon and select Add Device Under Test.
Note: The following example covers adding a DUT to a single node for simplicity.
A FRG (Fabric Resource Group) may be selected and assigned to the DUT. Refer to the Manage Groups section to create, use and manage Fabric Resource Groups (FRG).
Enter the required parameters that include:
•Switch – Select the switch from the drop-down list of devices.
•Port – Enter a port value or select ports using the interactive port selector.
•Description – Enter a description for the DUT.
Note: Attempting to use or modify non-flexed ports results in an error.
Select the DUT Options: Edit Configuration or Project. Please refer to the Settings - Projects section for more information on creating projects.
When selecting Edit Configuration, a variety of Attributes and Values are available. Specifying the attribute and its associated value and clicking Apply builds the DUT configuration.
Attributes include:
•FRG – Select a Fabric Resource Group from the drop-down list.
•Speed – Select the required port speed value from the drop-down list.
•Config State – Enable or disable from the drop-down list.
•Autoneg – Enable or disable from the drop-down list.
•Jumbo – Enable or disable from the drop-down list.
•CRC-check – Enable or disable from the drop-down list.
Click the ![]() icon to add additional DUT.
icon to add additional DUT.
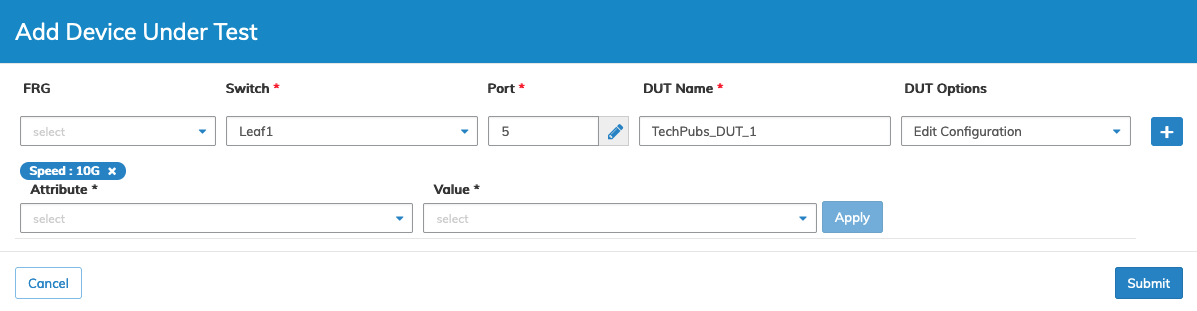
Dashboards VirtualWire - Device Under Test - Add Device Under Test - DUT 1
Add additional DUTs, as required.
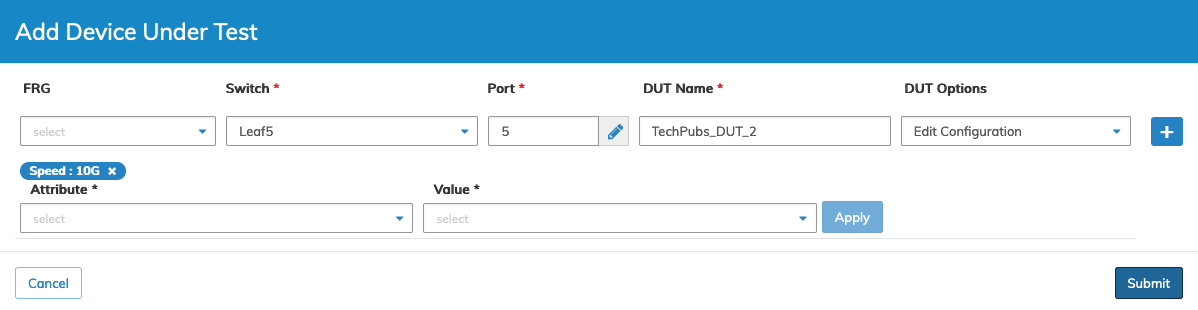
Dashboards VirtualWire - Device Under Test - Add Device Under Test - DUT 2
Click Submit to continue or Cancel to return to the previous screen without making any changes.
Note: If a DUT Option is not selected, the Speed attribute becomes the default value.
The Device Under Test Tab lists the new DUT.
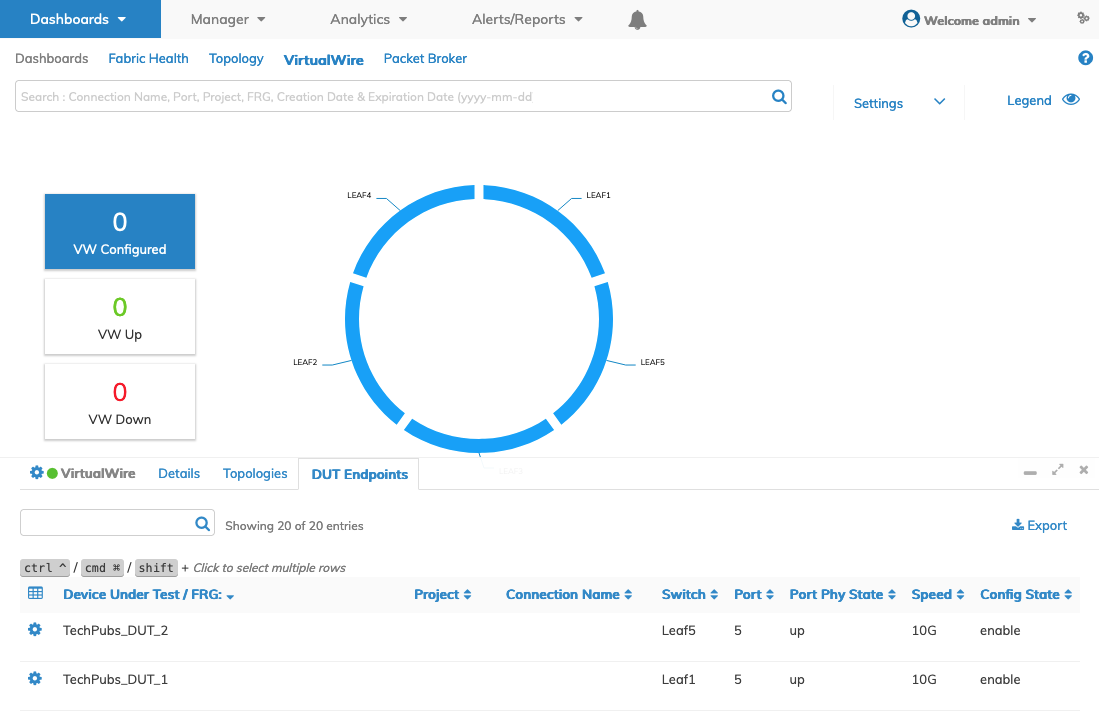
Dashboards VirtualWire - Device Under Test - Updated Dashboard
The Device Under Test dashboard displays the following parameter details:
•Device Under Test / FRG
•Project
•Switch
•Port
•Bezel Port
•Config State
•Port_Phy_State
•Port_Mac
•Speed
•Eth_mode
•VLANs
•Active_VLAN
Search DUT
Search for devices by entering your search criteria. The dashboard updates with the results. Click the ![]() icon to clear the search box.
icon to clear the search box.
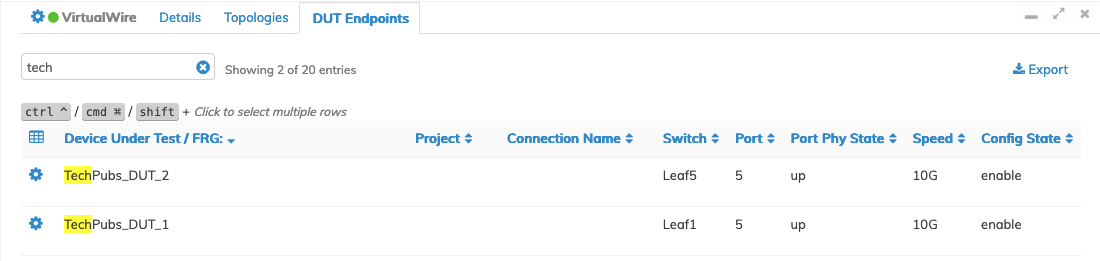
Dashboards VirtualWire - Device Under Test - Search Results Dashboard
Add a VirtualWire to DUT
To add a VirtualWire to the DUT, use the Cog ![]() icon and select Add VirtualWire.
icon and select Add VirtualWire.
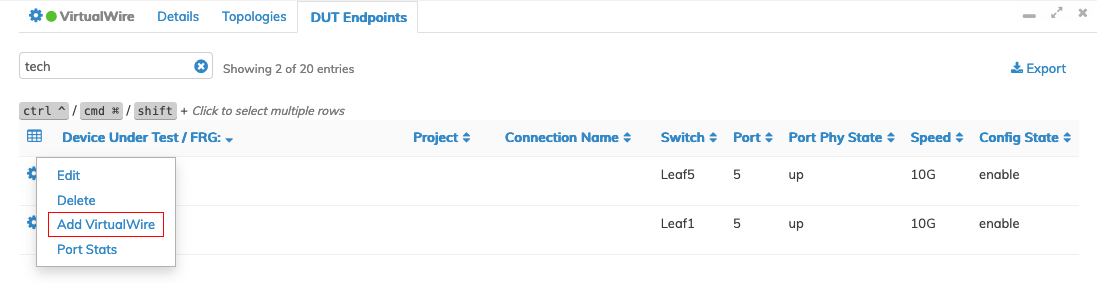
Dashboards VirtualWire - Device Under Test - Add VirtualWire
A FRG (Fabric Resource Group) may be selected and assigned to the VirtualWire. Refer to the Manage Groups section to create, use and manage Fabric Resource Groups (FRG).
Enter the required parameters that include:
•Name – Enter a description for the VirtualWire.
•Node 1 – Select the switch from the drop-down list of devices.
•Node 2 – Select the switch from the drop-down list of devices.
•Port 1 – Enter a port value or select ports using the interactive port selector.
•Port 2 – Enter a port value or select ports using the interactive port selector.
Select the VirtualWire Options that include:
•P2MP – Allows the creation of a point-to-multi-point or one-to-many VirtualWire (e.g., sharing a traffic generator across many devices). Example.
•CRC/Runt Error Transport – Makes a point-to-point VirtualWire transparent to CRC errors and Runt (under-size) frames. Example.
•Monitor Mode – Provides the ability to mirror the traffic on the VirtualWire to one or more remote monitoring/security tools. Example.
•Add Traffic Filter – Allows the basic filtering of VirtualWire traffic based on a 5-tuple (VLAN, Source IP, Destination IP, Protocol, L4 Port) list. Example.
•Expiration Date – Adds a timer to the VirtualWire, which upon expiration will automatically delete the VirtualWire and free up the resources. Example.
•Project – Please refer to the Settings - Projects section for more information on creating projects.
Click the ![]() icon to add additional VirtualWire connections.
icon to add additional VirtualWire connections.

Dashboards VirtualWire - Device Under Test - VirtualWire Settings
Click Submit to continue or Cancel to return to the previous screen without making any changes.
A discovery process runs, and the dashboard updates with the new VirtualWire entries. If the ports are up and connected, the dashboard displays a green connection line between the DUT switches.
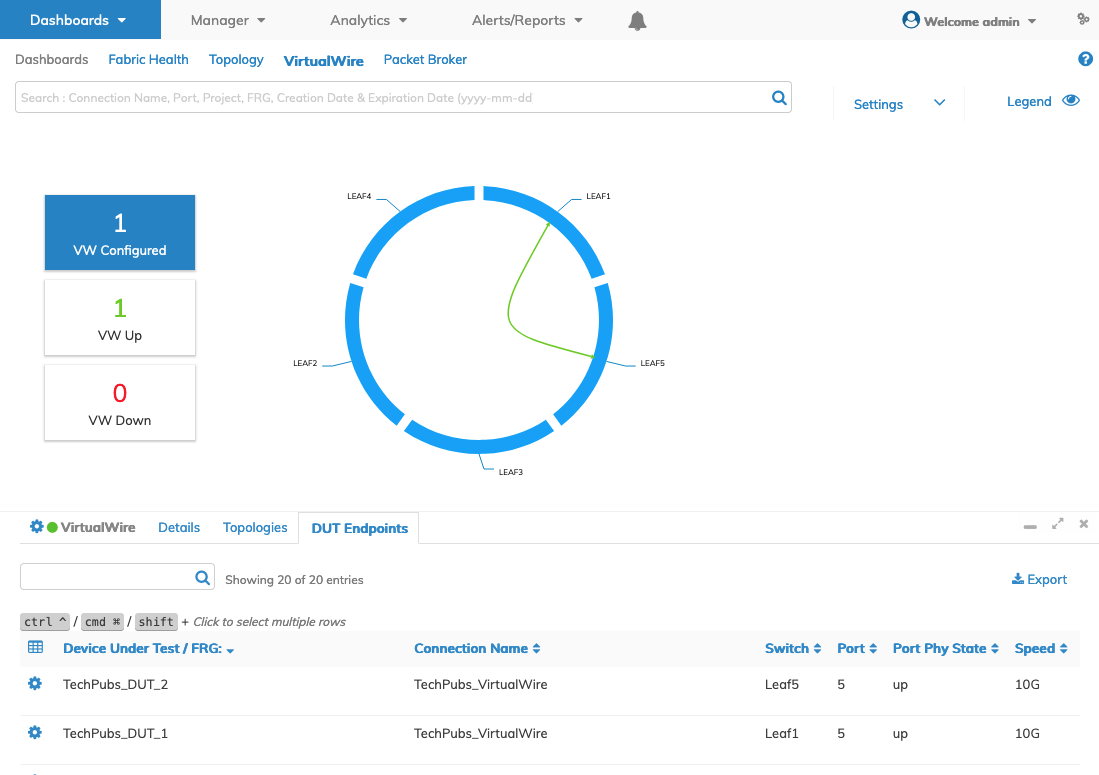
Dashboards VirtualWire - Device Under Test - VirtualWire DUTs Added
Selecting the Details Tab provides specific information about the VirtualWire.
Details include:
•Connection name / FRG
•Switch/Port/State/Description
•Tunnel1/State/VLAN/VXLAN
•Tunnel2/State/VLAN/VXLAN
•Status
•Port Config State
•CRC/Runt Support
•Creation Date / Elapsed Time
•Tracking
•Project
•Expiration Date
•Traffic Filter
Each Connection Name entry displays a status arrow indicating the state of the connection, Up or Down, shown as ![]() or
or ![]() .
.
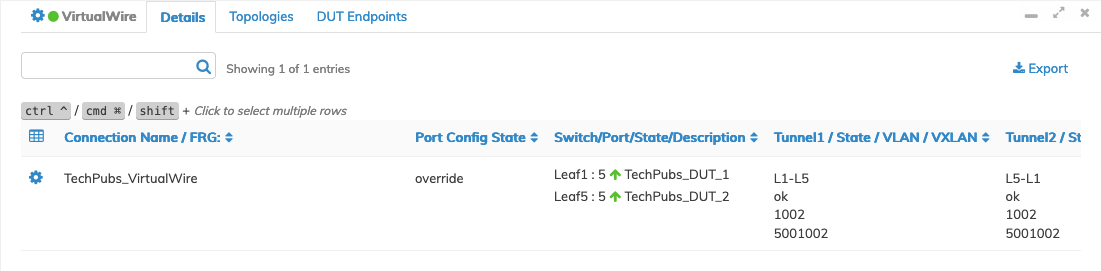
Dashboards VirtualWire - Device Under Test - VirtualWire Details
Expiration Date
Adds a timer to the VirtualWire, which upon expiration, will automatically delete the VirtualWire and free up the resources.
Select Expiration Date from the VirtualWire Options menu to add an expiration date.
Enter the Expiration Date and click Apply.
The expiration date provides Year, Month, Day, and Time by Hour granularity.
The expiration appears in the Expiration Date window. Click Apply to enter the new expiration date value.
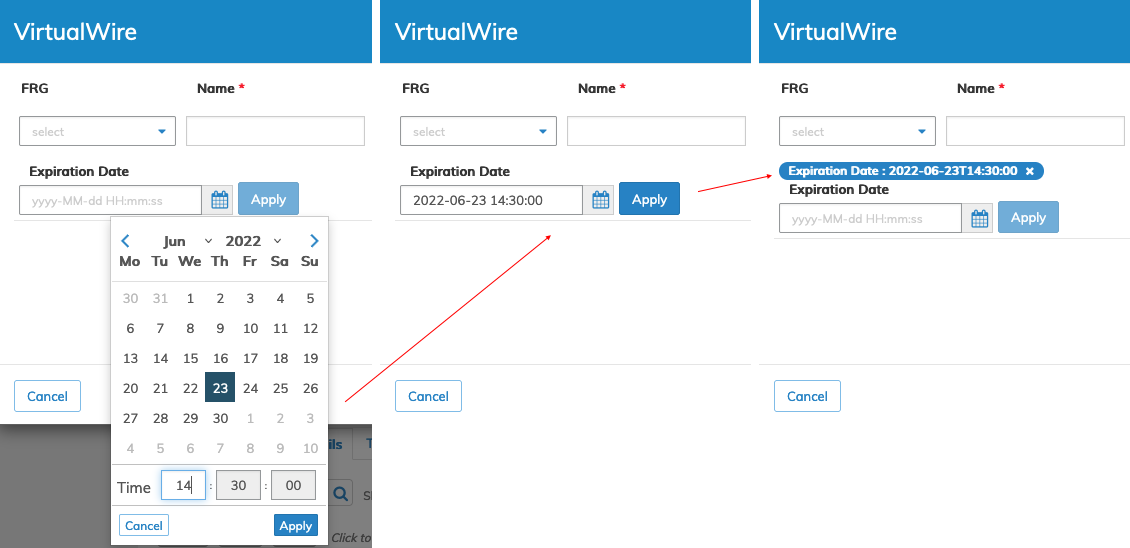
Edit VirtualWire - Device Under Test - Expiration Date
Click Submit to continue.
The Details dashboard displays the expiration date.
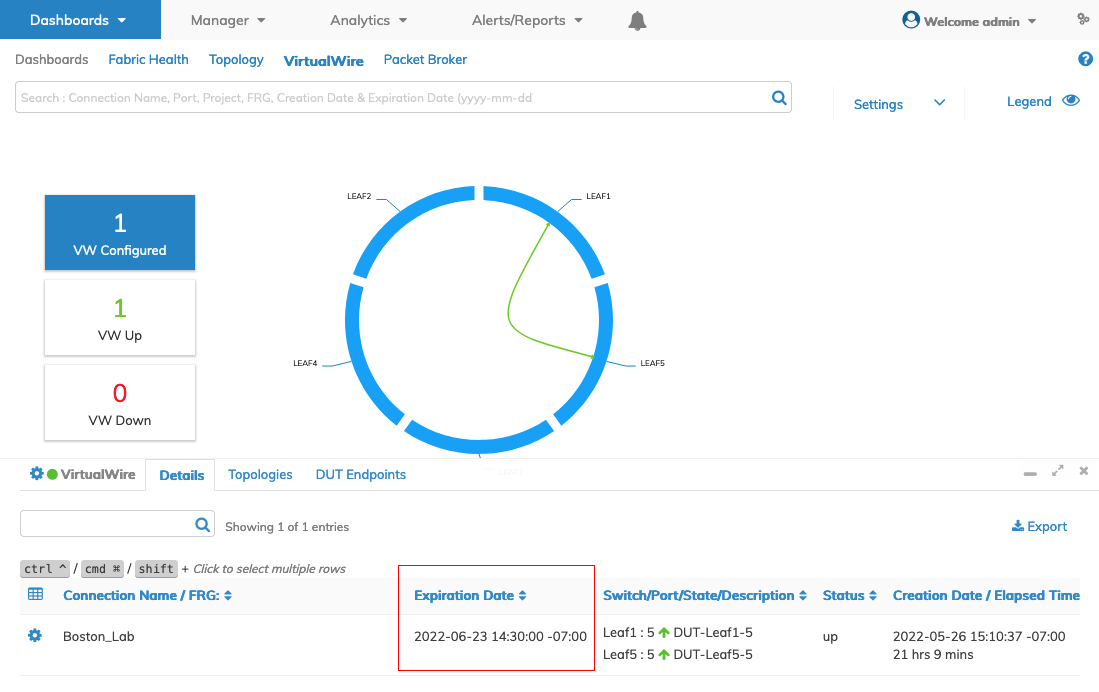
Edit VirtualWire - Device Under Test - Expiration Date - Details Dashboard
Edit - Modify Device Under Test
Select an entry from theVirtualWire DUT Endpoints pane using the Cog ![]() icon.
icon.
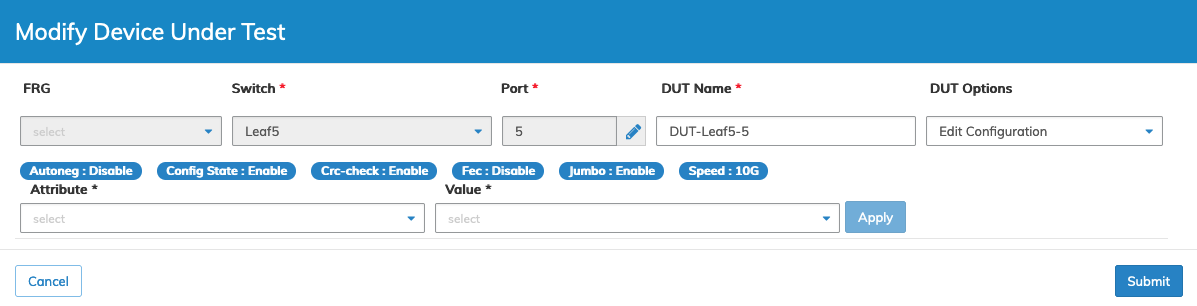
Dashboards VirtualWire - Modify Device Under Test - Settings
The Modify Device Under Test panel displays a list of VW configuration parameters.
Select a choice from DUT Options - Edit Configuration or Project - or an Attribute from the drop-down list and its associated Value.
Make changes as required. Click Apply to enter each change.
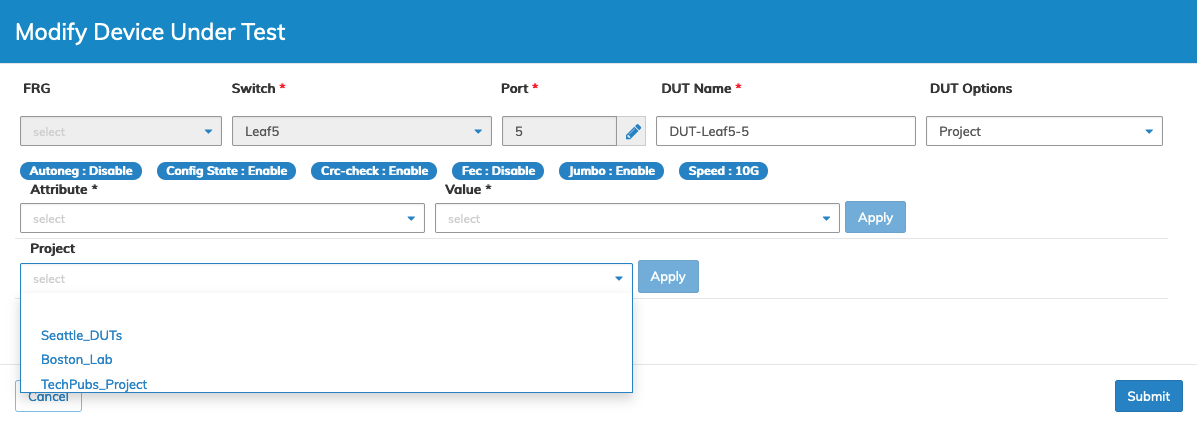
Dashboards VirtualWire - Modify Device Under Test - Project Example
Click Submit to continue or Cancel to return to the previous screen without saving any changes.