
Manage RMA for Switches - Cluster Re-Peer - Restore Switch
Managing RMA for Switches
There are features and functions used in Arista NetVisor UNUM and Insight Analytics that are common throughout the user interface (UI). Please refer to the Common Functions section for more information on the use of these functions and features.
In the event of a switch failure, you must raise an RMA request with the respective hardware vendor.
Caution: Arista Networks strongly recommended performing the RMA process only during a maintenance window.
Note: Both the Cluster Re-Peer and the Restore Switch functions require an out-of-band management network. If no out-of-band management network exists in an In-band or Fabric over Layer-3 (FoL3) deployment, restore and re-peer processes will need to follow the recommended NetVisor OS (CLI) procedures. In that event, use the backup files from NetVisor UNUM in the CLI-based restore/re-peer process. Please refer to Managing RMAs for Switches in the NetVisor OS Configuration Guide for more information on using the CLI process.
After the RMA is received, perform the following process to reconnect the switch to the Fabric:
1.Power on the new switch.
2.Connect to the Console window.
3.Configure the initial switch settings.
4.Enable SFTP and verify SSH and ICMP are enabled on the switch.
5.From your NetVisor UNUM instance, remove the failed switch from the Fabric using Remove Switch (right-click on the switch in the Left-Hand Navigation pane and select Remove Switch).
6.Use ZTP Switch to install or upgrade the software to the same version that was running on the failed switch.
7.Upload or import the previously backed up Configuration file.
8.Verify Backup Settings are correctly set enabled.
In an Arista Unified Cloud Fabric, the configurations can be on a per scope basis: Local, Cluster, or Fabric-scoped configurations.
The scope defines the set of nodes participating in a transaction:
•Local — only the local node (switch) participates in the transaction
•Cluster — only two cluster peer nodes participate in the transaction
•Fabric — all nodes in the same Fabric instance participate in the transaction
Based on the switch configurations, use the below processes to restore the configurations on an RMA switch.
Cluster Re-Peer Process
When the failed switch is part of a cluster, Arista recommends using the cluster re-peer process to restore configuration on the failed switch.
Use the following process if one of the member nodes of the cluster is active and none of the nodes in Fabric is offline, except the faulty node.
This is helpful because each cluster node automatically backs up the other node's configuration. If one node in the cluster fails, the above command restores the configuration from the other node.
Caution: Execute only one re-peer or restore at a time. Please do not attempt to run multiple re-peer or restore operations simultaneously; otherwise, they will fail.
Note: Before proceeding, enable both SSH and ICMP on the switch.
Caution: The software versions on the cluster switches must be identical; otherwise, the re-peer will fail.
From the LHN in the Topology dashboard, right-click on the Switch name and click Cluster Re-Peer.
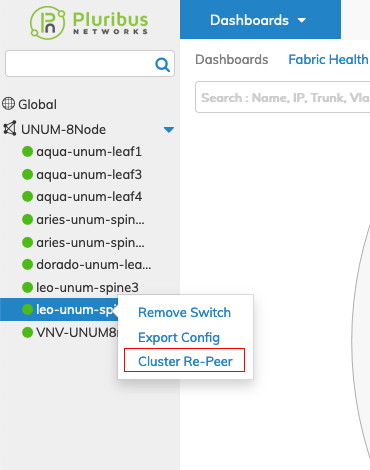
Select Switch - Cluster Re-Peer
Enter the requisite switch values in the configuration window.
Note: Both the Hostname and the IP address are mandatory. The Cluster Re-Peer process uses the IP address to connect to the switch while using the Hostname to set the Switch Name and during the EULA acceptance.
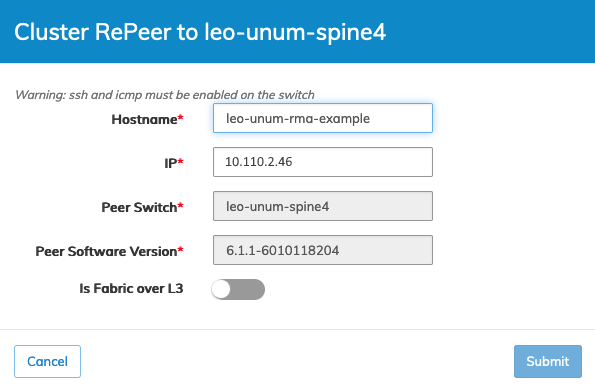
Cluster Re-Peer Settings
If a Management Network interface is not in use and the Fabric only connects over FoL3, set the Is Fabric over L3 selector to On.
The following images are an example of the re-peering process in operation.
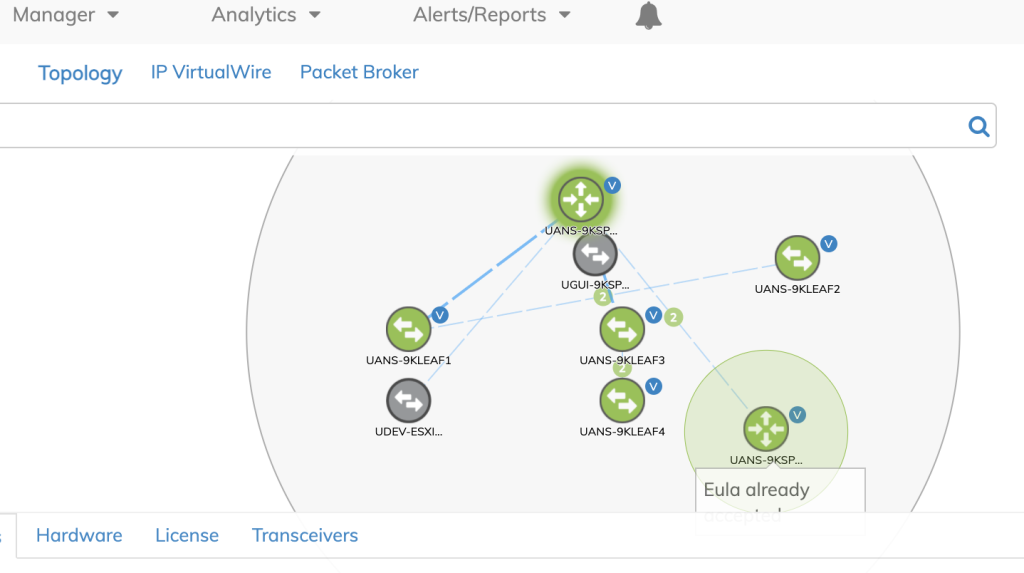
NetVisor UNUM Topology Left-hand Navigation - Cluster Re-Peer Start
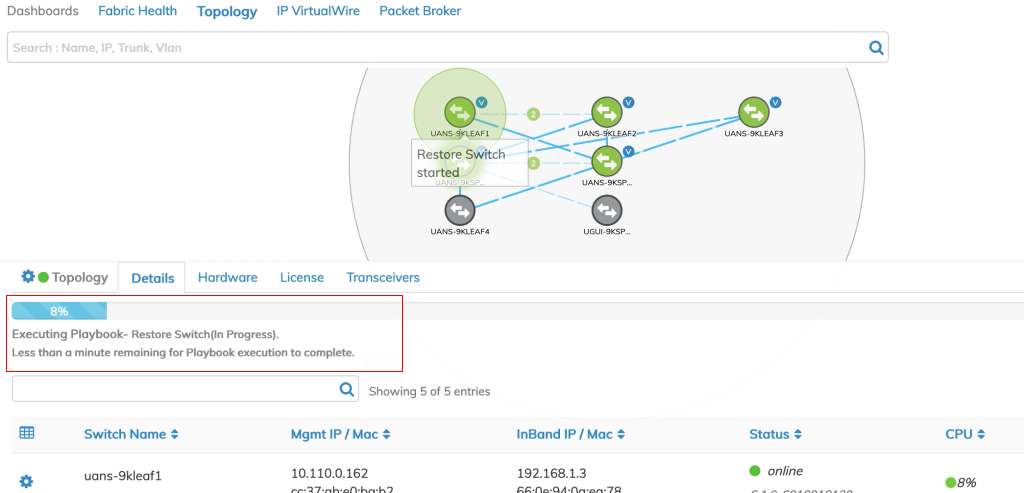
NetVisor UNUM Topology Left-hand Navigation - Cluster Re-Peer Progress Bar
Restore Switch
Restore Switch provides the functionality to restore configuration settings to a failed switch in the selected Fabric.
Caution: Execute only one re-peer or restore at a time. Please do not attempt to run multiple re-peer or restore operations simultaneously; otherwise, they will fail.
Selecting Dashboards → Topology → Left-Hand Navigation → Fabric Name → Restore Switch triggers the process.
Enter the required parameters including, Host Name, Config Time Stamp, and an IP address. You have the option to upload a configuration file using Upload Config.
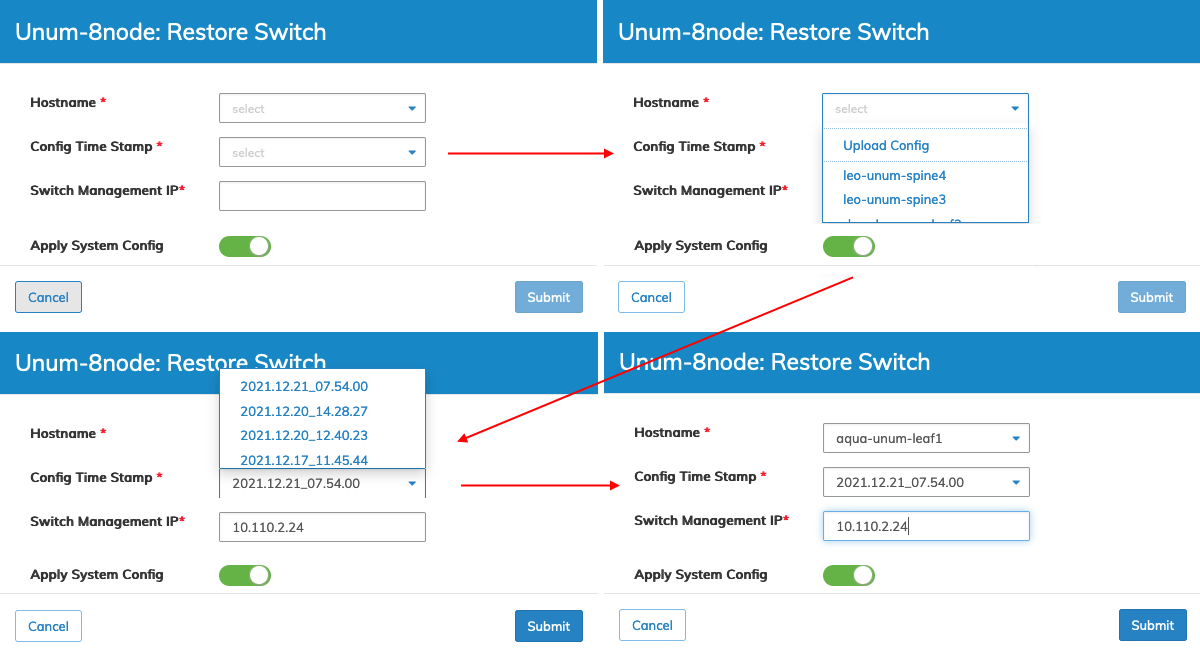
NetVisor UNUM Topology Left-hand Navigation - Restore Switch
Click Submit to continue or Cancel to return to the previous screen without making any changes.
The Restore Switch process begins, and a series of progress messages display in the dashboard.
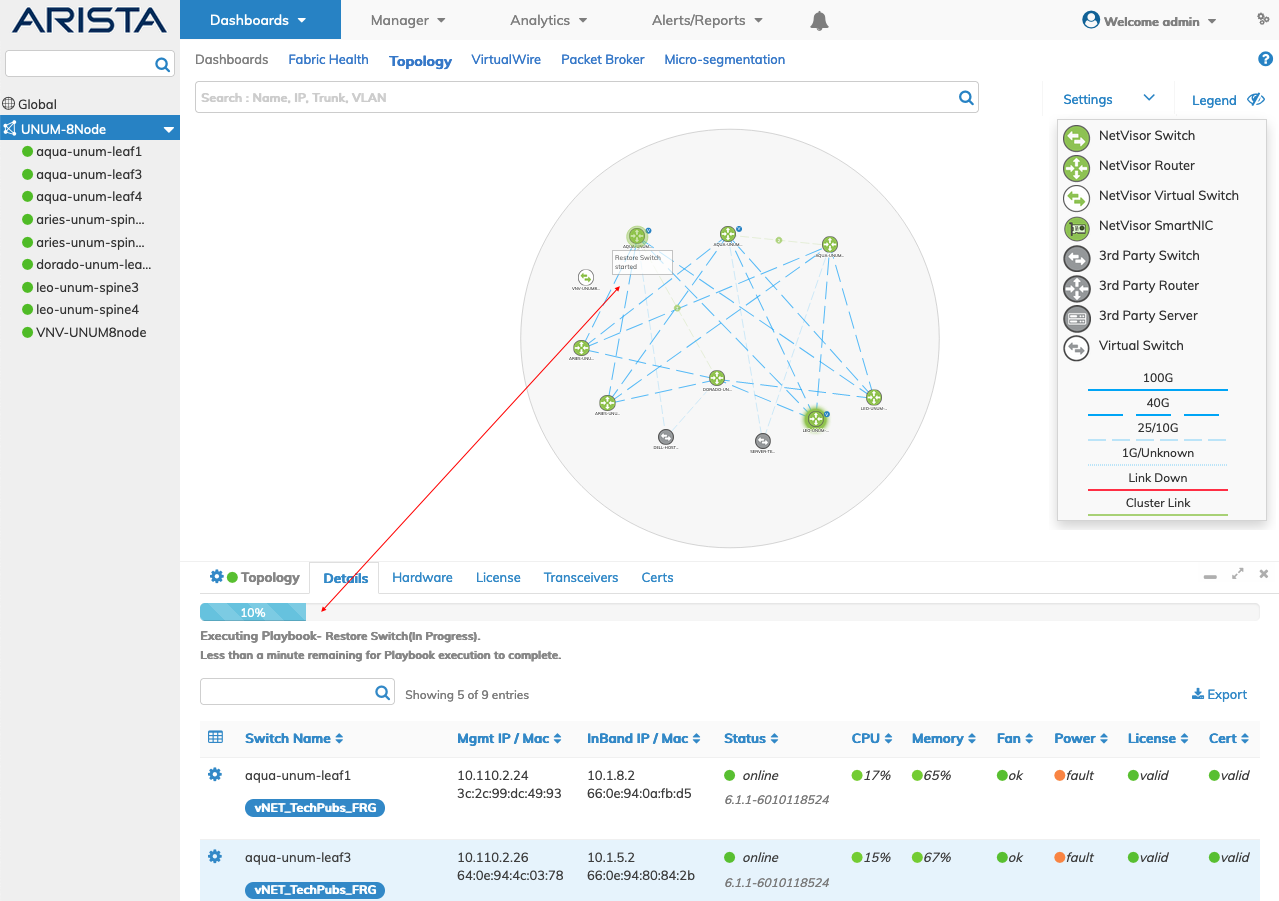
NetVisor UNUM Topology Left-hand Navigation - Restore Switch Triggered
Note: The switch version must match existing switch versions in the Fabric; otherwise , an error message displays, and the restore process fails. When running NetVisor UNUM, Arista Networks recommends using ZTP Switch to install the switch software.
Restore Switch errors appear in Notifications and trigger an Alarm Bell.
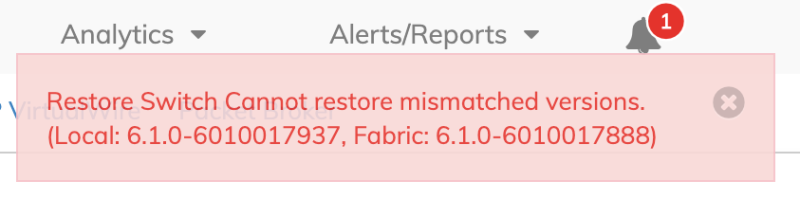
NetVisor UNUM Topology Left-hand Navigation - Restore Switch Failure Message

NetVisor UNUM Topology Left-hand Navigation - Restore Switch Failure Notification
Caution: When restoring a switch in a Super Fabric, you must ensure the uploaded configuration file matches the exported file name; otherwise, the restore process will fail. Arista Networks recommends using the Export Config feature in NetVisor UNUM and not making any changes to the file name after the export.
Note: As a best practice, Arista Networks recommends periodically backing up the configurations of all Fabric nodes (including cluster nodes) and saving the configurations to an external server. Refer to Backup Settings and Backup Now for more information.