
Topology
Interactive Real-Time Topology Visualization
An interactive topology dashboard provides a comprehensive at-a-glance real-time view of network operations' current state and health.
•All connected devices are automatically discovered, including compatible adjacent third-party networked devices and connected endpoints, such as physical and virtual servers
•Granular flow-on-flow traffic path visualization superimposes traffic and state on the topology map exposing traffic and applications traversing the network
•Unified workflows allow operators to quickly isolate flows between endpoints to simplify troubleshooting and contextually drill-down to Insight Analytics for more in-depth analysis.
Topology
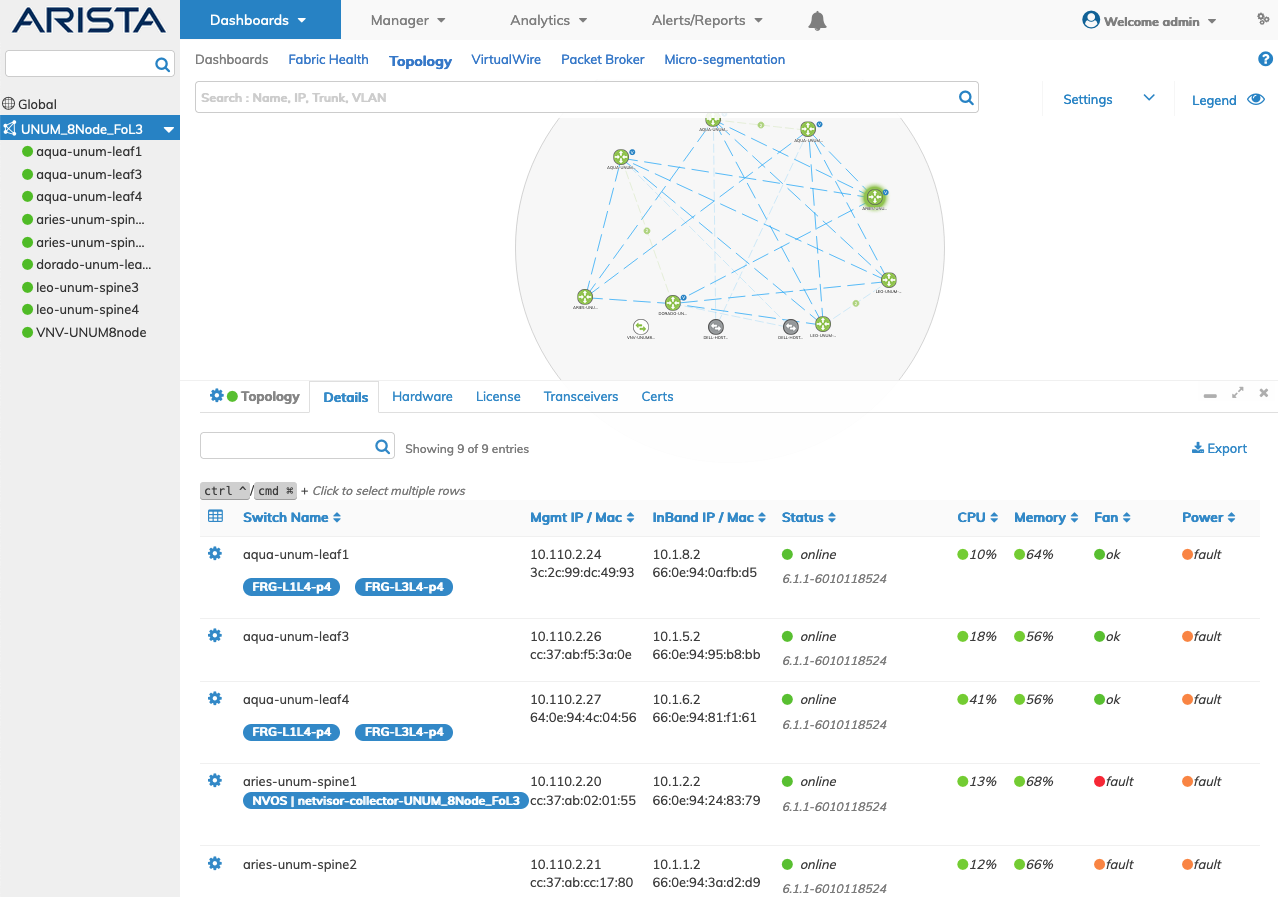
Selecting Dashboards → Topology displays important information about the Fabric devices and/or individual devices within the Fabric within a topology map or multiple topology maps depending on the number and fabrics and the connectivity between fabrics.
In general, the Left-Hand Navigation (LHN) pane displays the following characteristics for the following dashboards:
•When selecting a Super-Fabric on the LHN, the Topology shows all the switches. To view the Pods on the Topology, select the "Highlight Pod" checkbox, which will enable the Pod circles. The Seed Switch of the respective pods/Fabric highlights. The details panel will list information of all the switches under the selected Super-Fabric.
•When selecting a Pod/Fabric under a Super-Fabric, the entire Super-Fabric to which the pod belongs is displayed, and only the chosen pod highlights on the Topology. The "Highlight Pod" checkbox has no effect in this case. The Seed Switch of the selected pods/Fabric also highlights. The details panel will list information of all the switches under the selected pod/Fabric.
•When selecting a switch on the LHN, the entire Super-Fabric to which the switch belongs displays, and only the switch highlights. When the "Highlight Pod" checkbox is selected, the Pod/Fabric to which that switch belongs highlights. The details panel will list information about the designated switch.
For purposes of clarity and conciseness, the Topology Map documentation contains several sections which include:
Note: Selecting Dashboards → Topology displays information about a Fabric assuming a fabric was created and added. For more information about creating and adding a Fabric please refer to the ZTP - Zero Touch Provisioning section in this manual.
Warning: NetVisor UNUM requires all hosts, switches, and servers to run LLDP if they are to appear in the Topology.
There are features and functions used in Arista NetVisor UNUM and Insight Analytics that are common throughout the user interface (UI). Please refer to the Common Functions section for more information on the use of these functions and features.
Topology Dashboard

NetVisor UNUM Topology Default Dashboard
Create Fabrics
To create a Fabric, right-click on Global and select + Add Fabric.
For more information on creating fabrics, refer to details under the Manager Add Fabric section.
Depending on the existing configuration state of your NetVisor UNUM instance, a topology map displays if you have previously configured a Fabric and Seed Switch. In that case, NetVisor UNUM may display a topology, as shown in the following example.
Note: Example displayed topologies are arranged for illustrative purposes in the document.
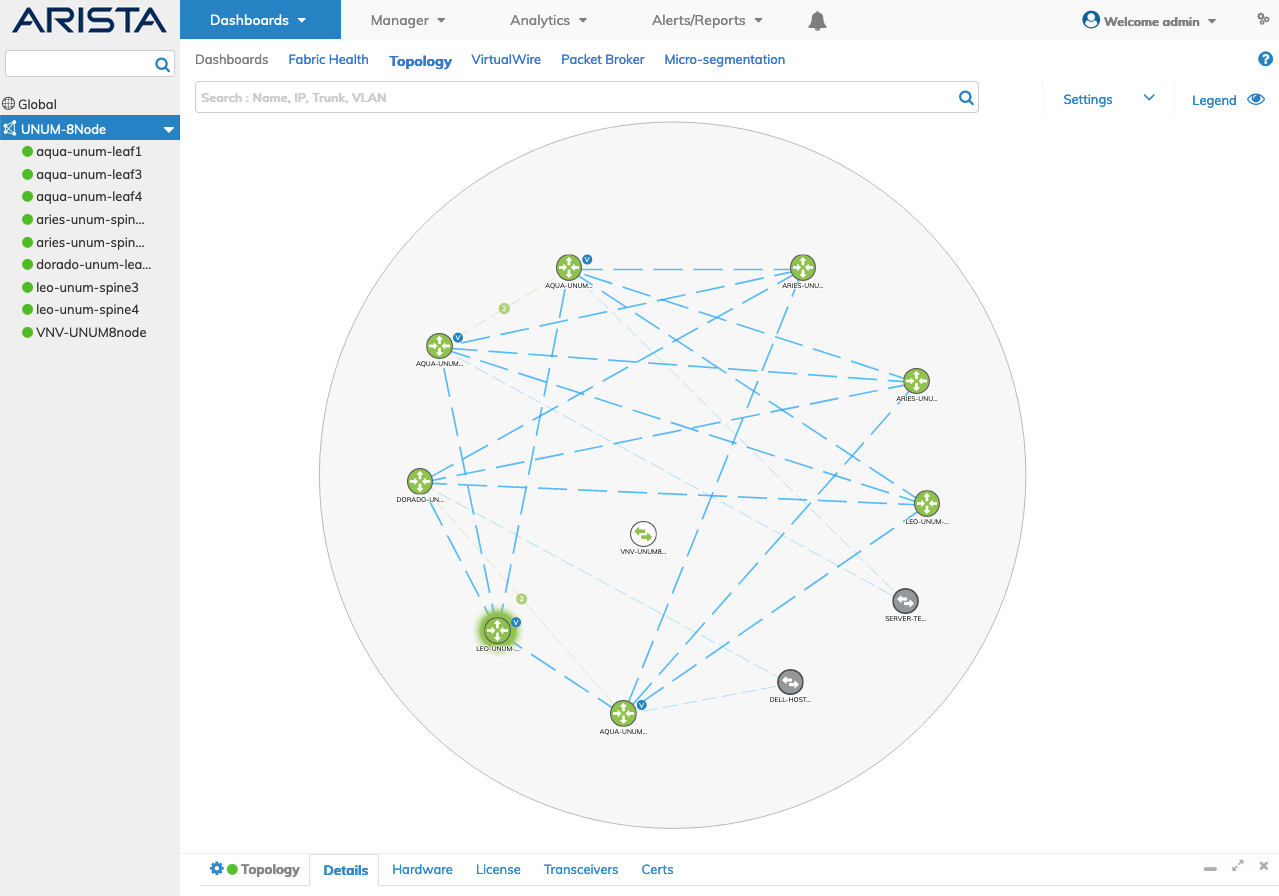
NetVisor UNUM Topology Map Example
If the Global Fabric navigation bar does not contain any Fabrics, right-click on Global and select + Add Fabric or proceed to NetVisor UNUM Global Add to set up your Fabric.
Fabric Icons, Pods and Switches
|
|
Left Hand Navigation (LHN) Header |
|
|
Fabric or Pod Icon |
|
|
Super Fabric Icon |
|
|
Fabric Name |
|
|
Fabric Name Rollover |
|
|
Switch Name & Status |


NetVisor UNUM Left-Hand Navigation Example
The Left-Hand Navigation (LHN) pane provides specific information about Fabric, Super Fabric and Pod structures.
•When selecting a Super-Fabric on the LHN, the Topology shows all the switches. To view the Pods on the Topology, select the "Highlight Pod" checkbox, which will enable the Pod circles. The Seed Switch of the respective pods/Fabric highlights. The details panel will list information of all the switches under the selected Super-Fabric.
•When selecting a Pod/Fabric under a Super-Fabric, the entire Super-Fabric to which the pod belongs is displayed, and only the chosen pod highlights on the Topology. The "Highlight Pod" checkbox has no effect in this case. The Seed Switch of the selected pods/Fabric also highlights. The details panel will list information of all the switches under the selected pod/Fabric.
•When selecting a switch on the LHN, the entire Super-Fabric to which the switch belongs displays, and only the switch highlights. When the "Highlight Pod" checkbox is selected, the Pod/Fabric to which that switch belongs highlights. The details panel will list information about the designated switch.
Super-Fabric selected on LHN and "Highlight Pod" enabled shows the Pods/Fabrics highlighted as illustrated below.
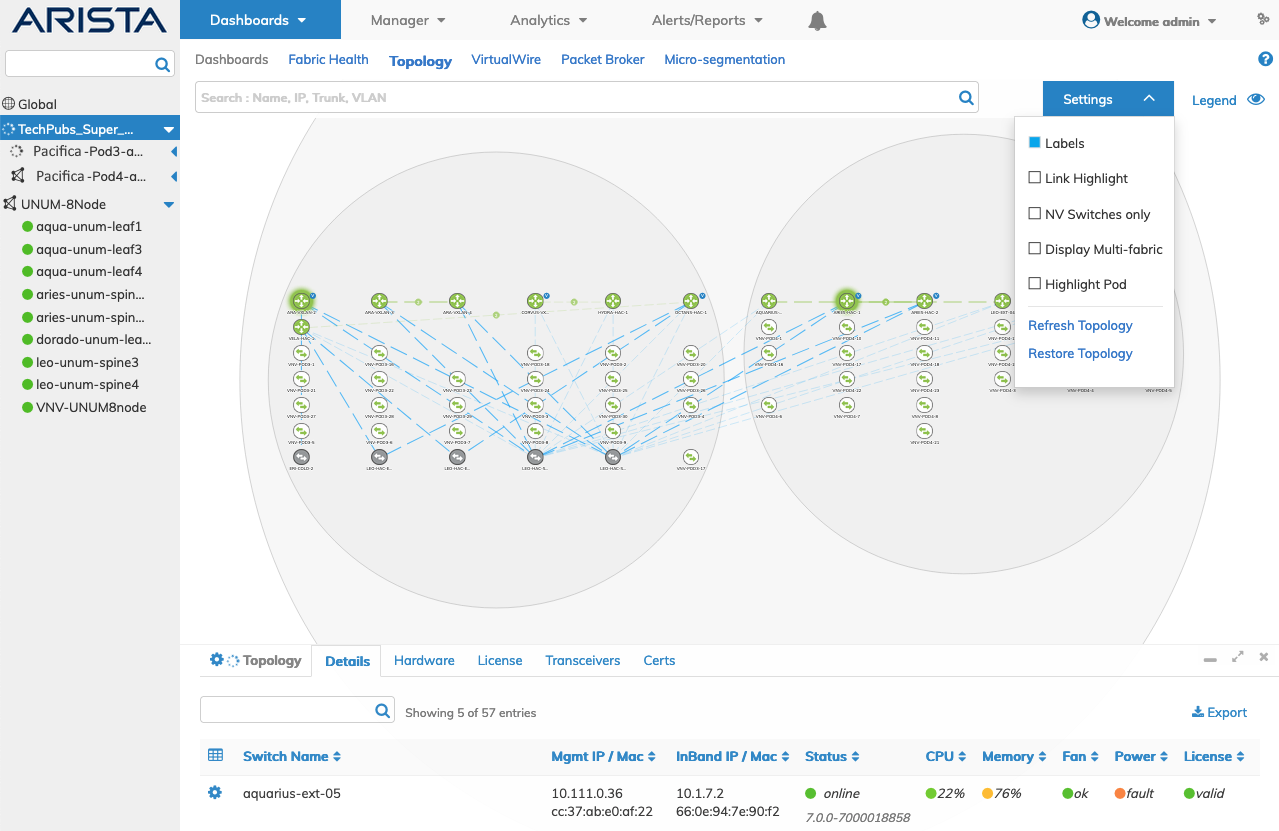
NetVisor UNUM Dashboard Super Fabric Highlight Pod
Pod/Fabric selected on LHN, the selected pod is highlighted on the topology.
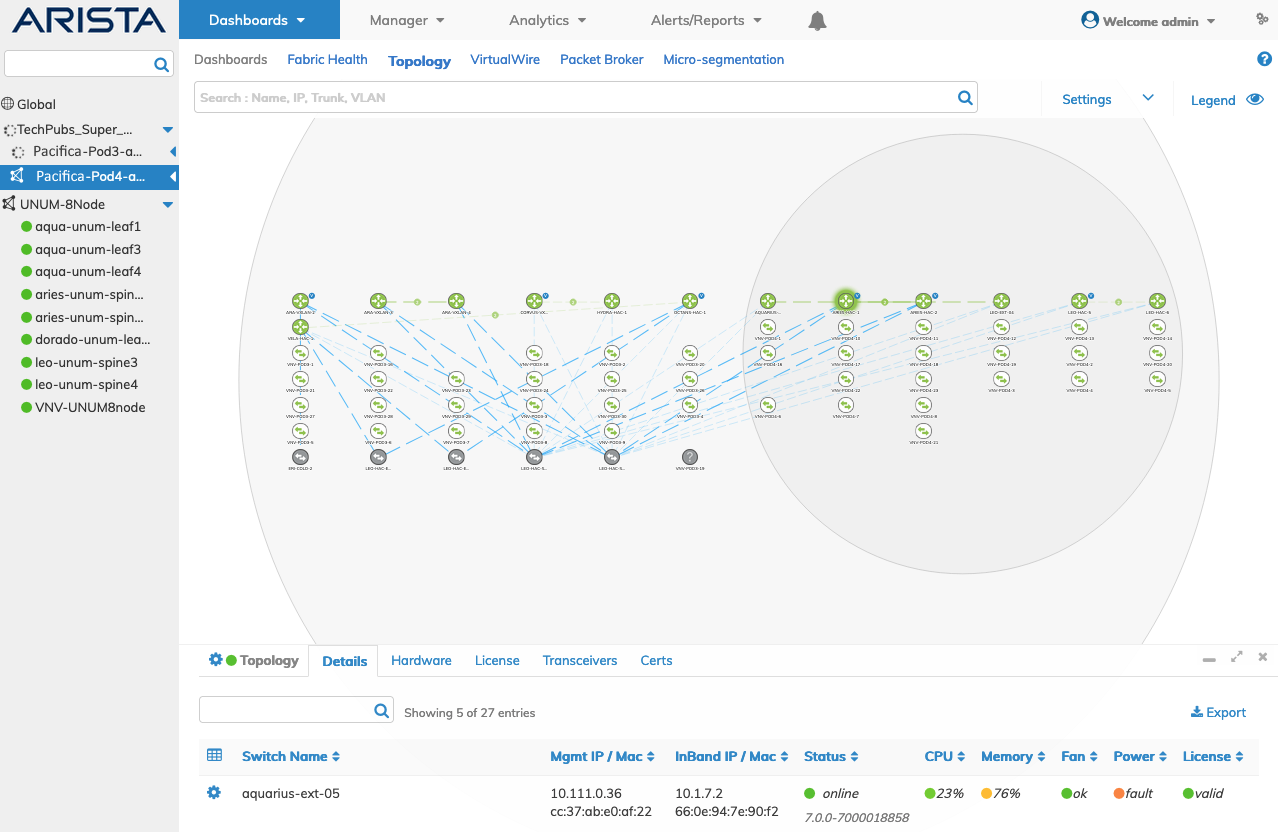
NetVisor UNUM Dashboard Pod/Fabric Highlight Pod
Link Down
Connections between devices are represented in the topology map as solid and dashed lines.
•Active links show in blue (blue).
•Down links show as red (red).
•Cluster links show as green (green).
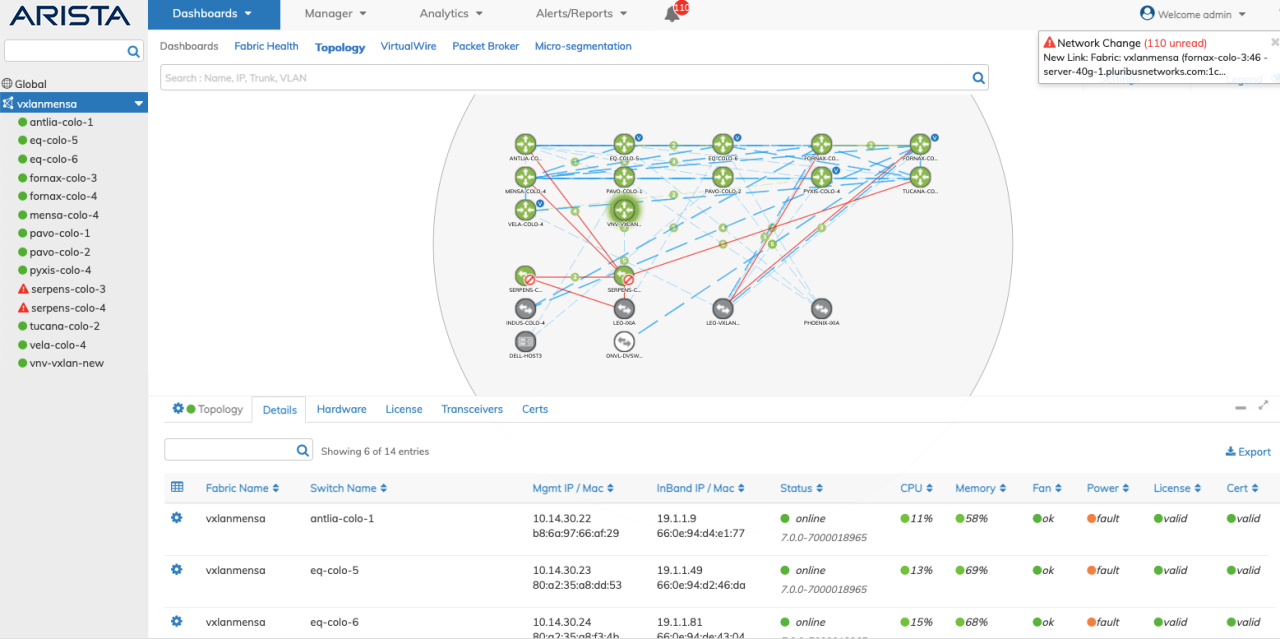
Two switches and their associated links show as down in the following Topology dashboard example. The LHN indicates the down switches using red icons and red lines in the topology map.
NetVisor UNUM Dashboard Link and Switch Marked Down
The All Notifications dashboard displays the down link details.
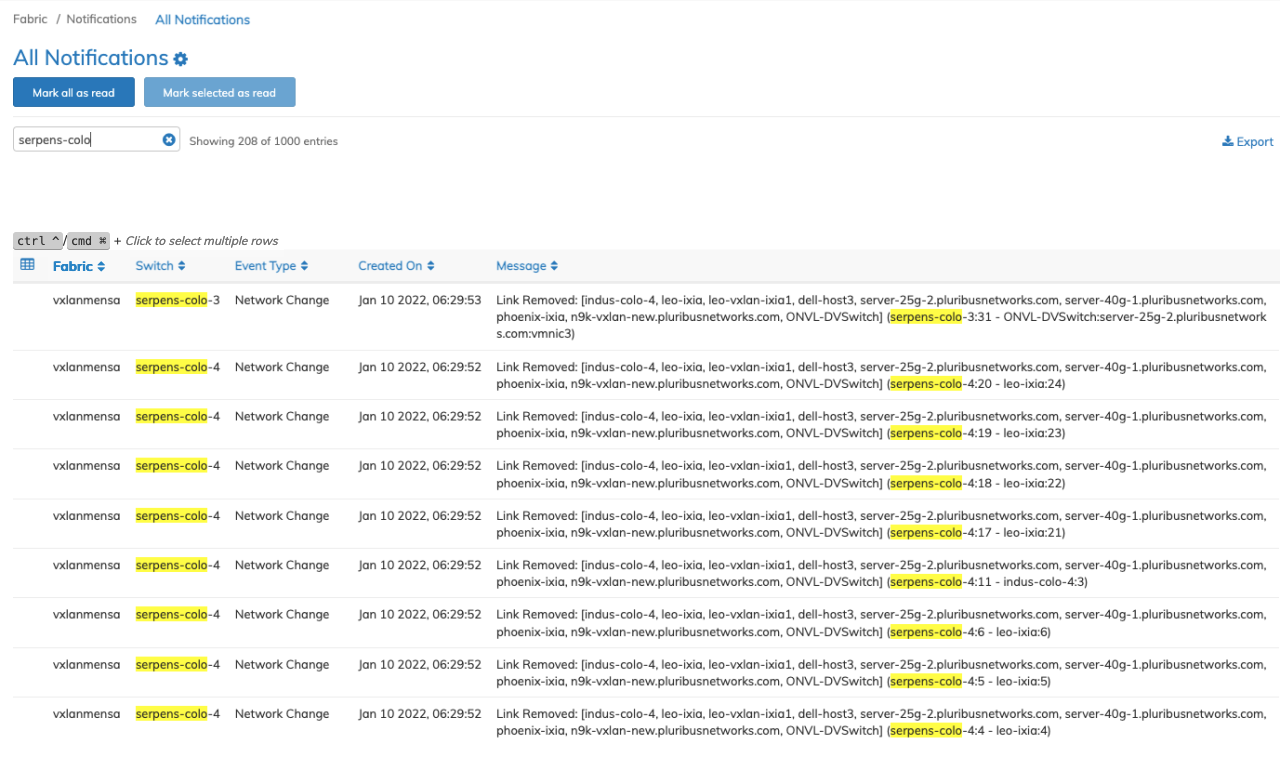
NetVisor UNUM All Notifications Dashboard - Link and Switch Marked Down
Super Fabric versus Fabric Iconography
The difference between a standard Fabric (ursa-lyon) and a Super Fabric (TechPubs_SF) topology is illustrated below.
![]()
NetVisor UNUM Topology - Fabric Icons
For more information on creating fabrics, refer to details under the Manager section.
Topology Dashboard Left-Hand Navigation (LHN) Features
Global
Right-clicking on Global reveals a series of command functions for creating a Fabric and configuring Backup settings. These are:
•Add Fabric – Add a Fabric using one of the following: Fabric Designer, Netvisor Fabric License, or, Quick Start.
•Backup Settings – Enable Backup and enter backup configuration values.
•Create Group – Create either a Fabric Resource Group (FRG) or a User Group (UG).
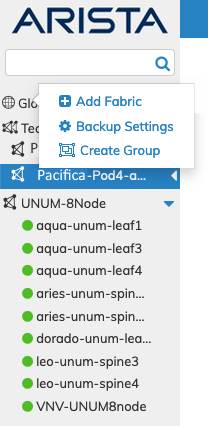
NetVisor UNUM Topology Left-hand Navigation - Global Menu - Add Fabric, Backup Settings and Create Group
Backup Settings
Select Backup Settings and enter the applicable configuration values in the Update Backup Settings window.
Backups are stored on an NFS Server (when configured) or the local NetVisor UNUM instance with an option to save to a secure remote location using SFTP.
To enable/disable backups, use the Enable Backup selector switch.
Enter the number of backups required, the backup interval in days and the backup time in 24H format.
NetVisor UNUM provides a countdown to the next backup event. For example "The next backup is scheduled for August 29 at 5:12."
Secure SFTP Connectivity
Save backups via a secure SFTP connection to a remote host.
With the SFTP option enabled, backups will still be saved to the default location, either NFS or local, and mirrored to the specified remote location. Purging of old backups will affect the remote location as well.
Enter the settings for:
•SFTP Host – IP Address or FQDN of the SFTP host.
•SFTP Port – Secure port number used by the SFTP host, i.e., port 22.
•SFTP Path – Directory to store the backups on the SFTP host.
•SFTP User – Username of the SFTP account on the SFTP host.
•SFTP Password – The SFTP user account password. The password is encrypted and saved. When re-editing the configuration, the password field will be blank. When left blank, the old password is used.
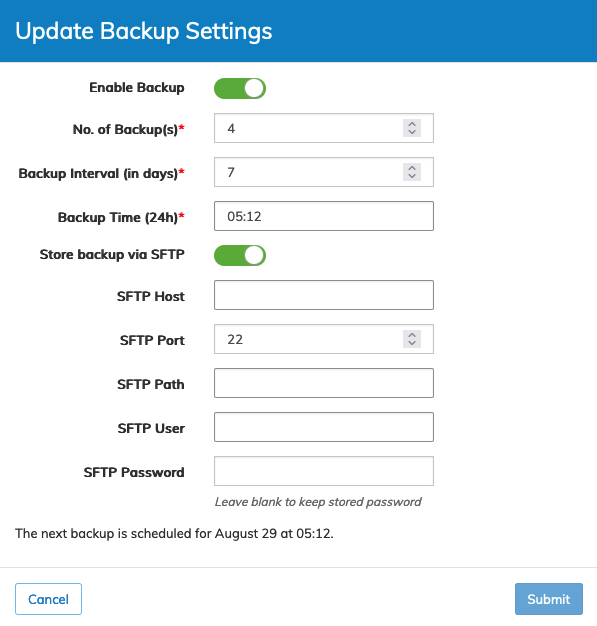
NetVisor UNUM Topology Left-hand Navigation - Backup Settings Configuration
Click Submit to continue or Cancel to return to the previous screen without making any changes.
After pressing Submit, testing of the SFTP connection occurs. If the test fails, the configuration popup screen remains open, and the settings are unsaved until the SFTP configuration is corrected or SFTP is disabled.
Note: When SFTP is enabled, entering the SFTP password and clicking Submit saves the settings and the password for future use. Once stored, the password field will appear blank for security purposes on subsequent use.
A confirmation message displays.
Note: After enabling Backup and by default, the daily job runs at approximately 3:12 am local time unless changed.
Create Groups
Select Create Group and enter the required information to create either a Fabric Resource Group (FRG) or a User Group (UG).
Create Fabric Resource Group
Note: For more information on creating, editing and deleting groups, please refer to the Manage Groups section.
To create a Fabric Resource Group, click Create Groups.
Enter the required details for the group including:
Name – Unique Name for the Fabric Resource Group.
Description – The description of the Fabric Resource Group.
Owner – Leave blank to create a new group or select an owner (if present) to assign as a sub-group.
Filter Type – Fabric Resource Group for switches and devices.
Click the ![]() icon and enter:
icon and enter:
Fabric – Assign a Fabric to the group.
Switch – Select a switch from the drop-down list.
Ports – Use the interactive port selector to select the specific ports to be managed by the group.
Click Apply to continue. The fabric name, switch name and managed ports appear in the configuration menu.
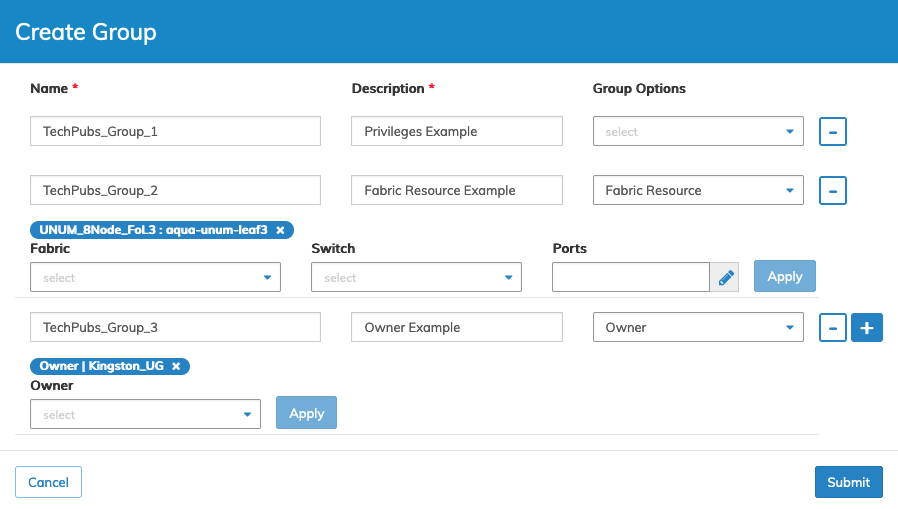
NetVisor UNUM Settings Manage Groups Create Fabric Resource Group
Click Submit to continue or Cancel to return to the previous screen without making any changes.
Create User Group
Note: For more information on creating, editing and deleting groups, please refer to the Manage Groups section.
To create a User Group, click Create Groups.
Enter the required details for the group including:
Name – Unique Name for the User Group.
Description – The description of the User Group.
Owner – Leave blank to create a new group or select an owner (if present) to assign as a sub-group.
Filter Type – Privileges for role-based User Group.
Click the ![]() icon and enter:
icon and enter:
Menu – Page(s) assigned to the User Group. Leave blank to select all.
Module – Active when a specific Menu assigned to User Group, otherwise blank if Menu left blank.
Ports – Use the interactive port selector to select the specific ports to be managed by the group.
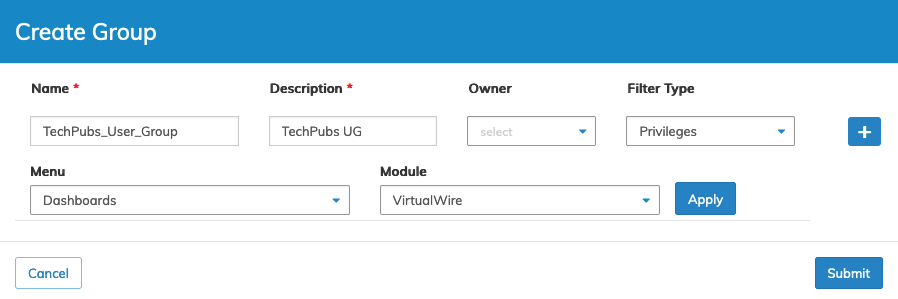
NetVisor UNUM Settings Manage Groups Create User Group Configuration Menu
Click Apply to continue. The menu and module (page) appears in the configuration menu.
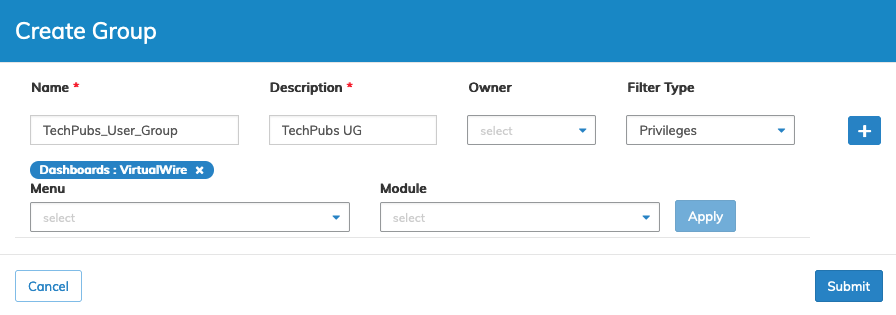
NetVisor UNUM Settings Manage Groups Create User Group Configuration Menu - Updated
Click Submit to continue or Cancel to return to the previous screen without making any changes.
Note: For more information on creating, editing and deleting groups, please refer to the Manage Groups section.
Fabric Name Menu
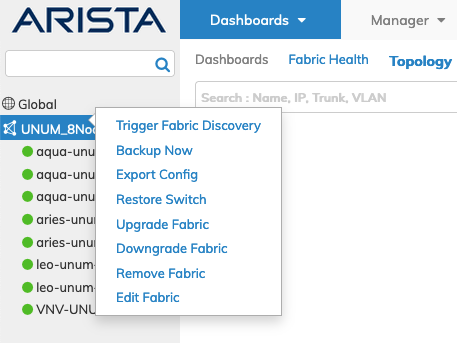
Right-clicking on a Fabric Name reveals a series of command functions for managing the Fabric. These include:
|
•Trigger Fabric Discovery – Trigger a Fabric discovery process. •Backup Now – Back up switch configurations to an NFS Server (when configured) or the local NetVisor UNUM instance. •Export Config – Export switch configurations and save them to a file. •Restore Switch – Restore a failed switch from a saved configuration file. •Upgrade Fabric – Perform Fabric upgrades installing new software. •Downgrade Fabric – Perform Fabric downgrades returning to a prior boot environment. •Remove Fabric – Remove a Fabric from NetVisor UNUM. •Edit Fabric – Update Fabric passwords. |
|
Switch Name Menu
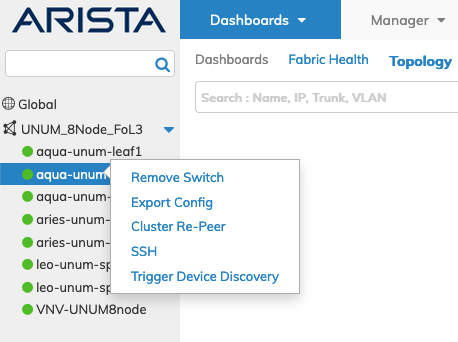
Right-clicking on a Switch Name reveals a series of command functions for managing an individual switch. These include:
|
•Remove Switch – Remove a failed switch from a Fabric. •Export Config – Export a single switch configuration and save to a file. •Cluster Re-Peer – Replace a failed cluster switch and rebuild the cluster. •SSH Console - Access a switch via a SSH Console session for the selected switch. •Trigger Device Discovery - Trigger a device discovery of the selected switch. |
|
Trigger Fabric Discovery
Trigger a Fabric discovery using the left-hand navigation bar and highlighting a particular Fabric, right-clicking on that Fabric, and then selecting Trigger Fabric Discovery.
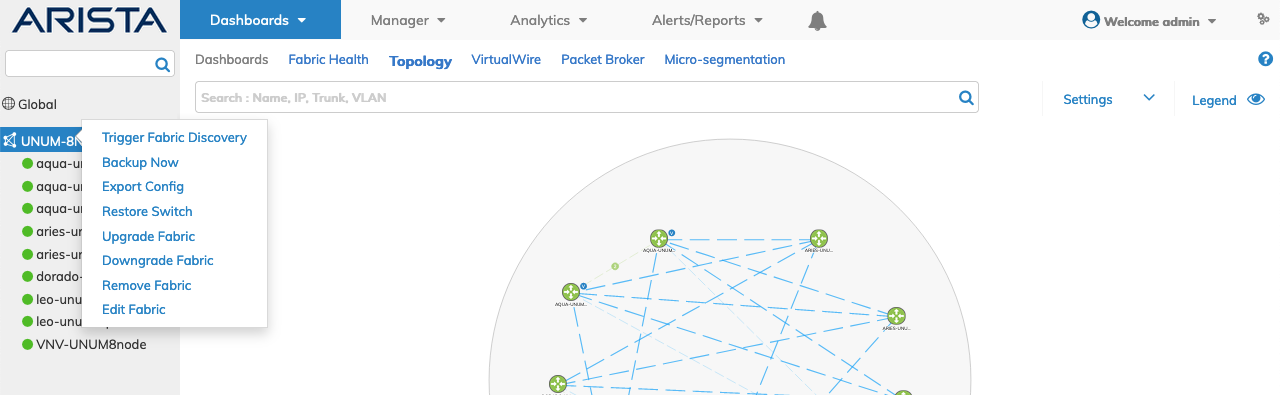
NetVisor UNUM Topology Left-hand Navigation - Trigger Fabric Discovery
A confirmation message appears and the discovery process begins.
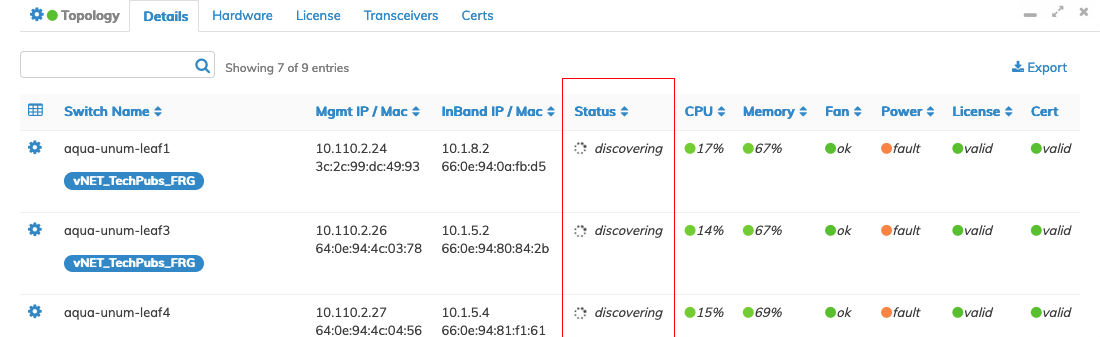
The Details pane status column provides feedback during the discovery process.
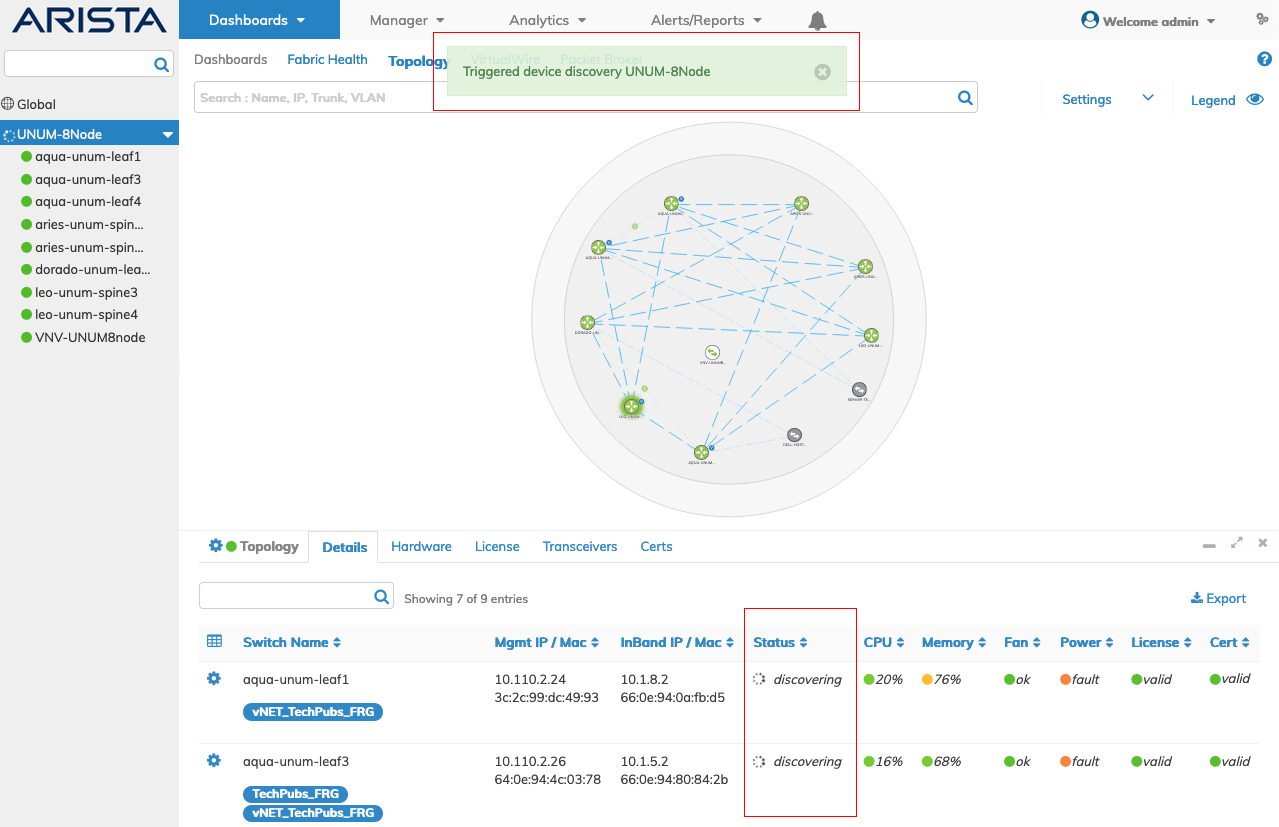
NetVisor UNUM Topology Left-hand Navigation - Trigger Fabric Discovery - Status
Backup Now
Backup Now provides the functionality to backup each and every switch configuration in the selected Fabric.
Backups are stored on an NFS Server (when configured) or the local NetVisor UNUM instance.
•NFS Location: ~/var/vcf/data/snapshots/netvisor_backups.tar.gz
•Local NetVisor UNUM Instance: ~/var/vcf/data/netvisor_backups.tar.gz
From the LHN, select Backup Now. The backup process begins and a confirmation message displays.
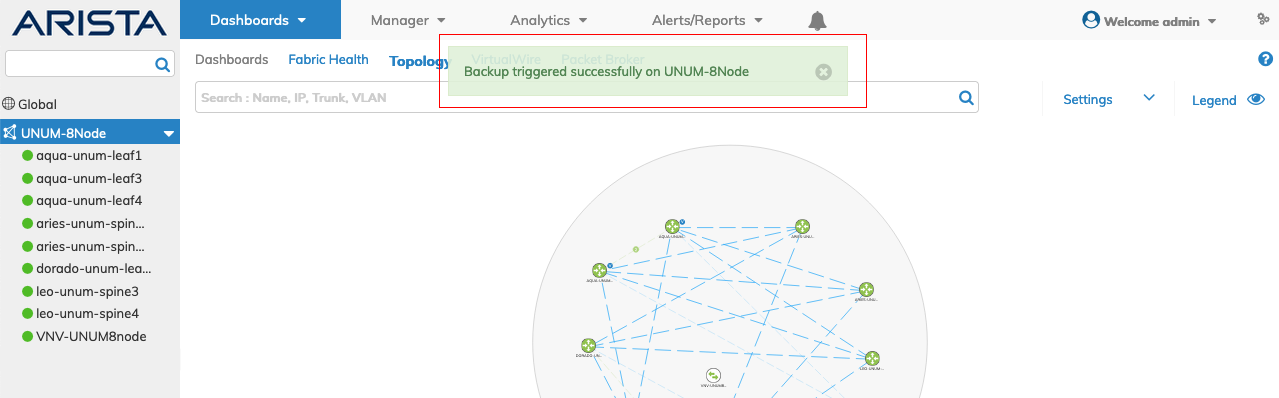
NetVisor UNUM Topology Left-hand Navigation - Backup Now
The Topology Details pane updates the Status column as the process continues.
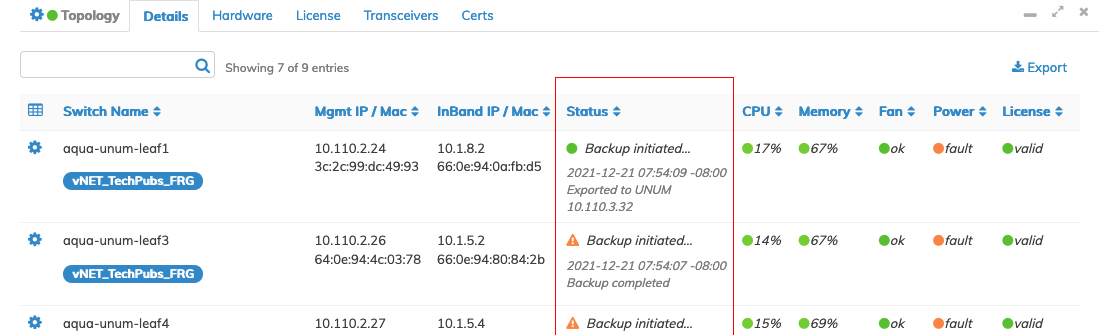
NetVisor UNUM Topology Left-hand Navigation - Backup Now Status Message
The backup process includes a discovery step which runs automatically.
NetVisor UNUM Topology Left-hand Navigation - Backup Now Discovery
After completing the backup process, the Status column updates again.
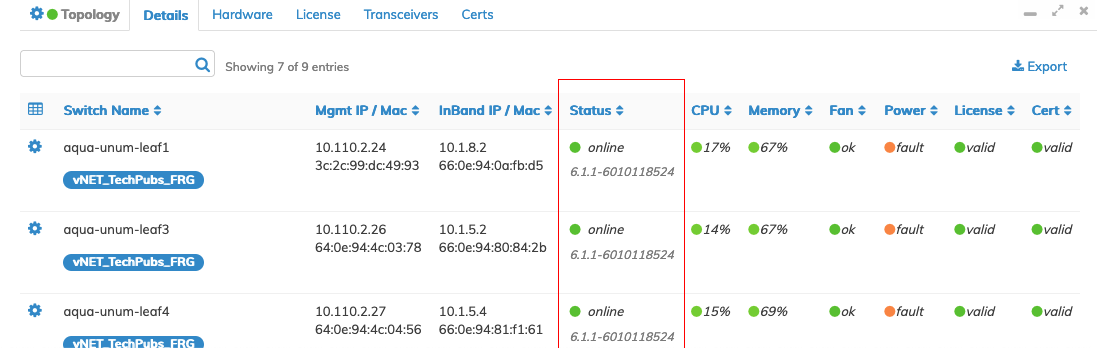
NetVisor UNUM Topology Left-hand Navigation - Backup Now Status Message Online
Export Config
Export Config provides the functionality to export configuration settings for a switch or multiple switches in the selected Fabric.
Two methods exist to select the switches and perform the export. Method One, using Export Config from the LHN, provides the option to choose a Time Stamp. Method Two, using the Details Pane, exports the most recent configuration.
Method One
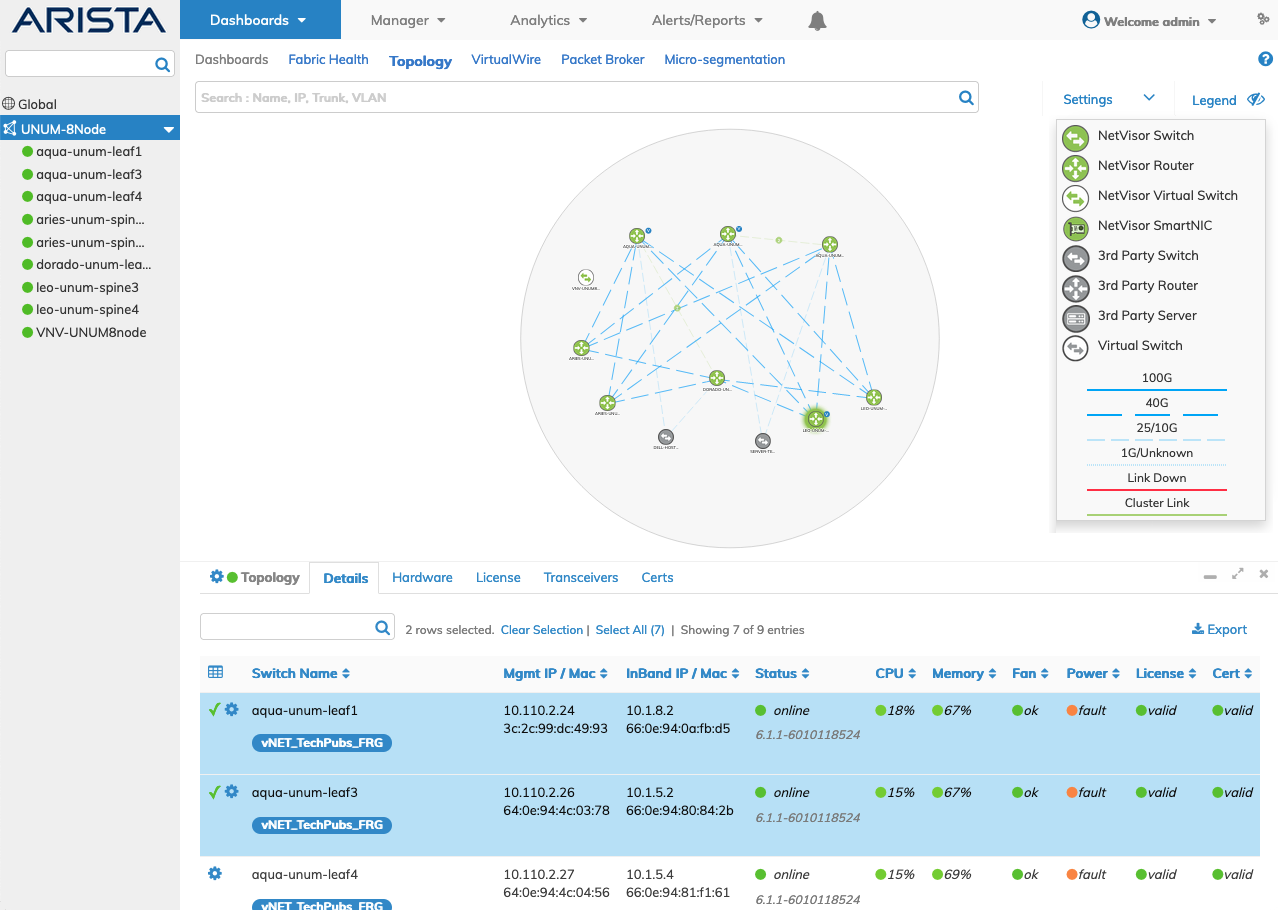
From the LHN, right-click on the Fabric Name and click Export Config. Select the Configuration Time Stamp from the drop-down list.
Hold the CTRL / Command and click on a row or multiple rows to select the switches as illustrated in the following examples.
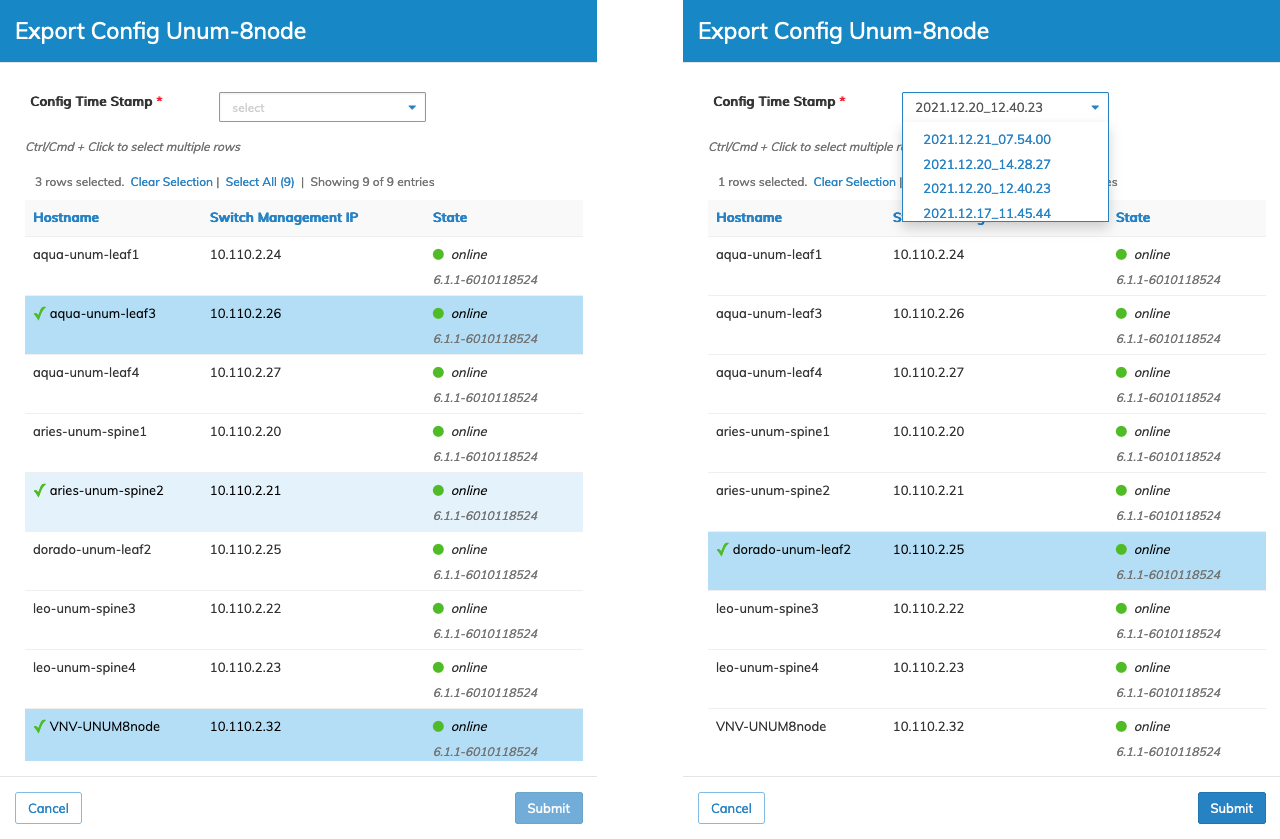
NetVisor UNUM Topology Left-hand Navigation - Export Config Method One
The dashboard displays the selected switches, the number of rows chosen, and the total number of entries.
Use the Clear Selection or Select All options, as required.
Click Submit to continue or Cancel to return to the previous screen without making any changes.
Save the Export file.
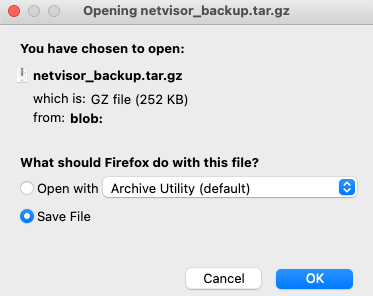
NetVisor UNUM Topology Left-hand Navigation - Export Config File Save
Method Two
Select the switches for export using the Details Pane in the Topology dashboard.
Hold the CTRL / Command and click on a row or multiple rows to select the switches as illustrated in the following example.
NetVisor UNUM Topology Left-hand Navigation - Export Config Method Two
The dashboard displays the selected switches, the number of rows chosen, and the total number of entries.
Use the Clear Selection or Select All options, as required.
Right-click in the Details pane and select Export Config.
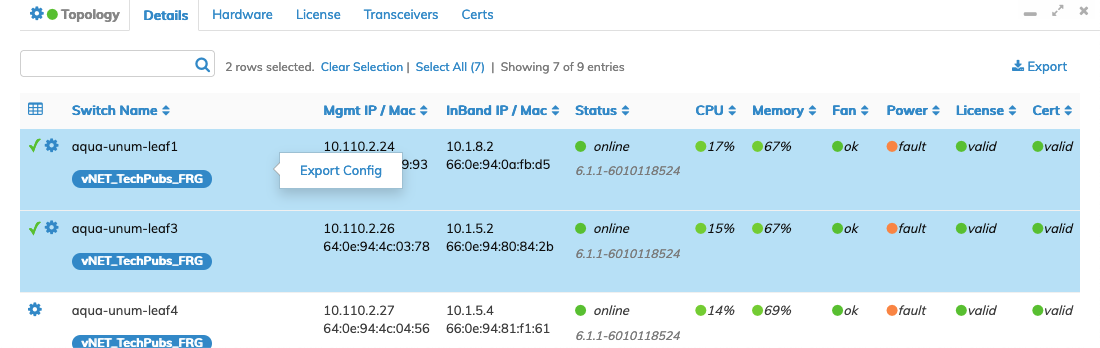
NetVisor UNUM Topology Left-hand Navigation - Export Config Switches
Save the Export file.
NetVisor UNUM Topology Left-hand Navigation - Export Config File Save
Restore Switch
Restore Switch provides the functionality to restore configuration settings to a switch in the selected Fabric.
Caution: Execute only one re-peer or restore at a time. Please do not attempt to run multiple re-peer or restore operations simultaneously; otherwise, they will fail.
Note: Both the Cluster Re-Peer and the Restore Switch functions require an out-of-band management network. If no out-of-band management network exists in an In-band or Fabric over Layer-3 (FoL3) deployment, restore and re-peer processes will need to follow the recommended NetVisor OS (CLI) procedures. In that event, use the backup files from NetVisor UNUM in the CLI-based restore/re-peer process. Please refer to Managing RMAs for Switches in the NetVisor OS Configuration Guide for more information on using the CLI process.
Select the Fabric Name from LHN and click Restore Switch.
Enter the required parameters including, Host Name, Config Time Stamp, and the Switch Management IP address.
During Host Name selection, you have the option to upload a configuration file using Upload Config.
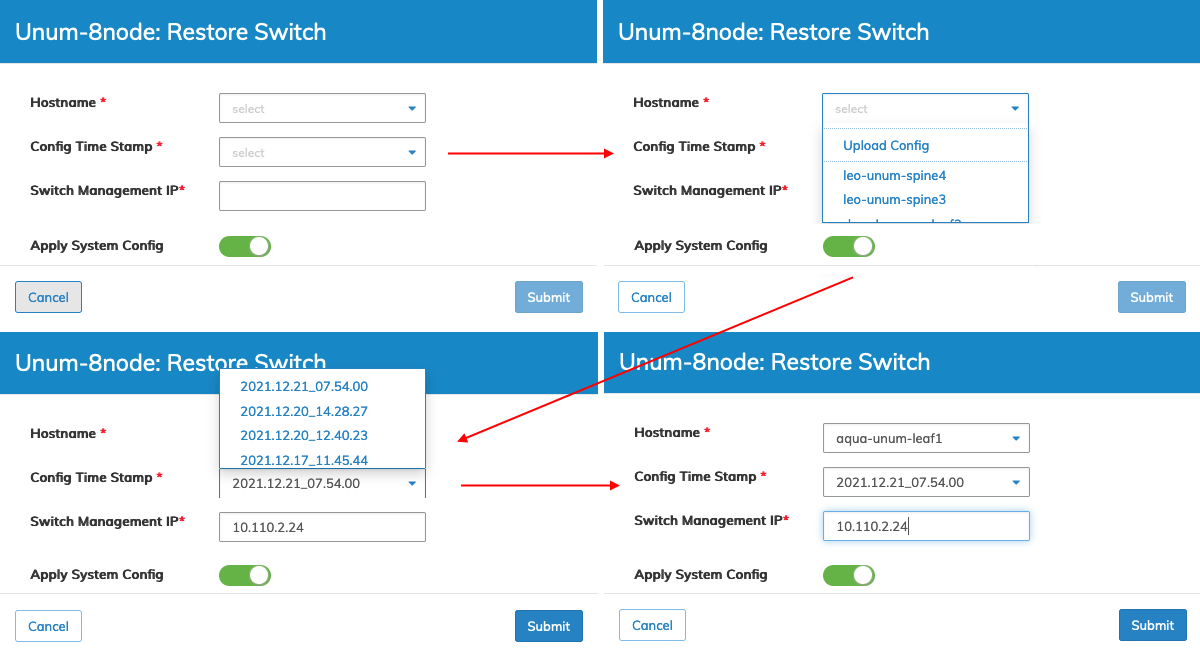
NetVisor UNUM Topology Left-hand Navigation - Restore Switch
Click Submit to continue or Cancel to return to the previous screen without making any changes.
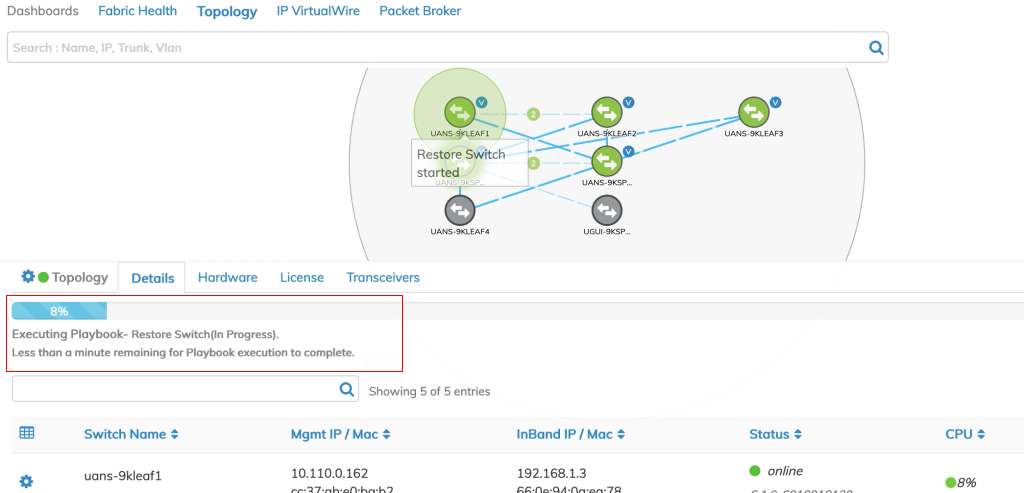
The Restore Switch process begins, and a series of progress and status messages display in the dashboard and in the Details pane.
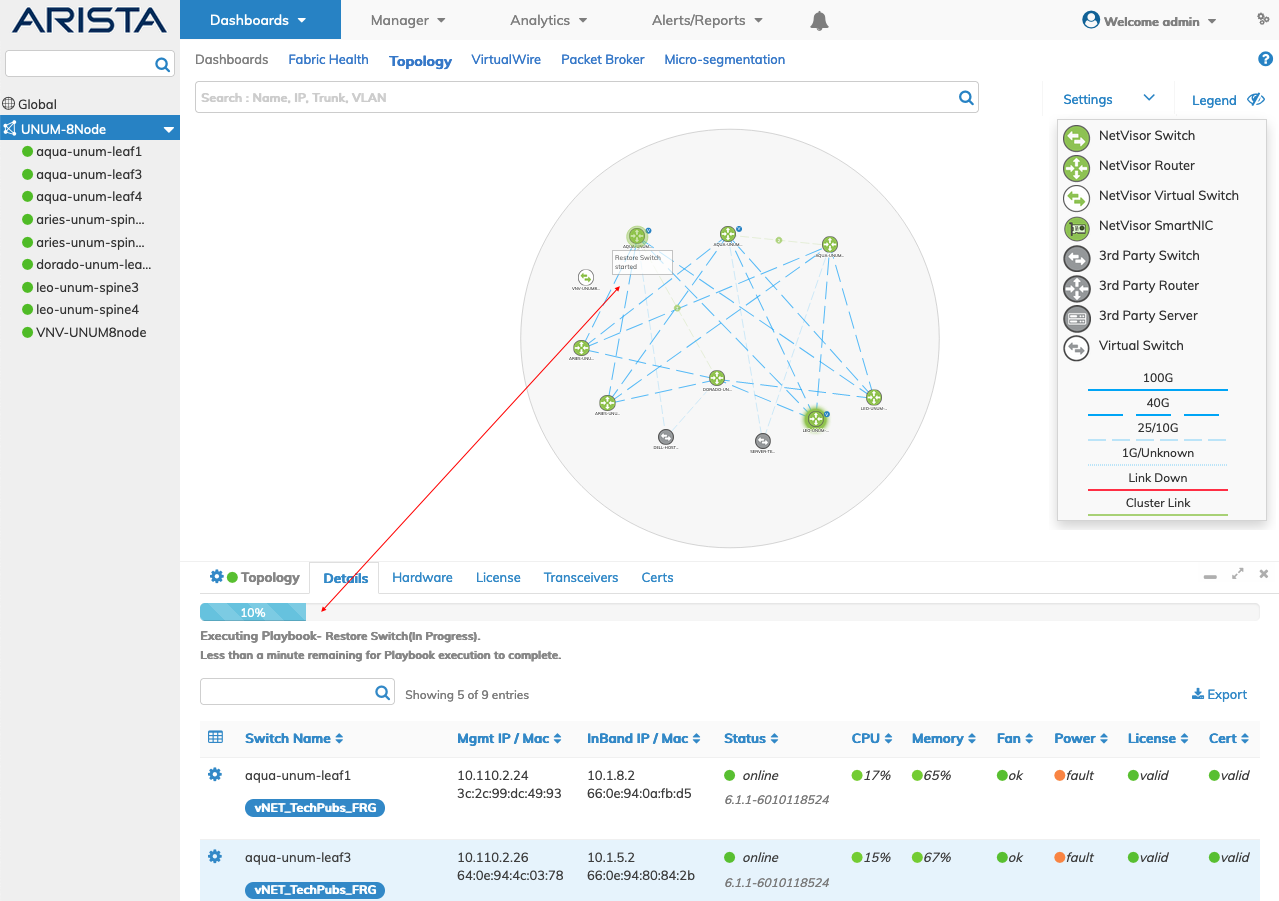
NetVisor UNUM Topology Left-hand Navigation - Restore Switch Triggered
A switch version has to match existing switch versions in the Fabric; otherwise, an error message displays, and the restore process fails.
Restore Switch errors appear in Notifications and trigger an Alarm Bell.
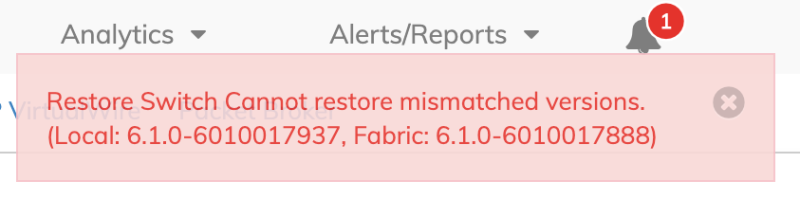
NetVisor UNUM Topology Left-hand Navigation - Restore Switch Failure Message

NetVisor UNUM Topology Left-hand Navigation - Restore Switch Failure Notification
Caution: When restoring a switch in a Super Fabric, you must ensure the uploaded configuration file matches the exported file name; otherwise, the restore process will fail. Arista Networks recommends using the Export Config feature in NetVisor UNUM and not making any changes to the file name after the export.
Upgrade or Downgrade a Fabric
Caution: Arista Networks strongly recommends using the following procedure when upgrading or downgrading the Fabric and its associated devices using the steps outlined below.
Recommended Procedure
Before and during a software upgrade or downgrade:
|
Connectivity |
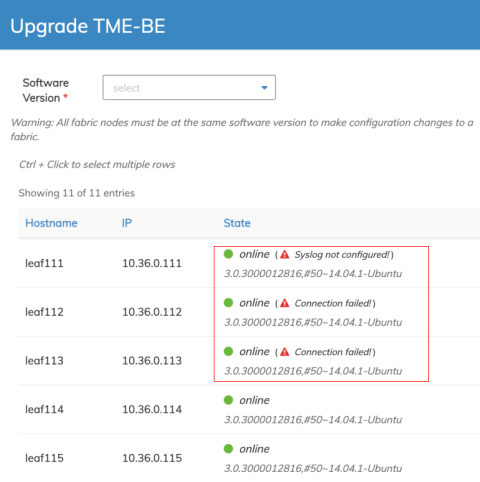
Ensure there is a reliable inband or management connectivity between fabric members, distributing the software to upgrade or downgrade and monitor the process's progress. The software distribution to the Fabric's nodes occurs in parallel to all devices when selected in the configuration dashboard at the start of the process. Each node receives the software approximately at the same time. While using an "Inband" connection to connect NetVisor UNUM to the Fabric for a Fabric upgrade or downgrade, NetVisor UNUM must maintain connectivity and communication with ALL the inband IP addresses in the Fabric. Otherwise, the Fabric upgrade or downgrade will fail. Please refer to the Inband Connectivity Use Case for more information on configuring Inband connectivity. Specifically, the software upgrade or downgrade fails if the SFTP connection is not usable or there is no Syslog connection. In that event, you will see the following messages displayed during the upgrade or downgrade process: Verify SFTP connectivity and Syslog configuration. |
|
|
Upgrade / Downgrade Connection Failure |
|
Console Access |
Arista Networks highly recommends console access to the switches during the upgrade or downgrade process. |
|
Configuration Changes |
Note the switches will not accept any configuration commands once the upgrade or downgrade process starts, so please plan accordingly. |
|
Seed Switches configured in HA (High Availability) Mode |
When you have WEB-HA configured, there will be no loss of connectivity to the Fabric, such that all other operations will continue as usual. |
|
Upgrade or Downgrade Fabrics Using Interleave Approach |
Do NOT reboot all switches at one time. Manually reboot the switches using the interleave approach.This step is crucial as communication with the Fabric is lost when the switch reboots the newly installed software during the upgrade or downgrade process. There will be a temporary loss of connectivity when there is only one configured Seed Switch, such as when a Spine Switch is the Seed Switch, and other switches in the Fabric may encounter a discovery failure. This condition is only temporary and results in no loss of data. Trigger a "Fabric Discovery" to clear the failure before proceeding. Upgrade or downgrade the Seed Switch last. |
|
Upgrade or Downgrade Leaf Switches |
With the conditions mentioned above in mind, proceed to upgrade or downgrade the switches in the Fabric. Manually reboot the switches. |
|
Verify Leaf Switch Connectivity and Functionality |
After manually rebooting each switch with the updated software, confirm connectivity and functionality. |
|
Upgrade or Downgrade Spine or Seed Switches |
With the conditions mentioned above in mind, proceed to upgrade or downgrade the spine or seed switches in the Fabric. Manually reboot the switches. |
|
Verify Spine and Seed Switch Connectivity and Functionality |
After manually rebooting the Seed Switch with the updated software, confirm connectivity and functionality. Upgrade or downgrade and reboot the Seed Switch last. |
Upgrade Fabric
Note: Please refer to the Recommended Procedure before starting a software upgrade.
Upgrade switch software versions by selecting Upgrade Fabric.
Using the left-hand navigation bar by highlighting a particular Fabric, right-clicking on that Fabric, and then selecting Upgrade Fabric.
Upgrade Fabric provides the ability to perform Fabric upgrades and install new versions of software and works in conjunction with Manage Images & Keys.
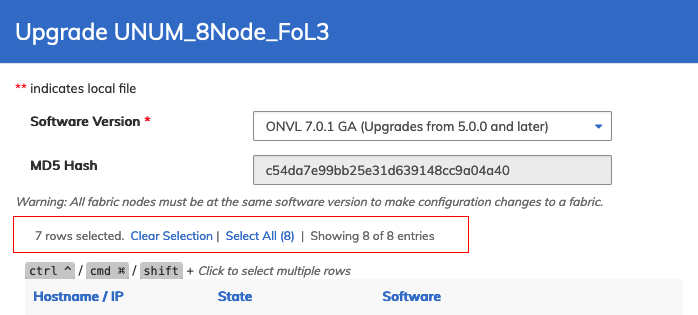
The dashboard displays:
•Software Version – A required filed and a drop-down list for selecting the software version to be installed. To upload a local software version first use Manage Images & Keys.
•MD5 Hash – A required field for entering the MD5 Hash value verifying the integrity of the software version file.
•Hostname / IP – Name of the device and the IP address of the device.
•State – The current state of the device, online or offline and the current version of the device software.
•Software – The software version for the upgrade process. The software column is grayed-out if the selected software version cannot be applied to the designated switch.
Entries marked with ** (double asterisk) indicate the file is a local file on the NetVisor UNUM instance.
Warning: All Fabric nodes must be at the same software version to make configuration changes to a Fabric.
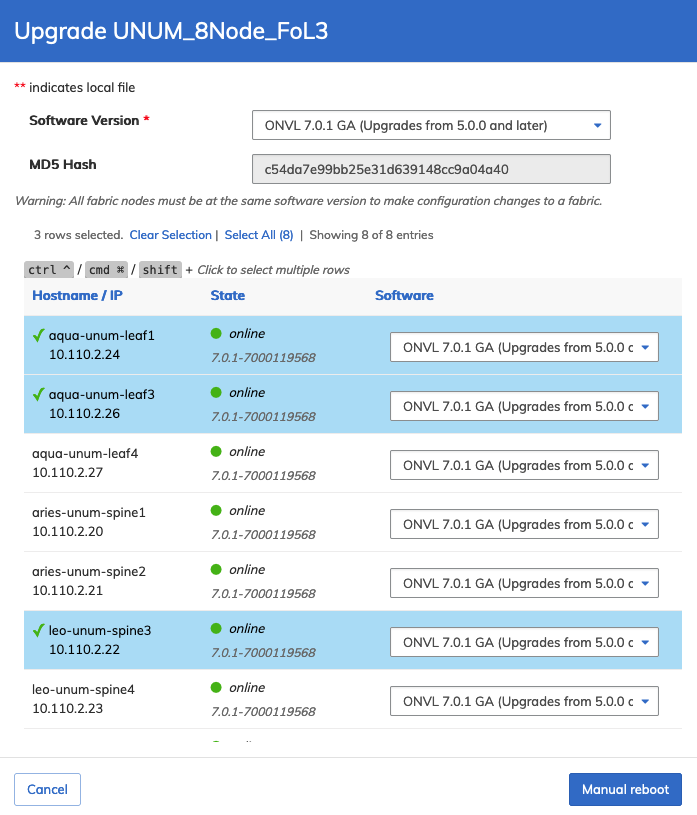
Hold the CTRL / Command / Shift and click on a row or multiple rows to select the switches as illustrated in the following examples.
Select the applicable Software Version from the drop-down list and select the switch or switches requiring the upgrade.
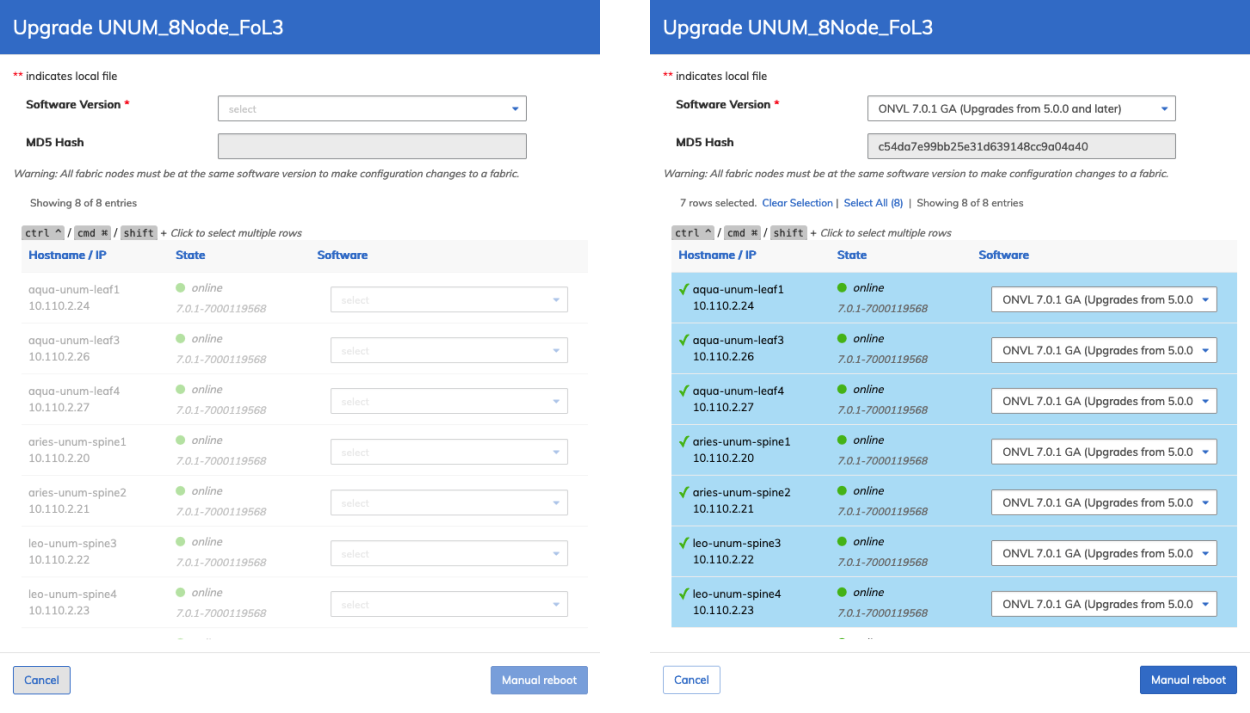
NetVisor UNUM Topology Left-hand Navigation - Upgrade Menu and Switch Selection
The software drop-down displays available image upgrades as shown in the following example.
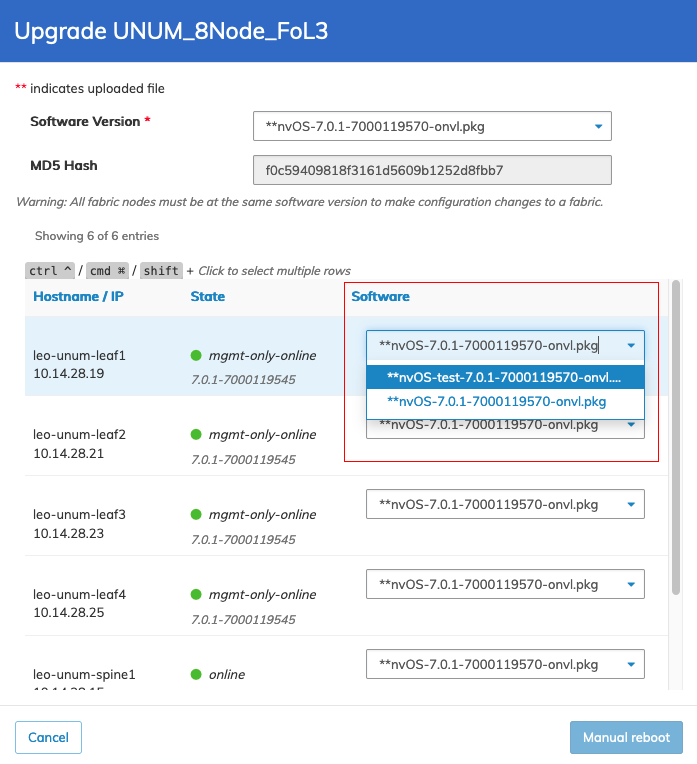
NetVisor UNUM Upgrade Fabric Menu Available Image Options
The dashboard displays the selected switches, the number of rows chosen, and the total number of entries.
Use the Clear Selection or Select All options, as required.
NetVisor UNUM Topology Left-hand Navigation - Upgrade Menu and Switch Selection Options
To upload a local software version first use Manage Images & Keys.
After selecting the upgrade version click Manual Reboot to continue. Select Cancel to return to the previous screen without making any changes.
•Manual Reboot – You must reboot the switches manually to complete the upgrade process. NetVisor UNUM prompts you to perform the reboot or abort the upgrade. Refer to the example further below.
A backup automatically runs before the upgrade process begins.
Select the switches for the upgrade, choose the required Software Version, and enter the associated MD5 Hash value.
NetVisor UNUM Topology Left-hand Navigation - Upgrade Fabric - Begin Upgrade
Click Manual Reboot to continue or Cancel to return to the previous screen without making any changes.
Caution: During the upgrade process, all backups are disabled until the upgrade process is complete.
A console monitoring session is available during the upgrade process, providing details about the downgrade process. Click in the column and on the device undergoing the upgrade to launch the SSH console.
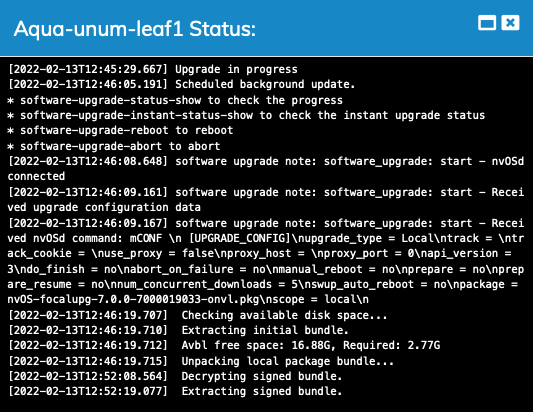
NetVisor UNUM Topology Left-hand Navigation - Upgrade Fabric - Upgrade Status Console
Once the upgrade completes, the details dashboard Upgrade Status updates.
Note: During the process, various notifications, including switches going offline, appear. The appearance of these messages is normal and expected behavior.
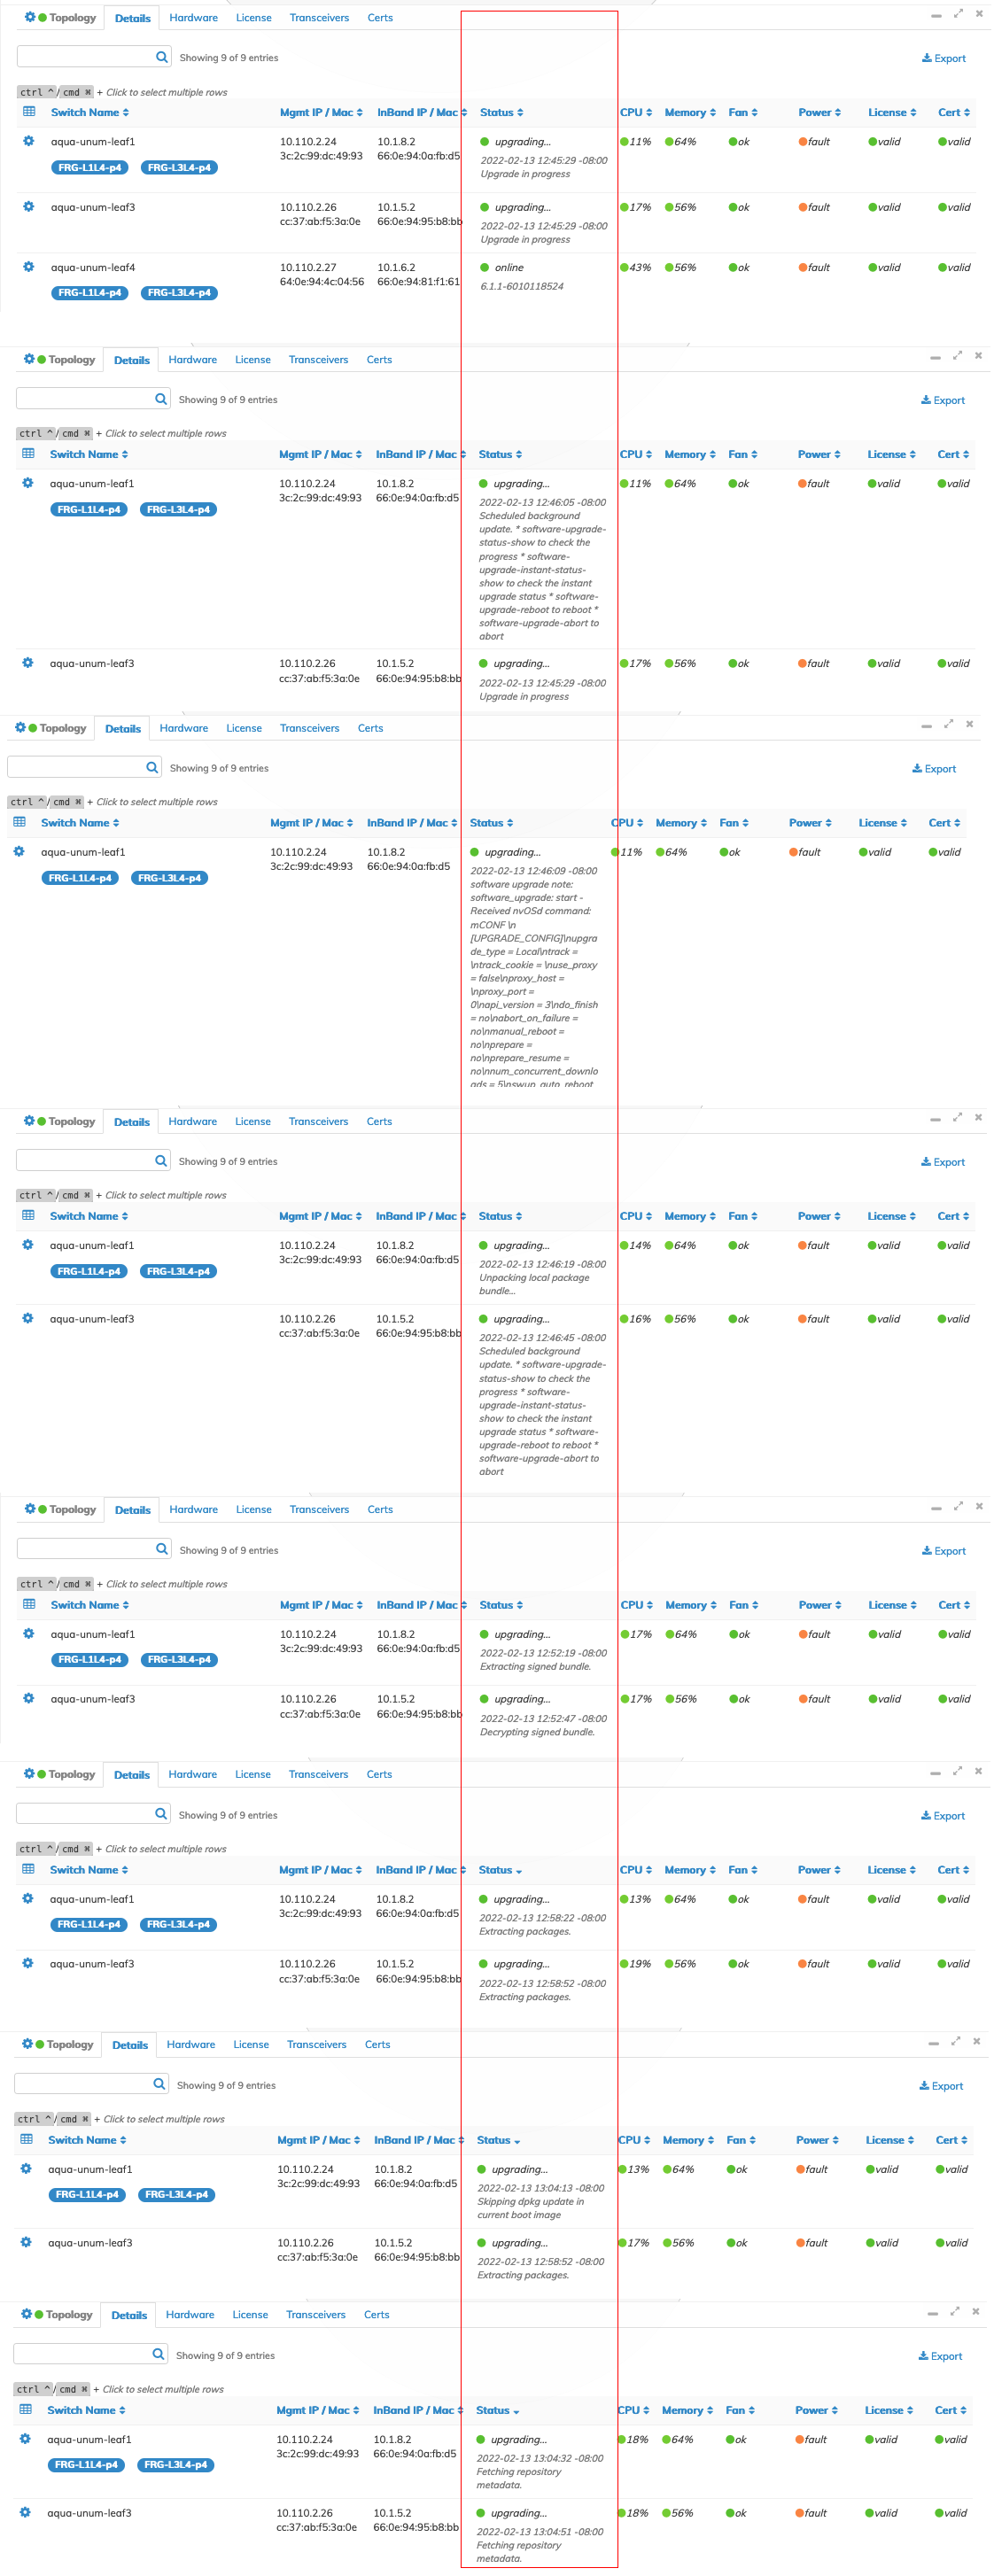
NetVisor UNUM Topology - Upgrade Fabric - Details Dashboard Status Updates
Once the software update is complete, perform a Manual Reboot or a software upgrade Abort.
Manual Reboot: You must reboot the switches manually to complete the upgrade process. NetVisor UNUM prompts you to perform the reboot or abort the upgrade. Refer to the example below.
A backup automatically runs before the upgrade process begins.
Manual Reboot or Abort
The following example illustrates to Reboot or Abort prompt following a software upgrade using the Manual Reboot option.
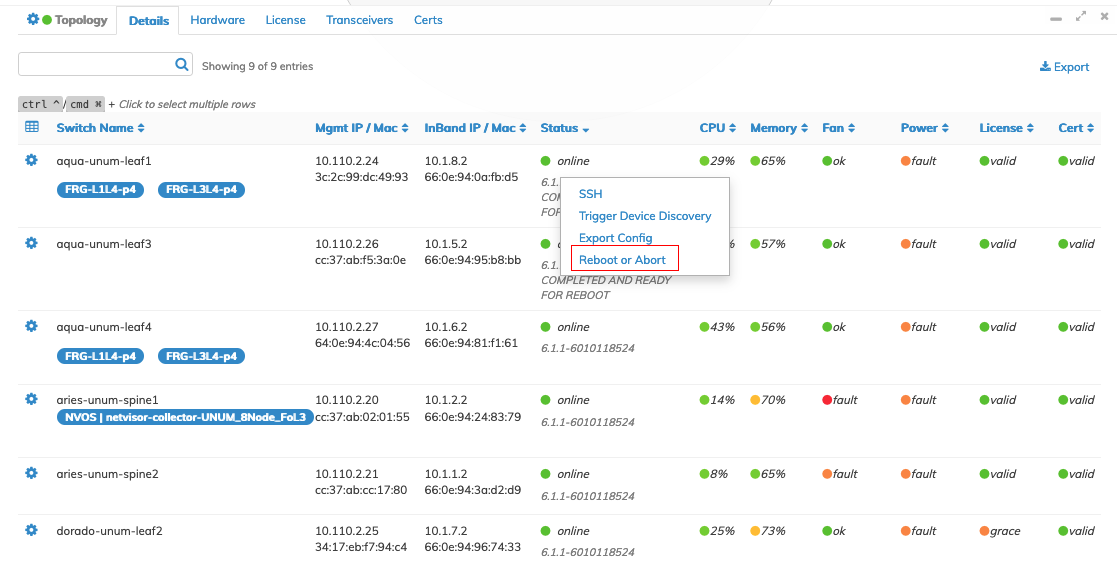
NetVisor UNUM - Topology -Upgrade Fabric - Software Upgrade Manual Reboot or Abort
Reboot completes the upgrade process while Abort keeps the switch at its current software version.
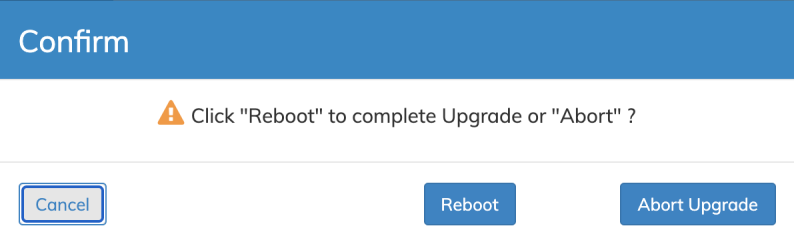
NetVisor UNUM - Upgrade Fabric - Software Upgrade Manual Reboot or Abort - Confirm
Confirm the selection using Reboot or Abort Upgrade. Click Cancel to return to the previous screen without making any changes.
The switches reboot and return to service following the upgrade process.
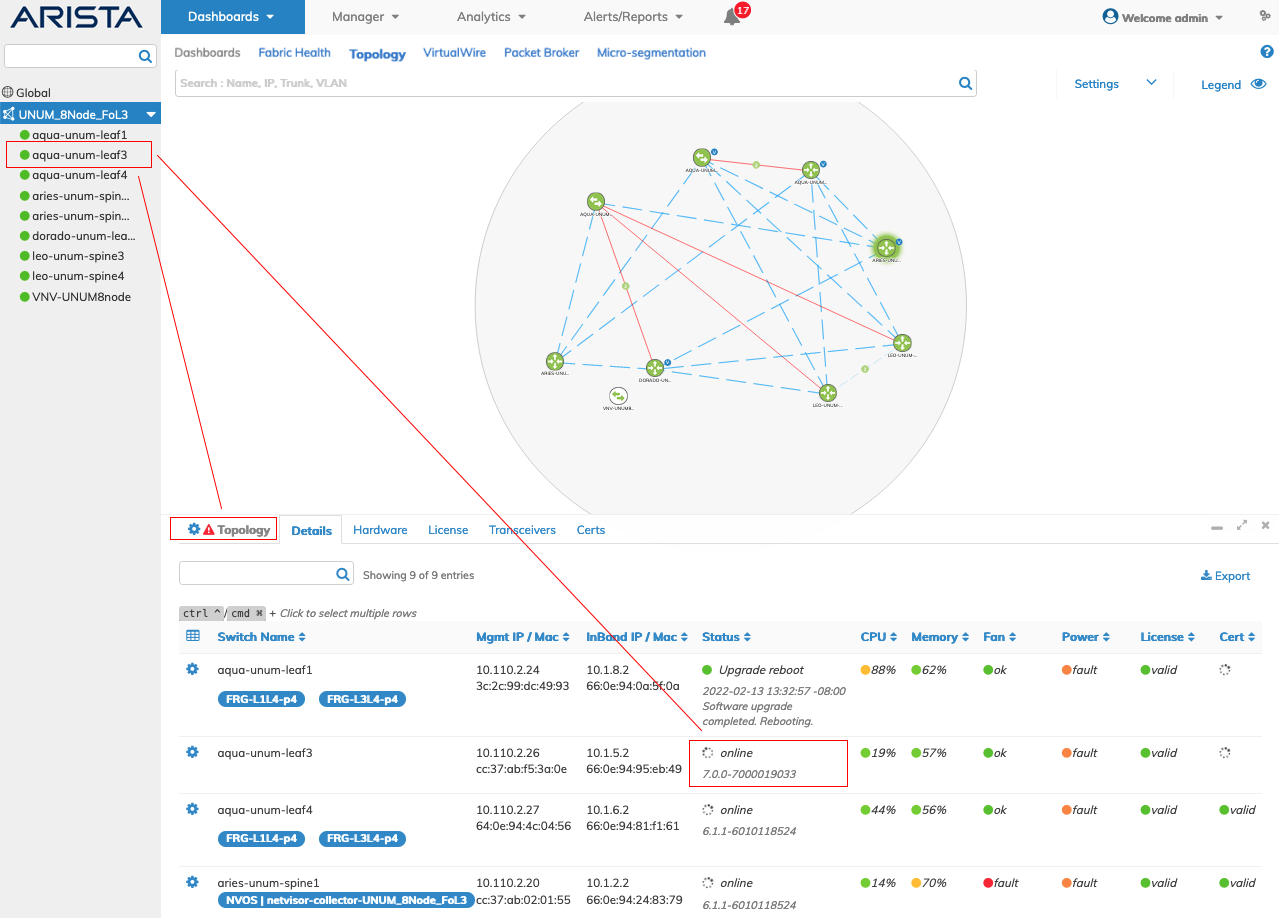
NetVisor UNUM - Upgrade Fabric - Software Upgrade Manual Reboot - Completing
After running an upgrade, the Topology details dashboard may display an alert icon. The alert indicates a device is running a different software version than other switches in the Fabric. To remove the warning, ensure all switches are running the same NetVisor OS (software) version.

NetVisor UNUM Topology - Downgrade Topology Alert Indicator Details Dashboard
Caution: Attempting to select an upgrade for a switch with an earlier version of the software results in a grayed-out menu screen, and completing the upgrade process cannot be performed.
Downgrade Fabric
Warning:
The downgrade process uses the NetVisor OS Boot Environment (BE) on the Fabric.
Arista Networks ONLY recommends using the downgrade process in situations where an upgrade has not gone as planned, and you need to roll back to the prior version.
The downgrade process only supports downgrading the same Fabric which was in place before attempting an upgrade.
Any configurations that may have been applied post-upgrade are lost.
Please refer to the Recommended Procedure before starting a software downgrade.
You can downgrade switch software versions by selecting Downgrade Fabric.
Using the left-hand navigation bar by highlighting a particular Fabric, right-clicking on that Fabric, and then selecting Downgrade Fabric.
A warning message appears explaining configurations will be lost.
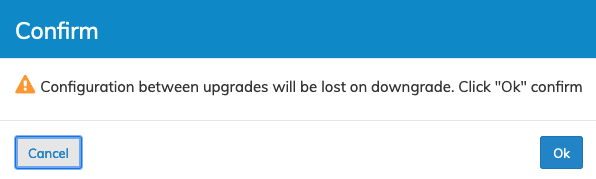
NetVisor UNUM Topology Left-hand Navigation - Downgrade Fabric - Warning Message
Warning: Configuration settings are lost when performing a downgrade of the software.
The dashboard displays:
•Hostname – Name of the device.
•Switch Management IP – The IP address of the device.
•State – The current state of the device, online, offline, and current NetVisor OS version.
Warning: All Fabric nodes must be at the same software version to make configuration changes to a Fabric.
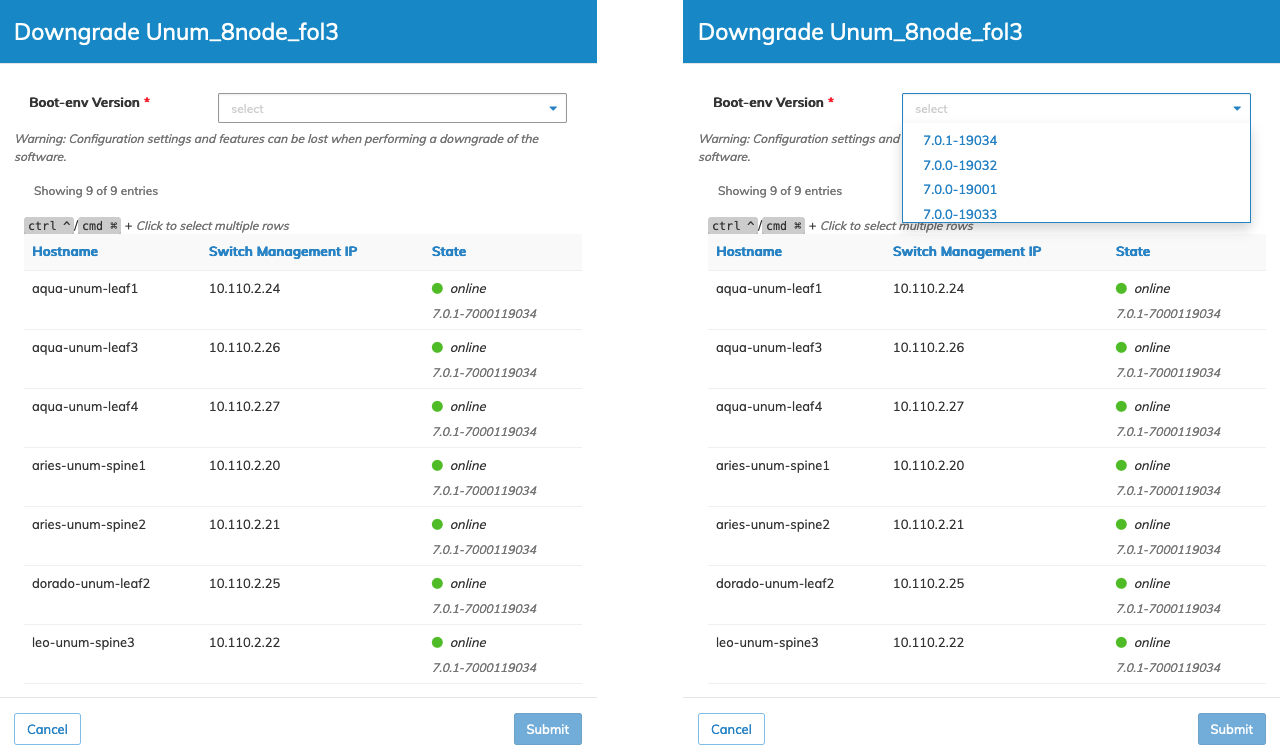
NetVisor UNUM Topology Left-hand Navigation - Downgrade Menus
Select the applicable Boot Environment Version from the drop-down list and select the switch or switches requiring the downgrade.
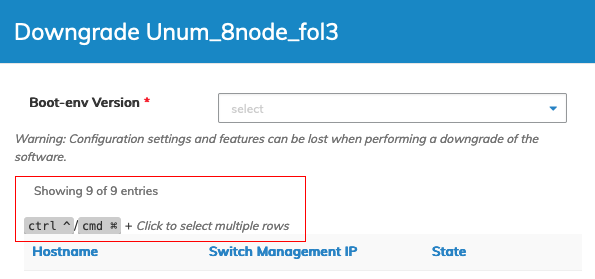
The dashboard displays the selected switches, the number of rows chosen, and the total number of entries.
Use the Clear Selection or Select All options, as required.
NetVisor UNUM Topology Left-hand Navigation - Downgrade Menu and Switch Selection Options
After selecting the upgrade version click Submit to continue or Cancel to return to the previous screen without making any changes.
Caution: During the upgrade process, all backups are disabled until the upgrade process is complete.
A console monitoring session is available during the downgrade process, providing details about the downgrade process. Click in the column and on the device undergoing the downgrade to launch the SSH console.
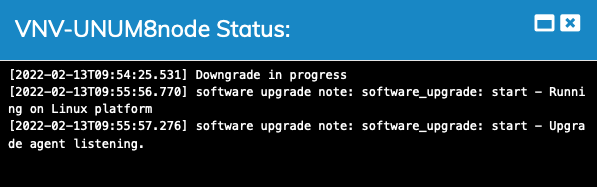
NetVisor UNUM Topology Left-hand Navigation -Downgrade Status Console
Once the downgrade begins, the details dashboard Status updates.
Note: During the process, various notifications, including switches going offline, appear. The appearance of these messages is normal and expected behavior.
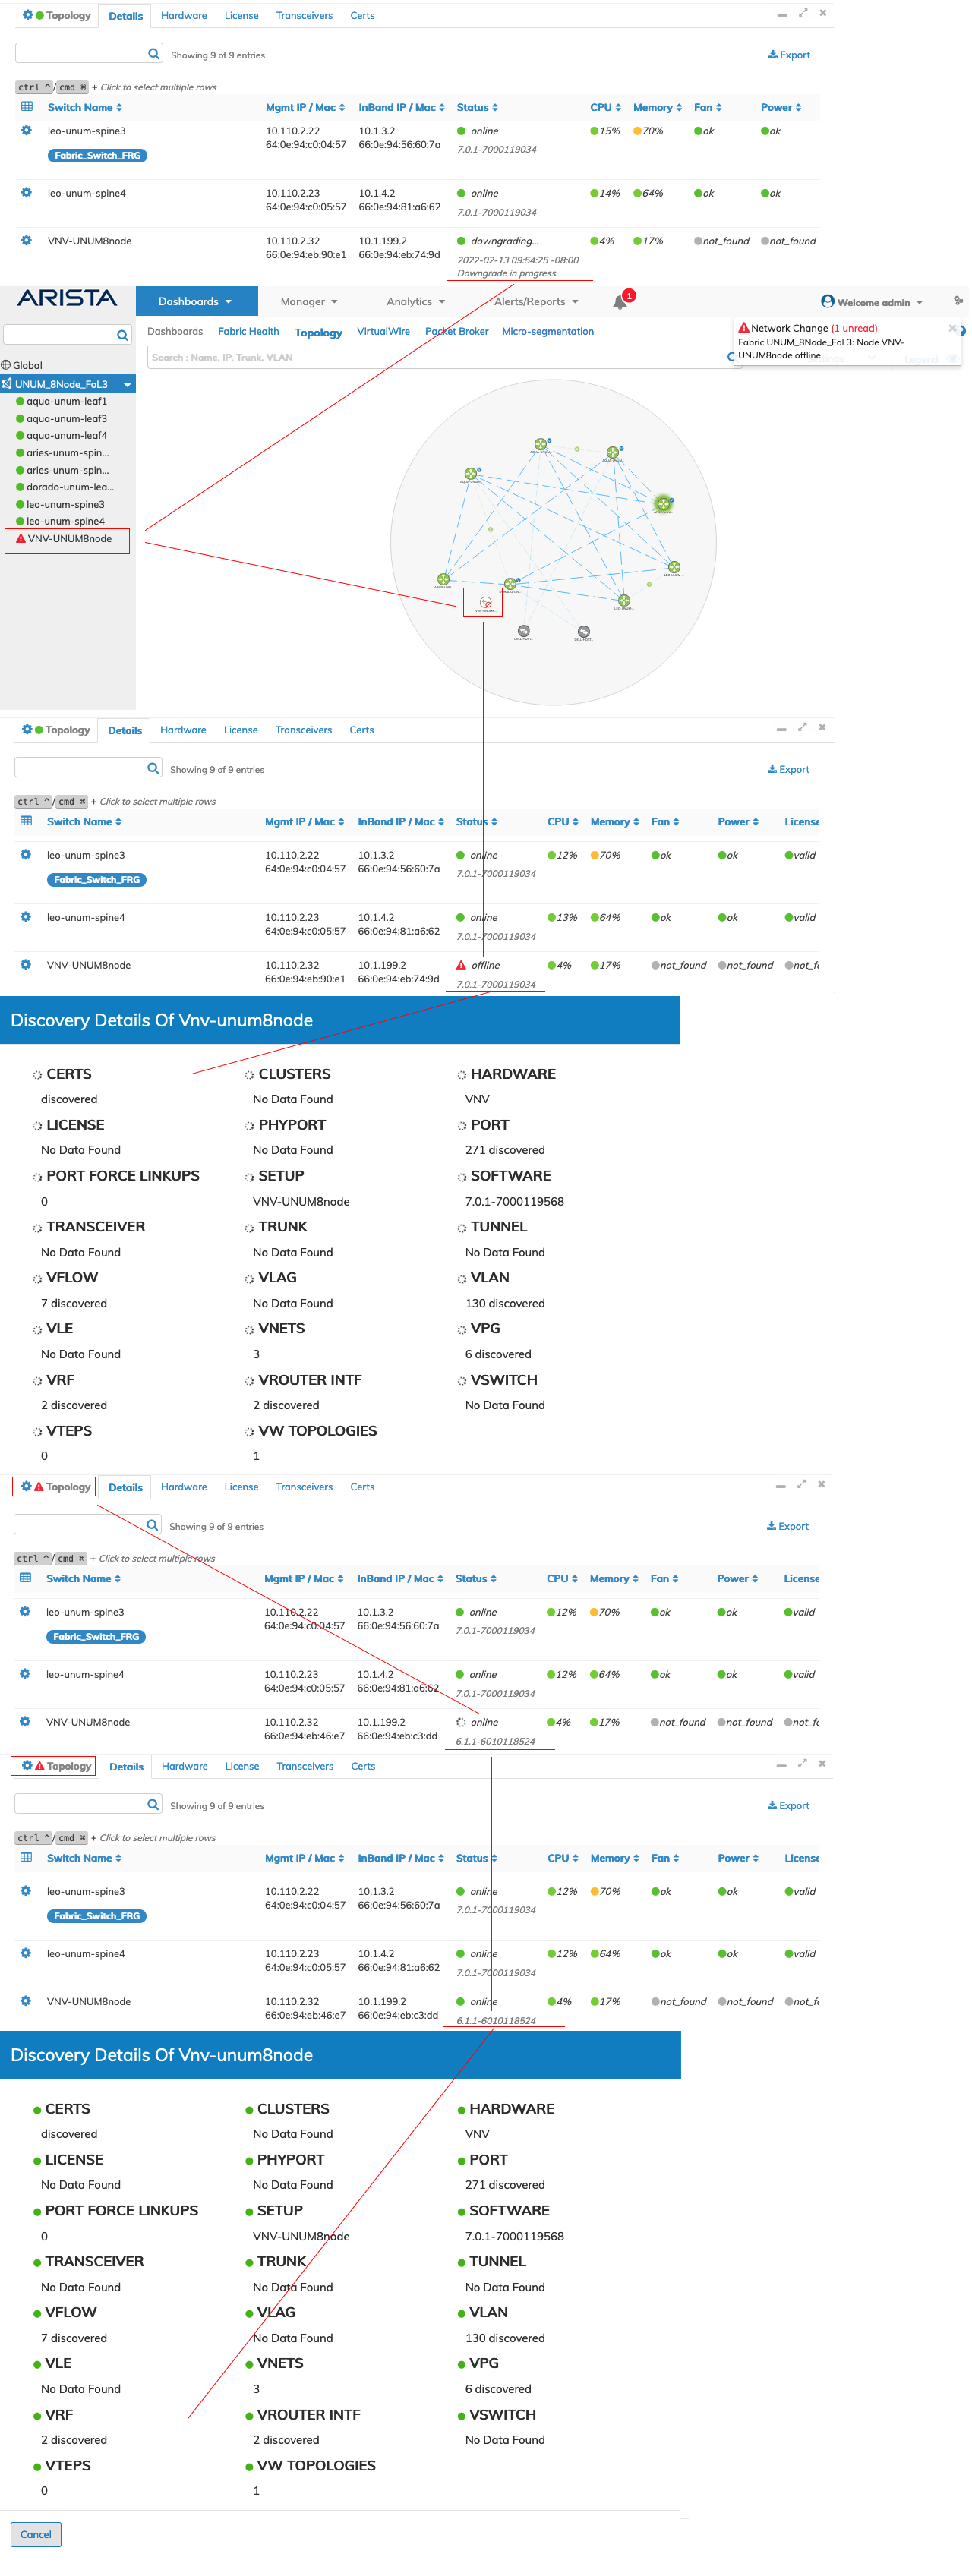
NetVisor UNUM Topology - Downgrade Details Dashboard
After running a downgrade, the Topology details dashboard may display an alert icon. The alert indicates a device is running a different software version than other switches in the Fabric. To remove the warning, ensure all switches are running the same NetVisor OS (software) version.
NetVisor UNUM Topology - Downgrade Topology Alert Indicator Details Dashboard
When all devices are running the same software version the dashboard updates and the alert message no longer appears.
NetVisor UNUM Topology - Downgrade Topology Complete
Caution: Attempting to select an downgrade for a switch with an equal or newer version of the software results in a grayed-out menu screen, and completing the downgrade process cannot be performed.
Remove Fabric
To remove a Fabric right-click on the Fabric name in the LHN and click Remove Fabric.
A confirmation window is displayed. Click OK to delete the Fabric or Cancel to return to the previous screen without making any changes.
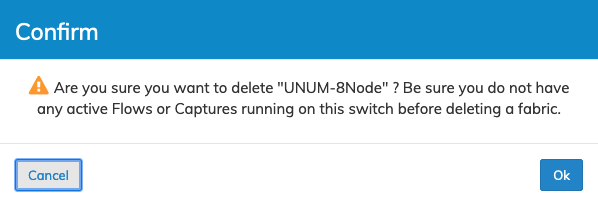
NetVisor UNUM Topology Left-hand Navigation - Remove Fabric
Edit Fabric
To update a Fabric right-click on the Fabric name in the LHN and click Edit Fabric.
An update window is displayed. Select Action and the drop-down choice (Edit Password).
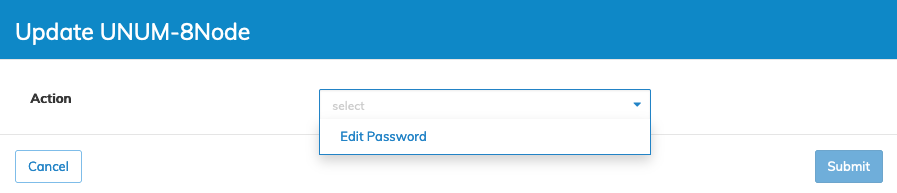
NetVisor UNUM Topology Left-hand Navigation - Update Fabric
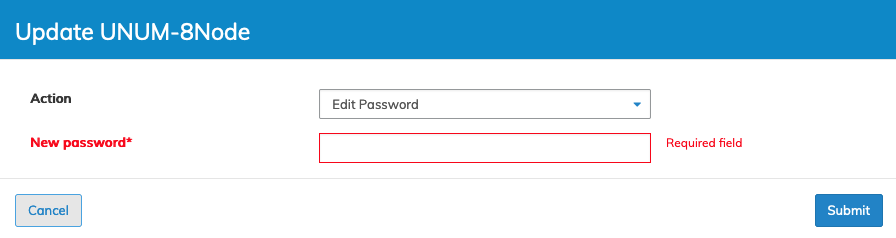
NetVisor UNUM Topology Left-hand Navigation - Update Fabric Password
Click Submit to enter the update or Cancel to return to the previous screen without making any changes.
Remove Switch
To remove a switch from a Fabric, right-click on the Switch name in the LHN and click Remove Switch.
Two scenarios may exist in that a switch is online or offline.
The the case of an online switch the confirmation window displays an Un-join Switch message while an offline switch displays an Evict Switch message.
In either case, click OK to confirm the removal of the switch or click Cancel to return to the previous screen without making any changes.
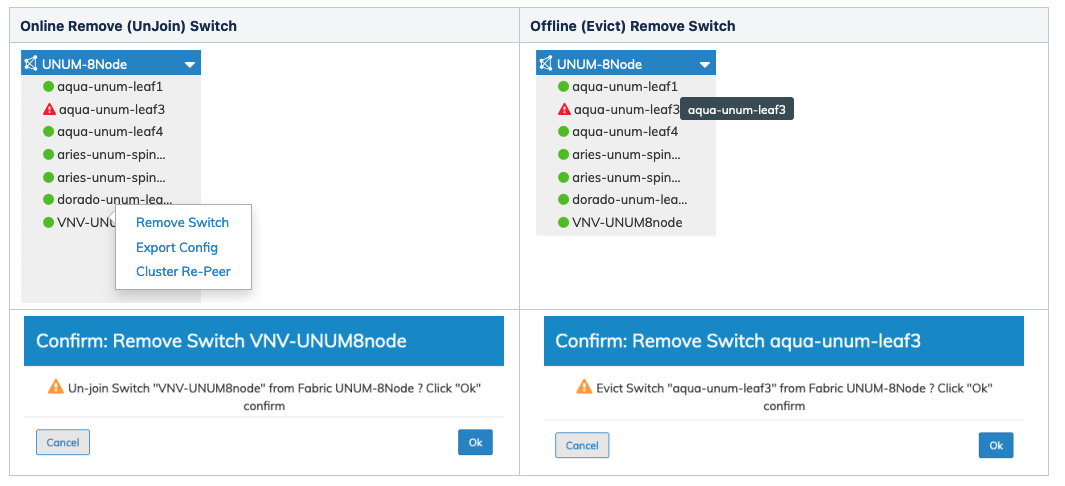
NetVisor UNUM Topology Left-hand Navigation - Remove Switch Online / Offline
An error condition occurs if you attempt to Unjoin a switch that is part of a cluster. You must first delete the cluster and then perform the Switch Remove process.
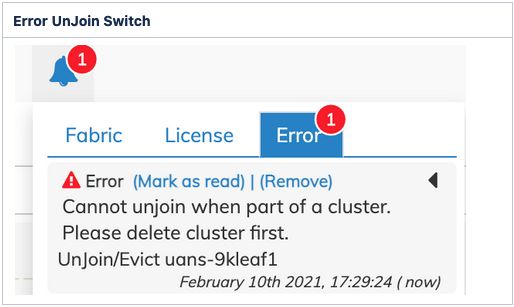
NetVisor UNUM Topology Left-hand Navigation - Remove Switch Online / Offline
Example of Switch Remove in a Super Fabric.

Export Config
Two ways exist to perform the export.
1.From the LHN in the Topology dashboard, select a Switch, right-click, and use Export Config.
2.Choose the switch in the Details Pane and click the Cog ![]() icon and select Export Config to export a switch configuration.
icon and select Export Config to export a switch configuration.
Either choice exports the most recent configuration. No timestamp option exists.
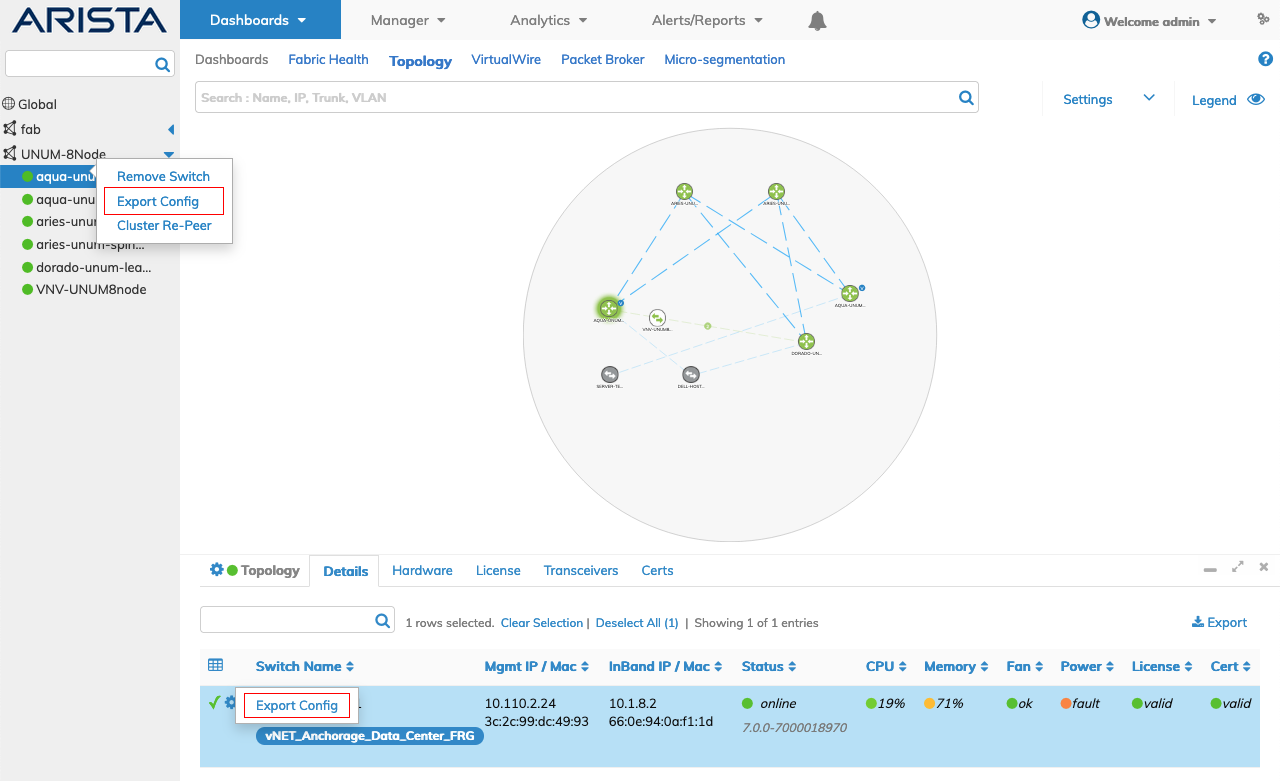
NetVisor UNUM Topology Left-hand Navigation - Export Config Individual Switch
The switch Export Config process is similar to the Export Config process documented above in this section.
Cluster Re-Peer
Rebuild an RMA cluster re-peering a switch.
Caution: Execute only one re-peer or restore at a time. Please do not attempt to run multiple re-peer or restore operations simultaneously; otherwise, they will fail.
Note: Both the Cluster Re-Peer and the Restore Switch functions require an out-of-band management network. If no out-of-band management network exists in an In-band or Fabric over Layer-3 (FoL3) deployment, restore and re-peer processes will need to follow the recommended NetVisor OS (CLI) procedures. In that event, use the backup files from NetVisor UNUM in the CLI-based restore/re-peer process. Please refer to Managing RMAs for Switches in the NetVisor OS Configuration Guide for more information on using the CLI process.
To re-peer a switch in a cluster, right-click on the Switch name in the LHN and click Cluster Re-Peer.
Enter the requisite switch values in the configuration window.
Note: Before proceeding, enable both SSH and ICMP on the switch.
Caution: The software versions on the cluster switches must be identical; otherwise, the re-peer will fail.
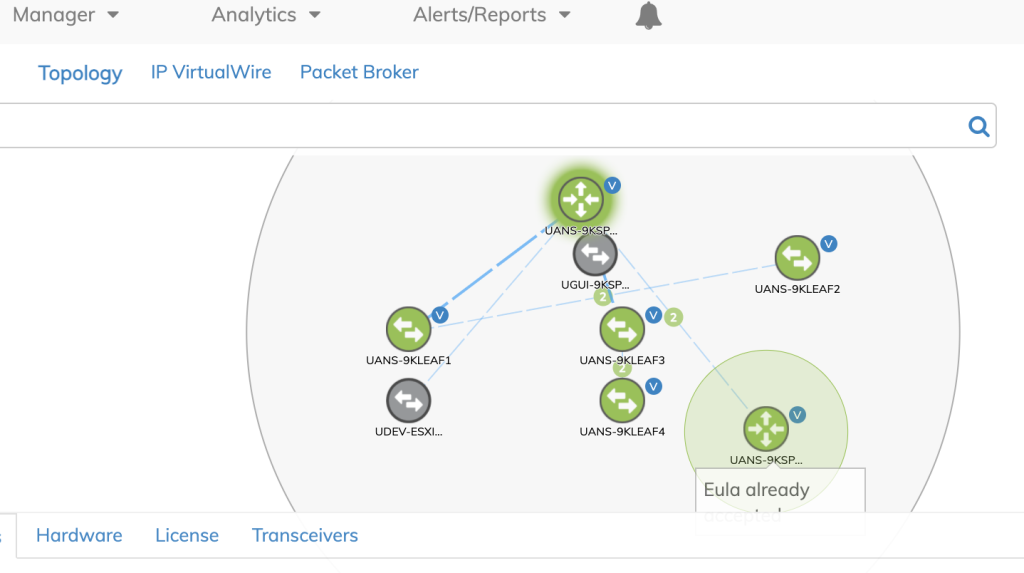
Note: Both the Hostname and the IP address are mandatory. The Cluster Re-Peer process uses the IP address to connect to the switch while using the Hostname to set the Switch Name and during the EULA acceptance.
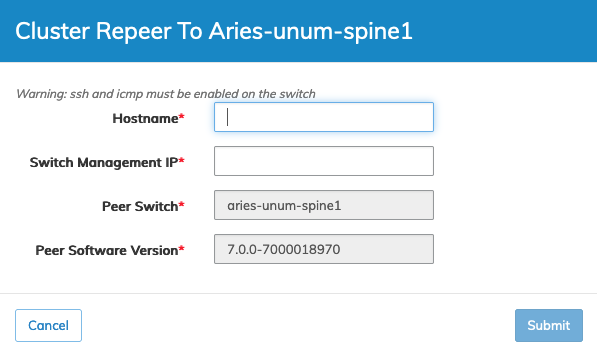
NetVisor UNUM Topology Left-hand Navigation - Cluster Re-Peer Configuration
Click Submit to enter the update or Cancel to return to the previous screen without making any changes.
The following images are an example of the re-peering process in operation.
NetVisor UNUM Topology Left-hand Navigation - Cluster Re-Peer Start
NetVisor UNUM Topology Left-hand Navigation - Cluster Re-Peer Progress Bar