
Using Archiver for Disaster Recovery
Using Archiver for Disaster Recovery
There are features and functions used in Arista NetVisor UNUM and Insight Analytics that are common throughout the user interface (UI). Please refer to the Common Functions section for more information on the use of these functions and features.
In the event of a catastrophic HW failure where the NetVisor UNUM instance is completely lost, you can use your Archiver data to restore the last backed-up data.
Note: Archiver must have been configured and running before the disaster event occurred. Refer to the Prerequisites section below.
Prerequisites
To use the NetVisor UNUM Archiver function as a disaster recovery method, you need the following items in advance.
•Archiver License - An installed and activated Archiver License.
•NFS Share - A configured and operating NFS Share. Record the NFS configuration settings, mount point and repository and keep the information in a safe place.
•Archiver running before the disaster event AND an up-to-date backup of the NetVisor UNUM configuration (see Advanced Settings - Backup UNUM Configuration). To fully restore the NetVisor UNUM instance, two different backup types are required.
•Pluribus Networks Cloud Login - Access to the Pluribus Networks Cloud.
•NetVisor UNUM Machine ID -NetVisor UNUM Machine ID. Record the Machine ID the information in a safe place. Keep in mind the Machine ID changes after completing the DR process. Please record the new Machine ID at the conclusion of the DR process.
•NetVisor UNUM License Information. Please familiarize yourself with all of the NetVisor UNUM Licenses you may have installed. You will need all of the license information to complete a successful Disaster Recovery process.
Please review all of the following steps before proceeding with the Disaster Recovery Process.
How to find your NetVisor UNUM Machine ID
There are two methods you can use to find your NetVisor UNUM Machine ID.
Method 1 - NetVisor UNUM License Management Dashboard
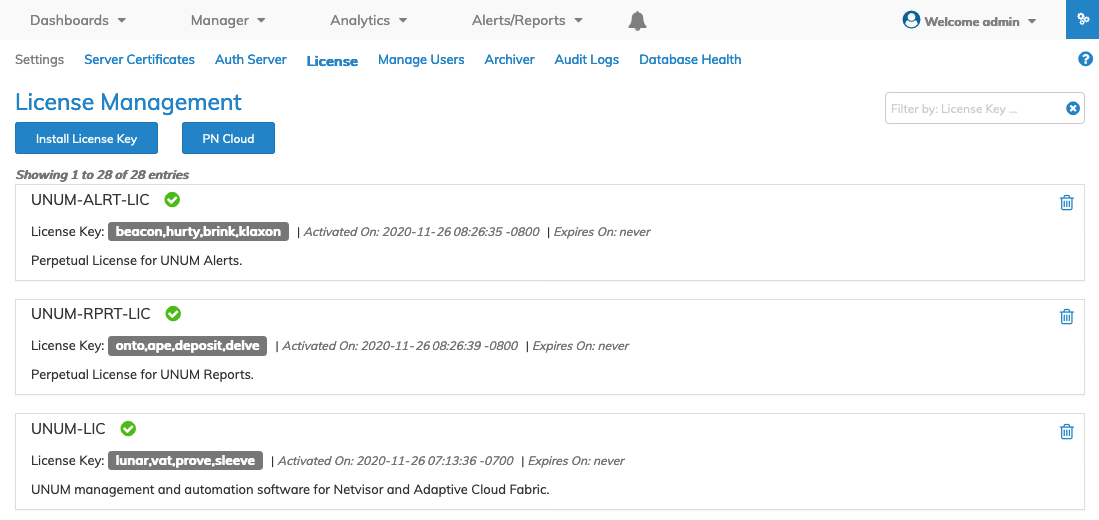
1)While logged in to NetVisor UNUM, select Settings → License and click on Install License Key.
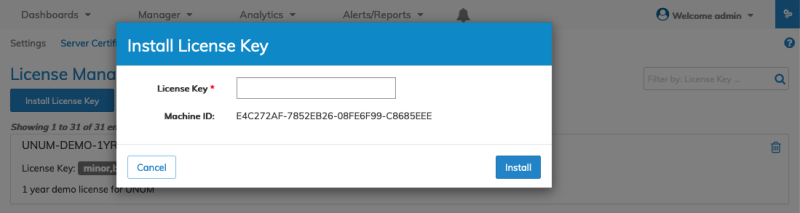
2)Record the Machine ID and keep it in a safe place.
Method 2 - NetVisor UNUM Setup Script
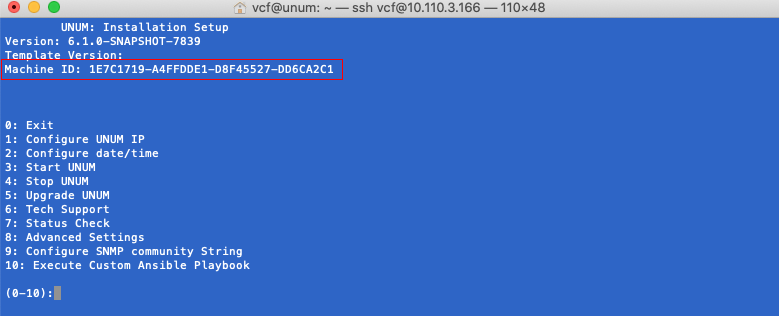
NetVisor UNUM Set Up Script
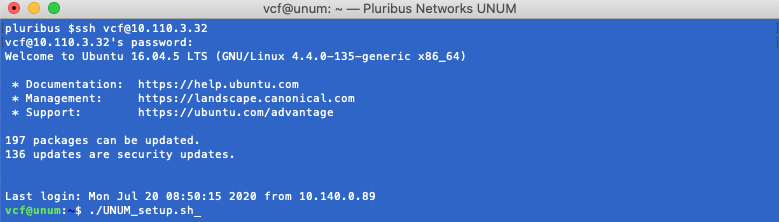
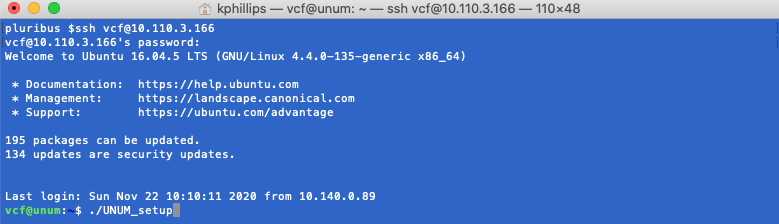
1)Login into the Remote Console as user “vcf” and enter your password . The NetVisor UNUM setup script is named “UNUM_setup.sh” and is in the default folder of user “vcf”.
2)Run the setup script: ./UNUM_setup.sh
3)The NetVisor UNUM Machine ID is displayed.
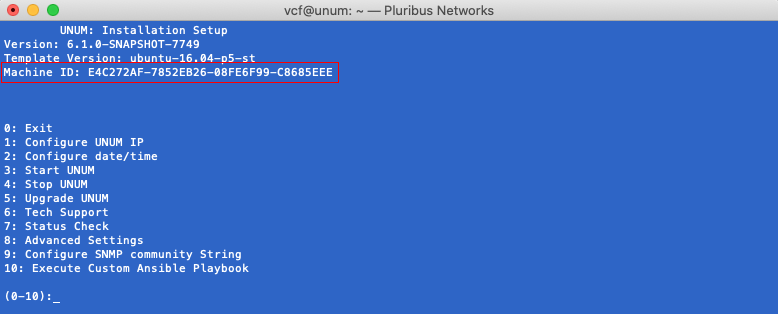
4)Record the Machine ID and keep it in a safe place.
Workflow to Restore the NetVisor UNUM Instance
Caution:
Please follow this sequence of events carefully and in the order presented; otherwise your Disaster Recovery process will fail.
Please familiarize yourself with all of the following steps before proceeding.
•Deactivate the license for the failed NetVisor UNUM instance.
•Build and deploy a new Virtual Machine (VM).
•Download the NetVisor UNUM OVA, configure the new VM and new NetVisor UNUM settings.
•Configure the original NFS Share settings.
•Obtain the new NetVisor UNUM Machine ID.
•Activate and validate the new NetVisor UNUM License.
•Take the new NetVisor UNUM instance offline.
•Select and Recover the Archive data.
•Restore the Global Time Selector.
•Select and Restore the NetVisor UNUM Configuration data.
•Bring the new NetVisor UNUM instance online.
•Trigger a Fabric Discovery.
Step 1 - Deactivate the License
Login to the License Cloud Server (LCS) and find the license for the failed NetVisor UNUM instance.
Please review the detailed instructions about logging in to the LCS.
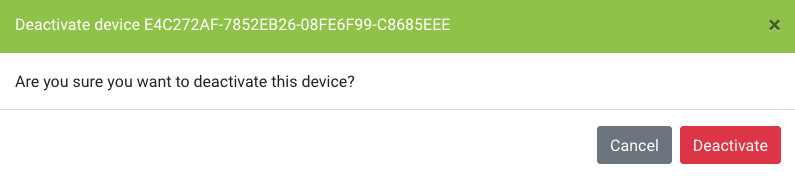
If you previously recorded your NetVisor UNUM Machine ID, locate the Machine ID in the license list and deactivate the associated license.
Select the license to be deactivated and click Deactivate and Close.
Proceed to the next step.
Step 2 - Build and Deploy a Virtual Machine (VM)
Refer to the Virtual Machine Software Installation section for more information about building and deploying a VM instance and review the Virtual Machine Requirements.
Proceed to the next step.
Step 3 - Download the NetVisor UNUM OVA and Configure the NetVisor UNUM VM Instance
Refer to the Installation section and the Virtual Machine Configuration section for detailed information about downloading the NetVisor UNUM OVA and configuring the NetVisor UNUM VM instance.
Proceed to the next step.
Step 4 - Reconfigure the NFS Share and Mount Point
Configure the NFS settings using the same NFS mount point and repository used previously to configure the original NFS Share.
Proceed to the next step.
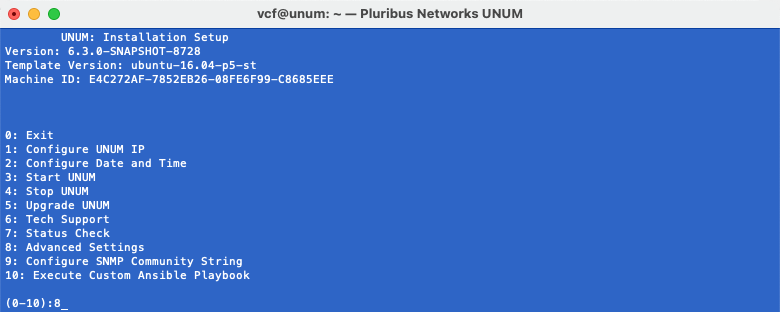
Step 5 - Obtain the new NetVisor UNUM Machine ID
1)Login into the Remote Console as user “vcf” and enter your password . The NetVisor UNUM setup script is named “UNUM_setup.sh” and is in the default folder of user “vcf”.
2)Run the setup script: ./UNUM_setup.sh
3)The new NetVisor UNUM Machine ID is displayed.
4)Record the new Machine ID and keep it in a safe place.
Proceed to the next step.
Step 6 - Activate the NetVisor UNUM License & Validate
Login to the License Cloud Server. Please review the detailed instructions about logging in to the LCS.
Caution: Before bringing NetVisor UNUM online, make sure you install ALL licenses you may have carried over from the previous failed NetVisor UNUM instance.
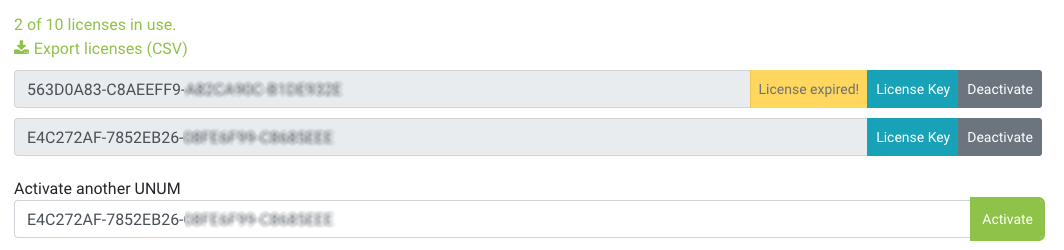
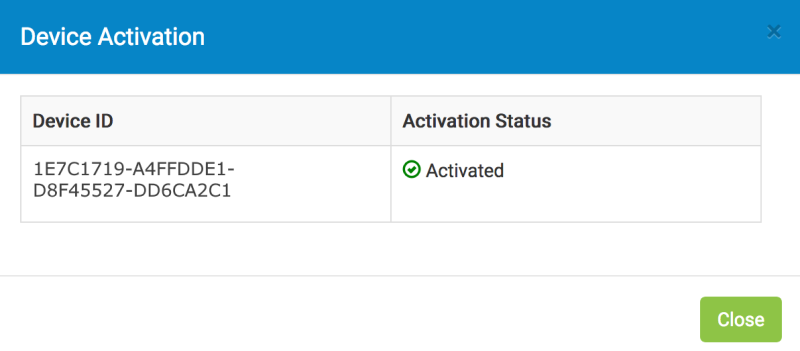
Enter the new Machine ID to activate your NetVisor UNUM licenses. The following example illustrates a NetVisor UNUM-LIC license activation.

Click the Activate button and the Device Activation Status appears.
Confirm the license appears as activated in the NetVisor UNUM License dashboard using Settings → License.
Proceed to the next step.
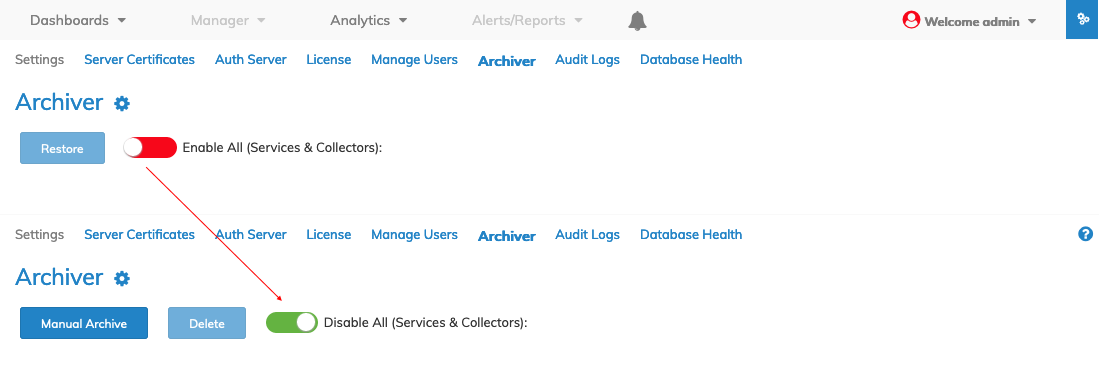
Step 7 - Take NetVisor UNUM Offline
Once the NetVisor UNUM instance set up is complete, log in to NetVisor UNUM, proceed to the Settings → Archiver, and take the NetVisor UNUM instance offline using the Disable All (Services & Collectors) switch.
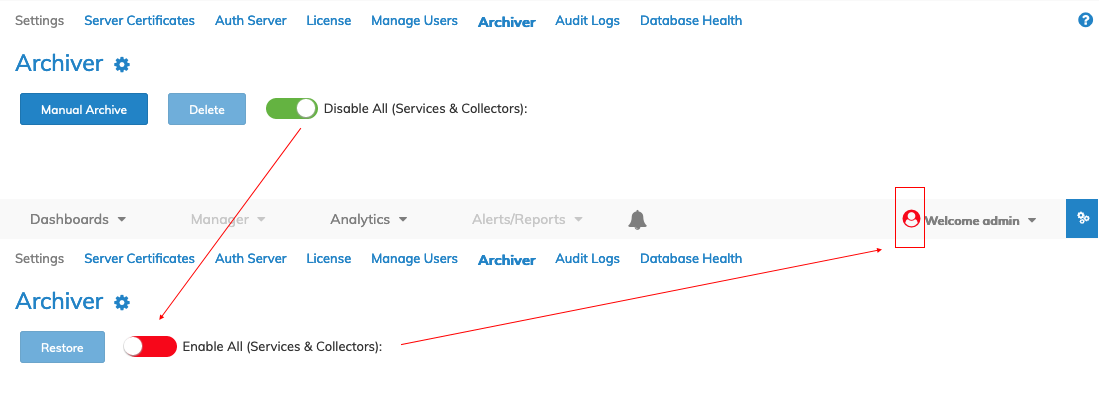
Note: NetVisor UNUM defaults to online, and you must take the NetVisor UNUM offline before proceeding. Otherwise, data restoration is not possible.
Proceed to the next step.
Step 8 - Select the Archive for Restore
Please review the Archive Restore section for more details on how the overall process works.
Select the applicable archive to begin the disaster recovery process as illustrated in the example below.
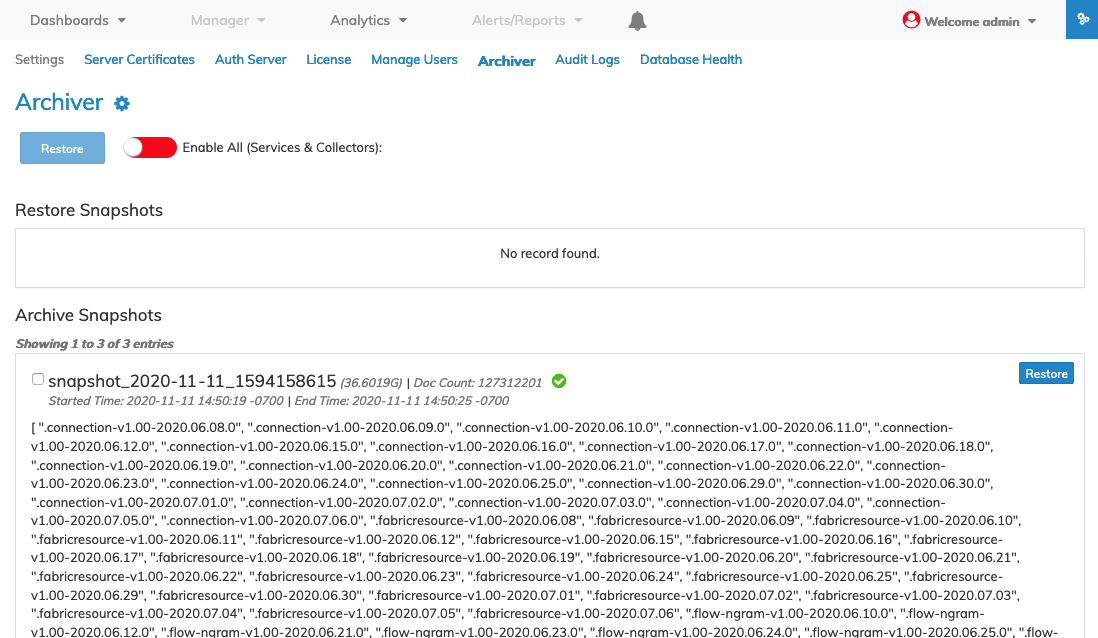
The data recovery process concludes after the NetVisor UNUM instance automatically restarts.
Proceed to the next step.
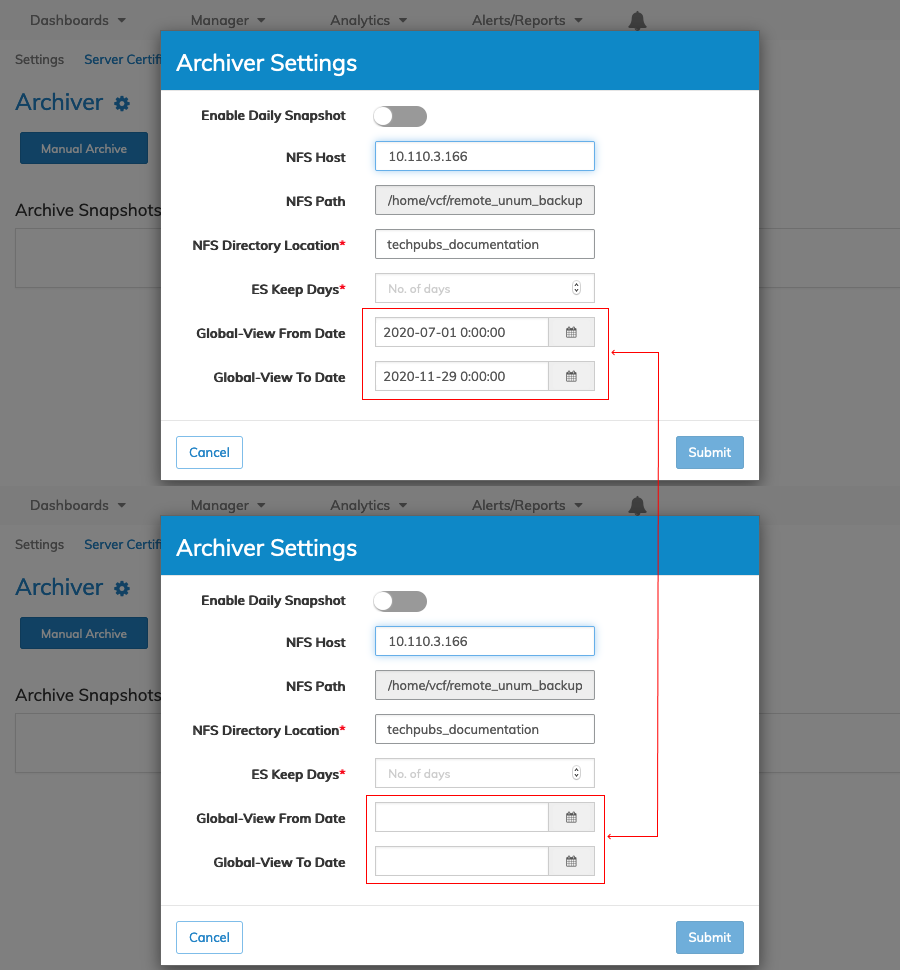
Step 9 - Restore Global Time Selector
During the Disaster Recovery process, you may notice the time selector interval set to the restored time period.
The information in the dashboards reflects the restored time and not the newly collected data.
In that event, manually reset the time selector interval in the using Settings → Archiver and clear out the Global-View From Date and Global-View To Date settings.
Note:
The Insight Analytics database stores Flow Connections related data for 30 days.
The Switch Analytics database stores vPort, SNMP, Syslog, and Port Stats for 30 days and Tunnel Stats, SNMP, Syslog, CPU/Memory, and Ping Stats for 7 days.
Stats data older than 7 days and Connections data older than 30 days are deleted once the restored NetVisor UNUM instance comes online.
Proceed to the next step.
Step 10 - Restore NetVisor UNUM Configuration
1.Login into the Remote Console as user “vcf” using password “changeme”. The NetVisor UNUM Insight Analytics Flow setup script is named “UNUM_setup.sh” and is in the default folder of user “vcf”.
2.Run the setup script: ./UNUM_setup.sh
Select Option 8 - Advanced Settings.
Select option 2 - Restore NetVisor UNUM Configuration and select the most recent backup.

Proceed to the next step.
Step 11 - Bring NetVisor UNUM Online
When the NetVisor UNUM instance restore is complete, proceed to the Settings → Archiver, and bring NetVisor UNUM instance online using the Enable All (Services & Collectors) switch. The switch turns green.
Proceed to the next step.
Step 12 - Trigger Fabric Discovery
Trigger a Fabric Discovery for each Fabric displayed in the NetVisor UNUM Topology Dashboard.
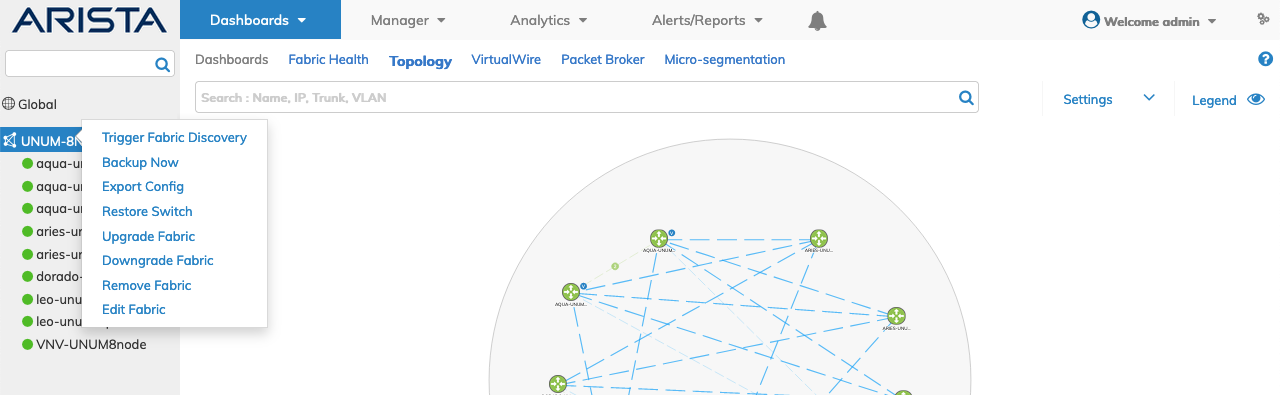
The discovery process ends, and each Fabric should be online.
Your restored data is present, along with newly collected information.
End of Disaster Recovery Process.